 Point-in-time recovery is the concept of restoring data to a particular time in the past.
Suppose you deleted an important database table at 2 p.m. on a Wednesday. You realize this fifteen minutes later and you need to restore the data. Replication will do you no good, because the table in the replica has also been deleted. Only backups can save the day.
However, if you back up your data at 1 a.m. every day, the closest recovery point to when the table was deleted will be at 1 a.m. that Wednesday. When you restore data, you will lose 13 hours of data. But if you use the point-in-time recovery strategy, you can recover data as of 1:55 pm, losing only 5 minutes!
To restore to any particular point in time, you do not need to store a snapshot of the data at each point in time, but rather store the history of data changes (transaction history). Re-executing transactions from the history after some base point will bring the database to the state of the last moment of the recorded history. Consistently moving the database change history to the storage is also called an incremental backup. In fact, such backups do not store all data, but only what has changed since the previous backup.
Binary Logs and How to Use Them for Backup

MySQL has a feature known as binary logs. Binary logs are files containing events that change the database. These files have a binary format, but can be converted to SQL instructions and re-run. Therefore, you can do a baseline full backup with mysqldump, and set up a process to copy all binary log files created after the baseline backup to the destination.
When you need to restore data, you need to restore the database dump (baseline backup) and then restore events from the binary log files that preceded the data corruption.
Point-In-Time recovery via binary logs is not a hack, but a feature. The mysqldump utility has special parameters to match the dump with the binary logs.
Turn on binary logs
The first thing to do is to make sure that the binary log files are enabled and that the binary format is set to ROW. You can run this command to find out if the binary logs are enabled:
SHOW VARIABLES LIKE 'log_bin';
If OFF is specified, add the following lines to the my.ini file at the end of the [mysqld]section
server_id=1
log-bin=mysql-bin
expire_logs_days = 7
binlog_format=row
then restart the MySQL Server.
If binary logs have been enabled, we recommend that you check their format:
SHOW VARIABLES LIKE 'binlog_format';
If binlog_format is not ROW, then add the binlog_format parameter to the end of the [mysqld] section of my.ini, or replace it.
binlog_format=row
then restart the MySQL Server.
Practical Implementation with Shell Commands
Baseline backup

Before you copy binary log files, you need to create a baseline backup. That is a FULL backup of the database. You should do this with mysqldump with some important arguments:
--flush-logs– immediately after the dump, a new binary log recording will start, which will be transactionally coordinated with the dump.
--source-data=2 – the name of the binary log created by the --flush-logs parameter will be written at the beginning of the output dump.
--delete-source-logs – all previous binary log files, except for the one created by --flush-logs will be deleted. This makes it much easier to copy the necessary binary log files. Do not use this parameter if your MySQL Server is participating in replication as master.
Command for a FULL backup of all databases:
mysqldump --all-databases --flush-logs --source-data=2 --delete-source-logs [login credentials] > backup.sql
This will create a baseline backup, which is stored in our home directory. And in the binary log directory, the first binary log has appeared. In Linux it looks like this:

Converting Binlog to SQL Commands
The mysqlbinlog utility can convert binary logs into SQL commands. It comes installed with MySQL Server, and you do not need to install it again.
Mysqlbinlog takes binlog files as input and SQL instructions as output. This utility can work with a list of files at once, and also has one very important parameter: --stop-datetimethrough which you can get SQL instructions to a certain point in time.
For example, if your data was corrupted on 2022-12-25 13:00:00, specify --stop-datetime="2022-12-25 12:55:00"
Linux:
cd /var/lib/mysql/
sudo mysqlbinlog --stop-datetime="2022-12-25 12:55:00" binlog.006116 binlog.006117 binlog.006118 binlog.006119 binlog.006120
Windows:
cd "C:\ProgramData\MySQL\MySQL Server 5.6 Data\ "
mysqlbinlog.exe --stop-datetime="2022-12-25 12:55:00" binlog.006116 binlog.006117 binlog.006118 binlog.006119 binlog.006120
Recovering from the binary log
In fact, we have everything we need to restore the data to a particular date. The baseline backup is located on the hard drive, and the binary logs are stored in “/var/lib/mysql/” or “C:\ProgramData\MySQL\MySQL Server 5.6 Data” directory.
If there are databases in the MySQL Server with the same names as in the backup, you need to delete them. Otherwise, you won’t be able to restore anything: you will get an error that the database with the same name already exists.
DROP DATABASE [db_name]
Perform this action for all the databases you are trying to restore.
Then you need to restore a FULL baseline backup.
Linux:
sudo mysql < backup.sql
Windows:
mysql.exe < backup.sql
Next, you can restore the binary log files. Find a string in the full backup (backup.sql) that looks like this:
– – CHANGE MASTER TO MASTER_LOG_FILE=’binlog.006116‘, MASTER_LOG_POS=157;
It contains the number of the binary log from which you want to start recovering data. List all binary logs that are older than or equal to this number in the utility parameter mysqlbinlog
SQL commands from binary log files can be saved in an intermediate file via stdout redirection:
cd "C:\ProgramData\MySQL\MySQL Server 5.6 Data\"
mysqlbinlog.exe --stop-datetime="2022-12-25 12:55:00" binlog.006116 binlog.006117 binlog.006118 binlog.006119 binlog.006120 > inc_backup.sql
Then execute SQL instructions via mysql.exe utility:
mysql.exe < inc_backup.sql
Or redirect directly to the MySQL Server via pipe, but this only works for Linux.
cd /var/lib/mysql/
sudo mysqlbinlog --stop-datetime="2022-12-25 12:55:00" binlog.006116 binlog.006117 binlog.006118 binlog.006119 binlog.006120 | sudo mysql
Great! The data has been restored.
 “Don’t put all your eggs in one basket!”
A database backup should not be kept on the same server where the DBMS is deployed. In the simplest scenario, send a copy of the backup to another server, or better yet, to cloud storage. However, while everything is straightforward with a basic full backup – you make a backup and send it immediately, it’s not so simple with the binary logs. When should you back them up, and which files should be backed up? Let’s explore this below.
The MySQL server has a command:
FLUSH BINARY LOGS
This command starts writing to the next new binary log file, so all previous binary log files can be copied. However, it is useful to compress binary logs before copying them.
After compression the backup must be transferred to another server: the easiest way to do this on Windows is to use mapped drive, on Linux – transfer the file over SSH.
Windows: Script to take incremental backup and send to shared folder
The script records the binary log files that are in the directory, executes FLUSH BINARY LOGS, and then transfers all the recorded binary logs to the network drive.
At the beginning of the script, you need to specify the MySQL database connection details, as well as the paths to the key utilities that are needed to run the script. For this script to work, you need to create a network drive w:\,as well as install the 7zip utility. You can download it here.
rem path to binlogs directory
set binlog_folder="C:\ProgramData\MySQL\MySQL Server 5.6\Data\ "
rem binlog file mask name, set in my.ini in the variable log-bin=mysql-bin
rem it is better to add ".0*" to the end of the mask; this ensures that extra files do not fall under the mask
set binlog_file_mask="mysql-bin.0*"
rem path to 7z.exe
set path_7z="c:\Program Files\7-Zip\7z.exe"
rem path to mysql.exe
set mysqlexe_path="C:\Program Files\MySQL\MySQL Server 5.6\bin\mysql.exe"
rem backup storage directory
set backup_folder="w:\backup\%DATE:/=% %TIME::=-%"
rem credentials to connect to MySQL
set mysql_user=root
set mysql_password=1234
rem create a temporary directory
mkdir %backup_folder%
rem save the list of binlog files available for copying
dir /b %binlog_folder%%binlog_file_mask% > binlog-files.txt
rem initialize the record in the new binlog file
%mysqlexe_path% -u %mysql_user% -p%mysql_password% -e "FLUSH LOG;"
rem move the binlog files into the backup archive
for /F %%A in (binlog-files.txt) do move %binlog_folder%%%A  %backup_folder%\%%A
rem compress the backup
%path_7z% a %backup_folder%.zip %backup_folder%\\
rem delete temporary directory
RMDIR /S /Q %backup_folder%
Linux: Script to take incremental backup and send to another server over SSH
This script compresses new binary log files and transfers them to another server with scp
The script assumes that you can connect to MySQL Server through sudowithout using a login or password. But if you need to specify a password, upgradesudo mysql command to replace it with mysql -u root -ppassword
Also, to use this script in a cron tasks, the scpcommand should not ask for a password. Add SSH public key to a server where you plan to transfer backups.
set -o xtrace
#path to directory with binary log files
binlogs_path=/var/lib/mysql/
#path to backup storage directory
backup_folder=/var/backups/mysql
#backup file name
backup_file_name=$(date +%d-%m-%Y_%H-%M-%S).zip
#start writing to new binary log file
sudo mysql -E --execute='FLUSH BINARY LOGS;' mysql
#get list of binary log files
binlogs=$(sudo mysql -E --execute='SHOW BINARY LOGS;' mysql | grep Log_name | sed -e 's/Log_name://g' -e 's/^[[:space:]]*//' -e 's/[[:space:]]*$//')
#get list of binary log for backup (all but the last one)
binlogs_without_Last=`echo "${binlogs}" | head -n -1`
#get the last active binary log file (which you do not have to copy)
binlog_Last=`echo "${binlogs}" | tail -n -1`
#form full path to binary log files
binlogs_fullPath=`echo "${binlogs_without_Last}" | xargs -I % echo $binlogs_path%`
#compress binary logs into archive
zip $backup_folder/$backup_file_name $binlogs_fullPath
#delete saved binary log files
echo $binlog_Last | xargs -I % sudo mysql -E --execute='PURGE BINARY LOGS TO "%";' mysql
#send backup over ssh
scp $backup_folder/$backup_file_name ivan@sqlbak-linux-auto-test.northeurope.cloudapp.azure.com:~/$backup_file_name
Scheduling an Automatic Backup
 You can run incremental backups very often, but you should also do a full backup from time to time. If you don’t do full backups, the chain of backups may become too big. This is not good, because damaging one of the files can damage the whole chain. It is therefore a good idea to maintain a reasonable balance.
For example, it would be reasonable to do a full backup once a day and a backup of the binary logs every 15 minutes.
Scheduling a regular backup on Windows is easier with Windows Task Scheduler and in Linux with crontab.
What can be Improved?
The scripts described above are not a ready-made solution, but rather a base for building up the functionality.
In this script we recommend adding the following features:
- Sending notifications to the administrator: by email or an integration with the administrator’s dashboard.
- Handling contingencies: For example, repeated attempts to transfer a file if the file could not be transferred to the destination.
- Encryption: For a user to connect to the database, they need to know the username and password or have administrator privileges. In the destination, on the other hand, backups are stored unencrypted and no special privileges are needed to read them.
- Automatic test recovery: There is only one way to make sure that your backup is fine, and that is to restore the database from the backup. This can also be done automatically in a test environment.
By implementing these four points, you will have an ideal solution that secures your data. However, this solution will require maintenance. You can avoid this by using dedicated, paid software.
SqlBak
SqlBak is a cloud service for managing database backups. The service can run on Windows and Linux. It can be used to implement a point-in-time recovery strategy for MySQL Server.
To start using this service you have to install a tiny tool (SqlBak) on your server and set a connection to sqlbak.com and to your MySQL Server. After that, all the settings will be made on the web on the “Dashboard” page. Below is a short tutorial on how to do it:
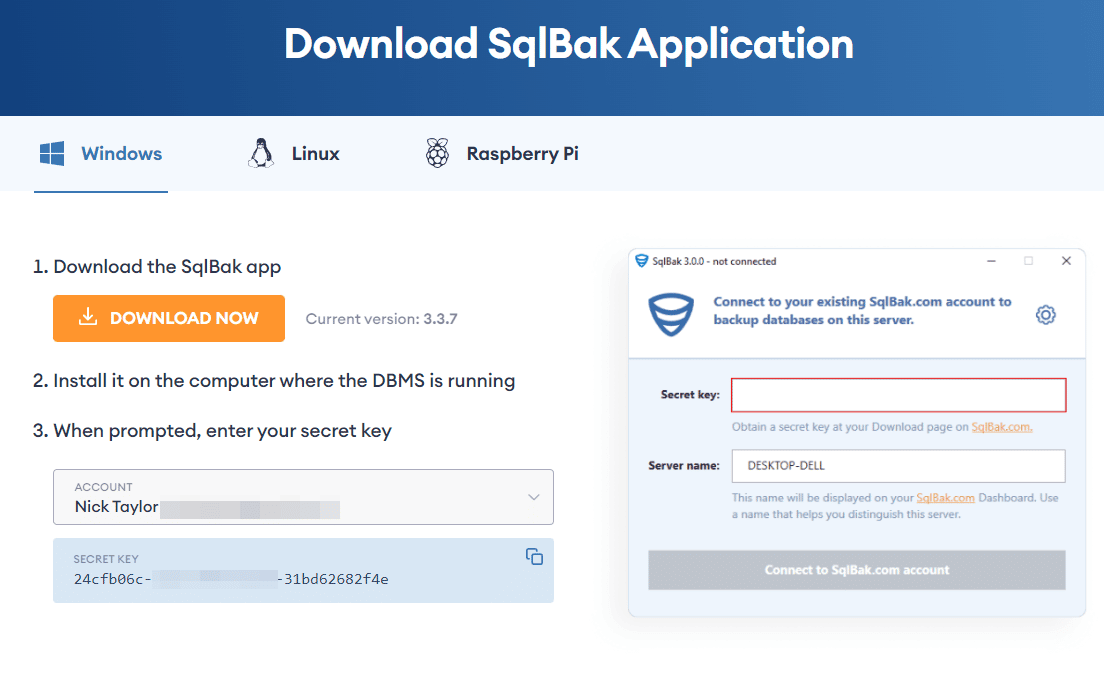
1. Install SqlBak app and connect to sqlbak.com
To perform incremental backups, the SqlBak app should be installed on the same server where MySQL Server is located.
On Linux
SqlBak supports various Linux distributions. Consider Ubuntu as an example (all available distributions and application installation details can be found on the Download page)
- Download package
curl -o sqlbak.deb https://sqlbak.com/download/linux/latest/sqlbak.deb
- Install the SqlBak app
sudo apt-get install ./sqlbak.deb
- Register a server
sudo sqlbak -r -k <your secret key>
On Windows
- Download and install the SqlBak app
- Run the SqlBak app and apply your Secret key
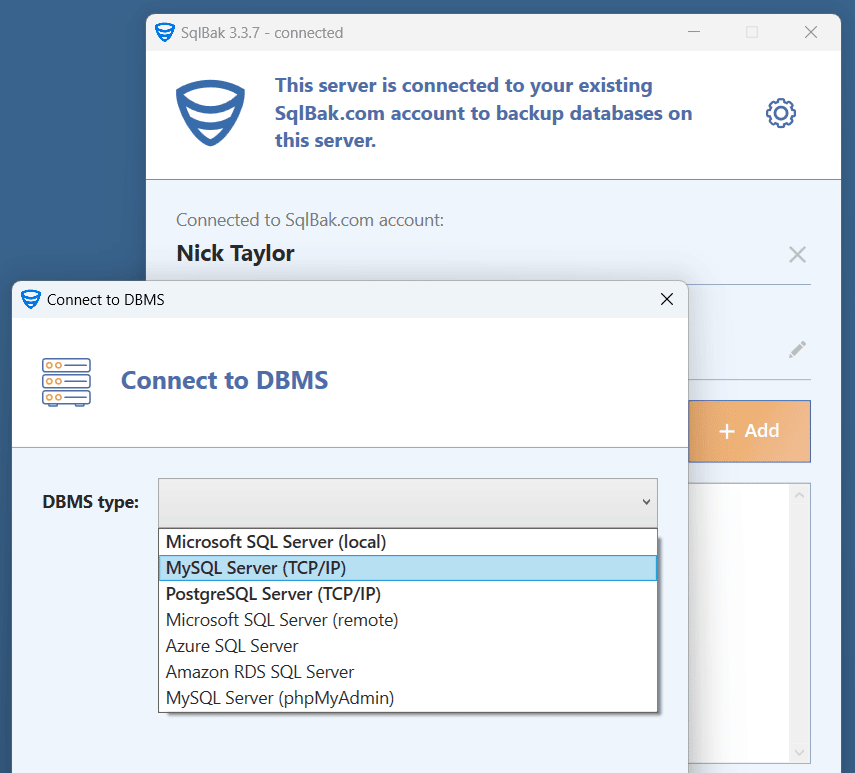
2. Establish a connection to your MySQL Server
On Linux
sudo sqlbak --add-connection --db-type=mysql --user=root

On Windows
Run the SqlBak app and click on the “Add” button then choose “MySQL Server (TCP/IP)” from the dropdown list.
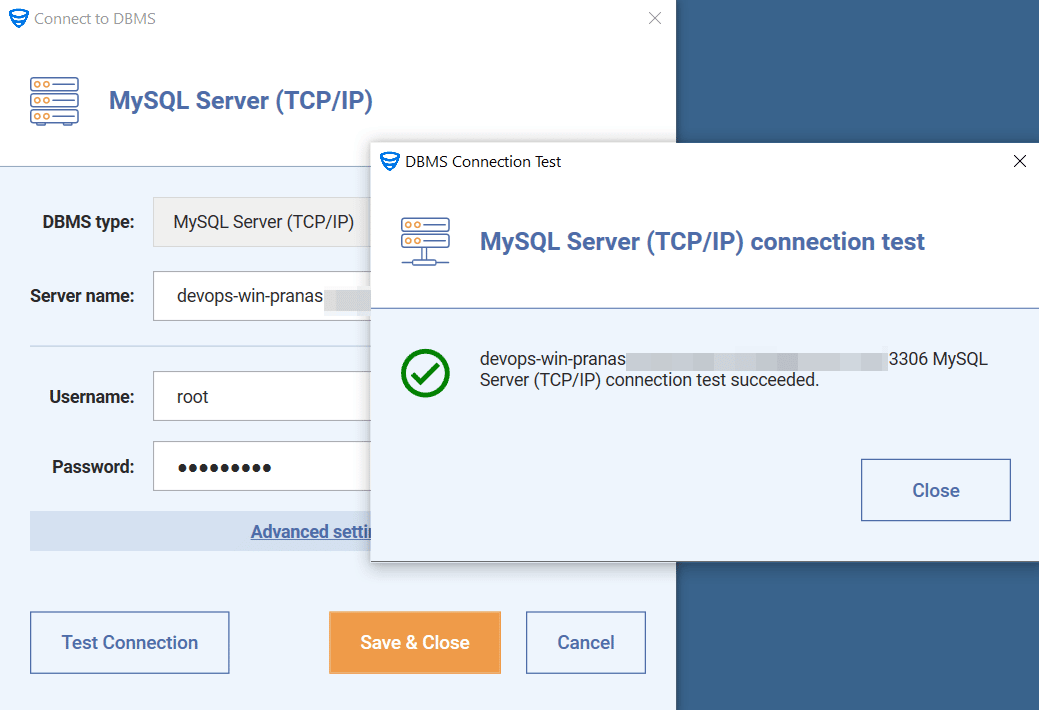
 In the window that opens, enter your server’s name and your credentials, then press the “Test Connection” button to check the connection.
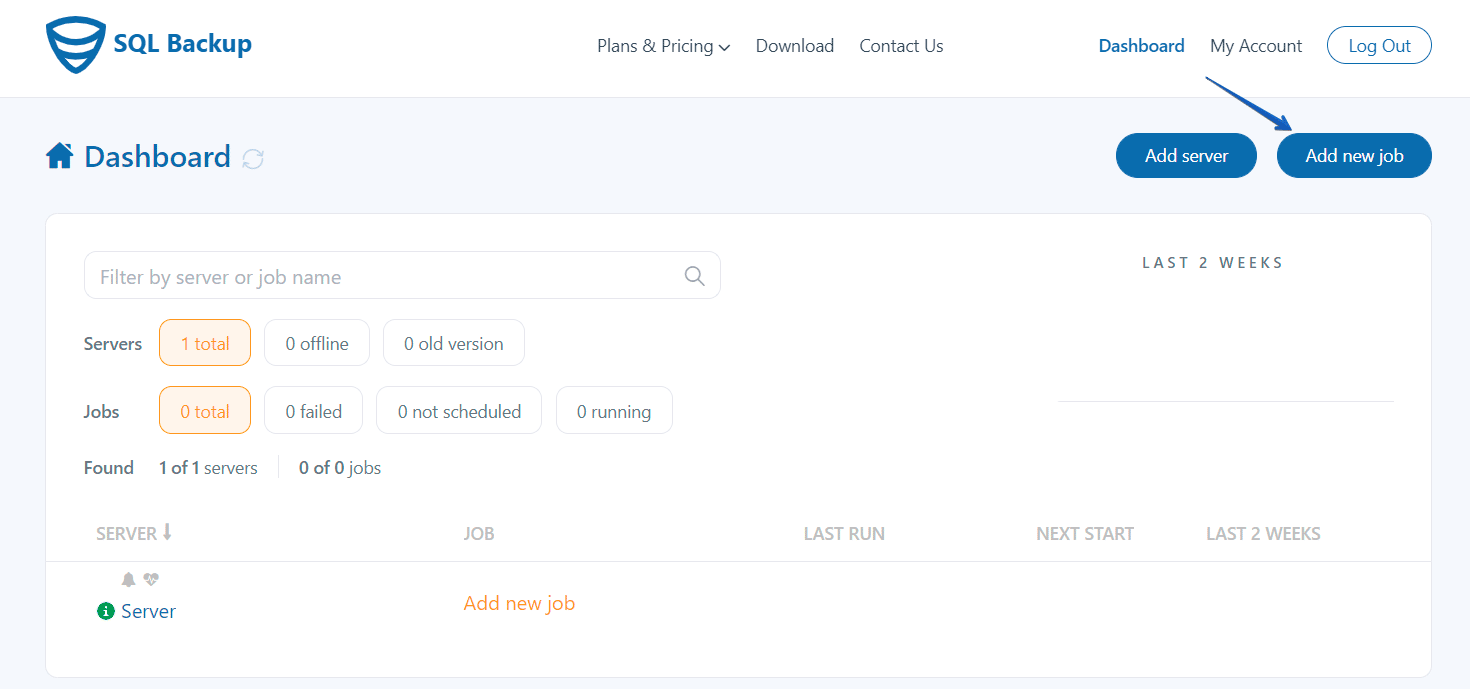
3. Create a Backup Job
Once the SqlBak app is installed and connected to sqlbak.com as well as to MySQL Server, your server will be displayed on the “Dashboard” page. Now it’s time to create a backup job. To do it simply click on the “Add new Job” button and follow and follow the suggested steps.
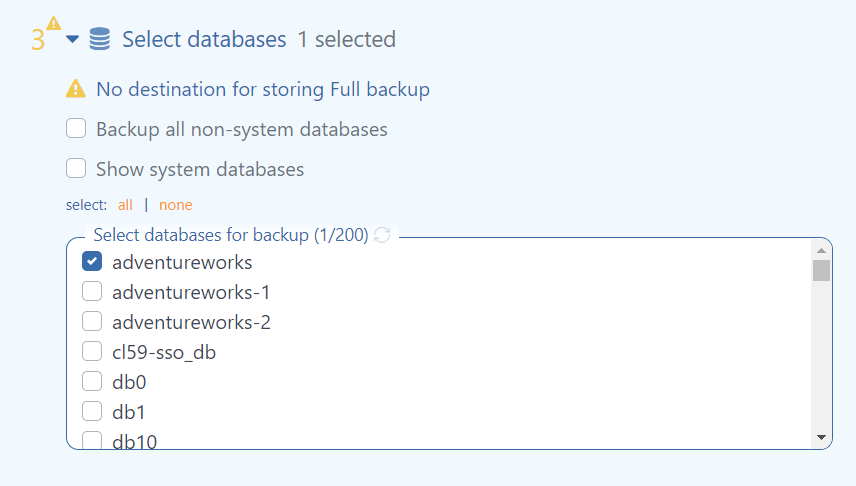
- On the job’s settings page, the first two sections will be completed, so scroll down to the 3rd section to choose the databases that should be backed up.
- Next, choose a destination where the backups will be stored. Note that multiple destinations can be set.

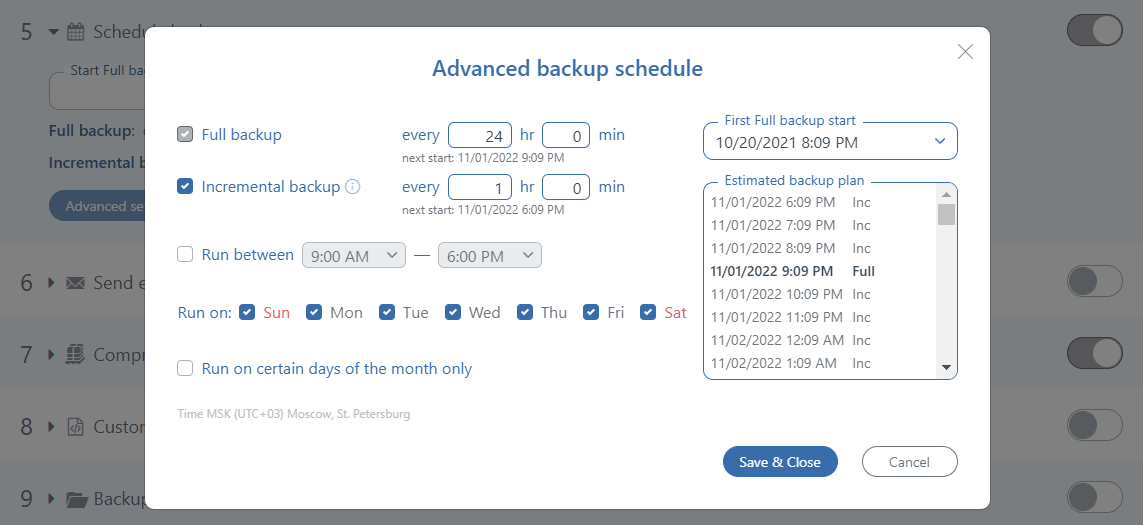
- To set a backup job schedule enables the “Schedule backups” option. Click on the “Advanced settings” and tick off the “Incremental backup” option. Set the schedule you need and save the settings.
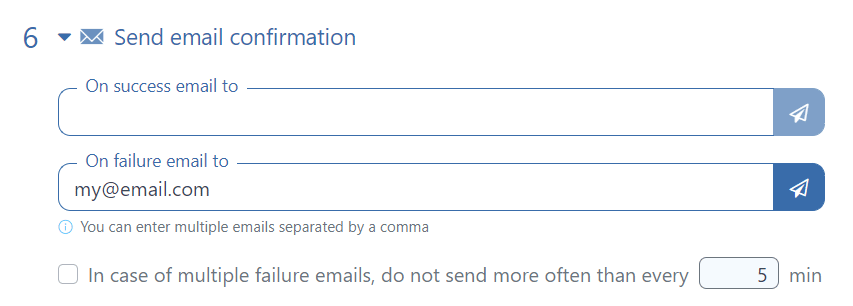
- And the last important setting is the email notification. In section 6 “Send email confirmation” specify where notifications should be sent when a backup job failed or successfully completed or both.
That’s it! Save your backup job and all the backups will be performed according to the selected settings.
SQLBackupAndFTP
SQLBackupAndFTP is our other backup tool that can perform MySQL Server incremental backups and send the backup to different storage. To start using SQLBackupAndFTP download the latest release at the “Download” page and install the app. To run MySQL Server incremental backups SQLBackupAndFTP should be installed on the same server where MySQL Server is located. Below are the simple steps to create a backup job:
- Go to the “Connect to Database Server” section and click the gear icon. At the opened windows choose MySQL Server (TCP/IP) from the dropdown list, then specify your Server’s name and the credentials. Click the “Test Connection” button to test the connection.

- In the “Select Databases” section you can choose the databases that should be backed up.

- Choose the destination where the backups will be stored. Note, you can set multiple destinations.

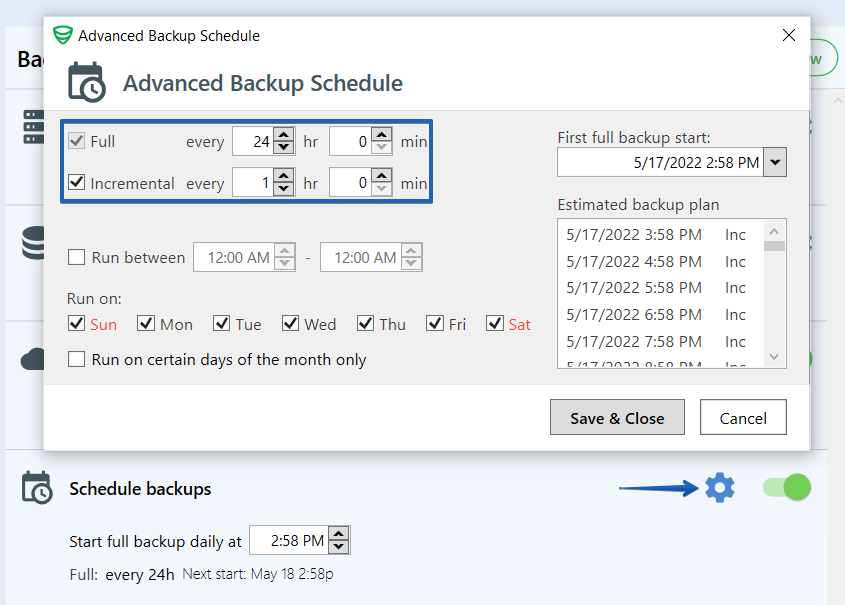
- To set a backup job’s schedule enable the “Schedule backups” option. The Advanced settings can be found by clicking the “gear” button. Enable the incremental backups and create the schedule you need.
- To receive email notifications set the “Send confirmation” section.

Bottom Line

If you have a database, and the data in it has any value, you need to back it up. A full backup every night is a good solution because it’s easy to do. Here is a detailed article on how to do simple full MySQL backups on Windows and Linux.
Implementation of point-in-time recovery on shell scripts will require writing scripts and supporting them, or using third-party software like SqlBak or SQLBackupAndFTP. Assess your business requirements to see if you need it.
The most important thing is to test your backups, at least in a test environment. It’s not enough to set it up once and forget about it. If things go south, you need to make sure that you have everything on hand to recover your data.