Because there are several ways to backup MySQL database on Windows, this article will review all the different options so that you can select the method that works for you. This article is limited to MySQL database backups for a Microsoft Windows Server only. If you are using a Linux-based OS, see How to Automate MySQL Database Backups in Linux.
Note that most of the methods described in this article are fully compatible with MariaDB, with the exception of hot physical backups.
MySQL Backup types
MySQL database supports the following types of backups:
- Logical – the result of a logical backup is a .sql script for database recreation. This script is created using the mysqldump utility. The main advantage of this backup is that it has no third-party dependencies and can be restored on any MySQL Server.
- Physical – this backup is created by copying the database files. Creating and restoring such a backup is faster than a logical backup. We recommend using it for large databases.
- Hot – if a MySQL Server is running on an InnoDB subsystem, then you can create transactional-consistent backups without stopping writing to a MySQL Server
- Partial – the backup is not created for the entire DBMS, but for specific databases or tables. This is useful when different backup strategies are applied to different data.
How to create a logical MySQL backup
Simple backup of MySQL database using mysqldump
When installing a MySQL server, the main backup utility is automatically installed – mysqldump. This command-line utility creates a backup file with a set of commands to recreate the database.
It is easy to restore a MySQL database from a file created by mysqldump. A small database can be restored by copying the contents of the file into the SQL editor of a graphic IDE (for example, in MySQL Workbench) and running it from there. However, it is preferable to restore a large database using the mysql command utility.
Typically, mysqldump is located in the MySQL Server installation directory. For example, for MySQL 8.0, the path to the directory is C:\Program Files\MySQL\MySQL Server 8.0\bin\. It is advisable to add this directory to the global PATH variable.
To create a backup of all MySQL server databases, run the following command:
mysqldump --user root --password --all-databases > all-databases.sql
To recover data, use the following command:
mysql --user root --password mysql < all-databases.sql
Often you need to backup not the entire server, but a specific database. To dump a specific database, use the name of the database instead of the –all-database parameter.
mysql --user root --password [db_name] < [db_name].sql
The fact that the backup is created in an open format has two important advantages:
- You can restore a dump on a server with a different version. Thus, switching to another version of MySQL can be done without worrying about backups.
- You can manually edit the .sql file if you need to change something before restoring.
For more information, see mysqldump documentation.
Backup using MySQL Workbench
MySQL Workbench is a tool for visual design and it works with a MySQL database. This application also allows you to create logical backups of a MySQL database.
To create a backup using MySQL Workbench follow these steps:
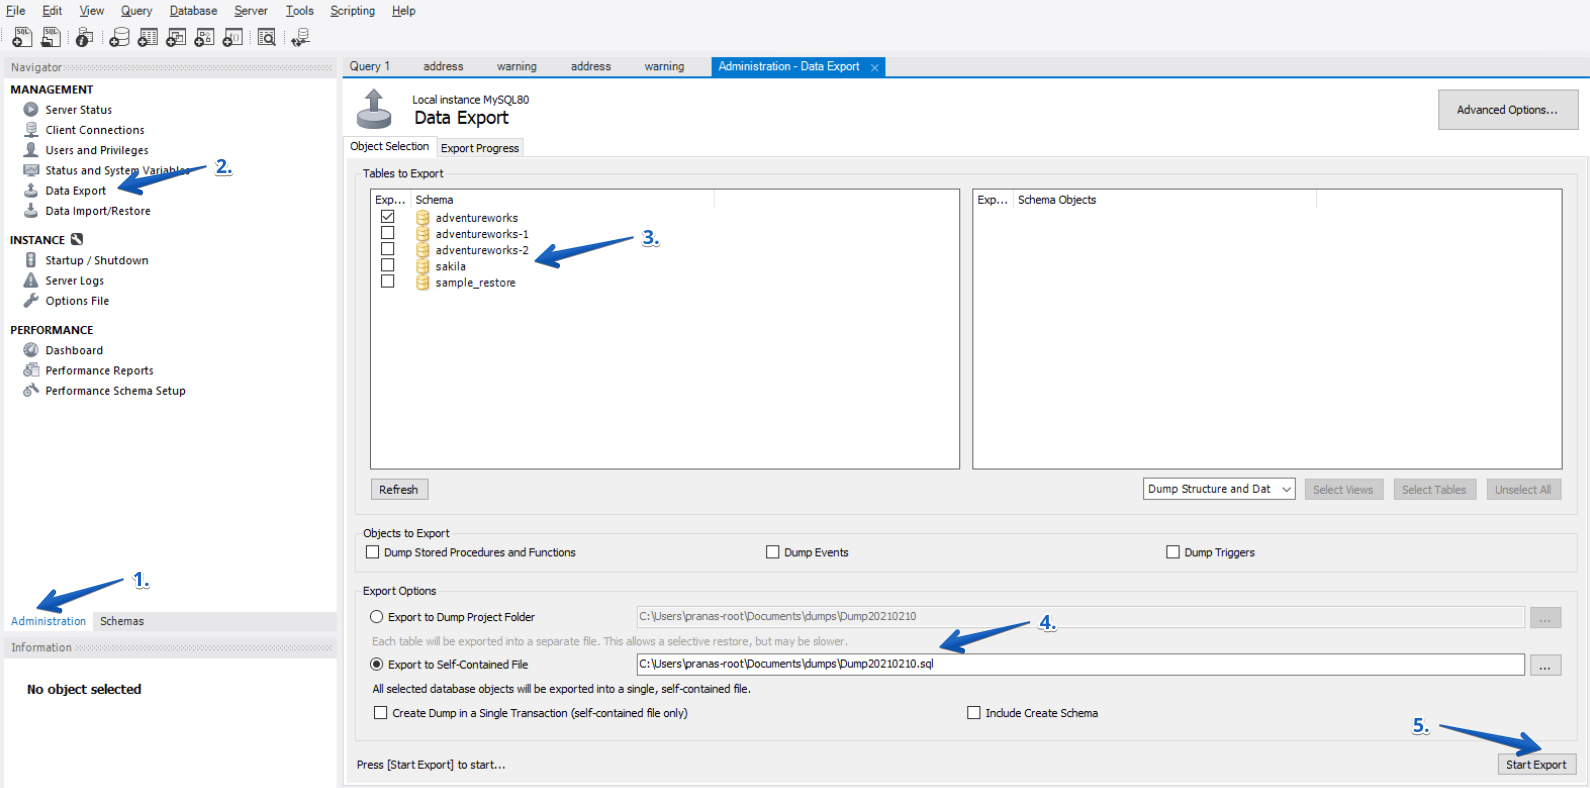
- Go to the Administration tab, on the Navigation panel (on the left by default)
- Select Data Export
- From the Data Export tab in the Tables To Export section, select the databases and tables that will be added to the backup file
- From the Export Option section, select the format for the exported data. Either each table will be exported to a separate .sql file, or one common .sql file will be created.
Exporting each table to a separate file can be useful if you need to restore not the entire database, but some specific tables. But, as a rule, this is not necessary, and it is easier to work with one backup file.
- Press the Export button to create a backup file.
The export section is essentially a graphic interface to the mysqldump utility. Although you cannot automate the creation process using MySQL Workbench, this tool is convenient for manually creating a backup and for migrating data.
Also, you can use MySQL Workbench as a parameter constructor for mysqldumpmysqldump

Dump recovery using MySQL Workbench
To restore the created backup, follow these steps:
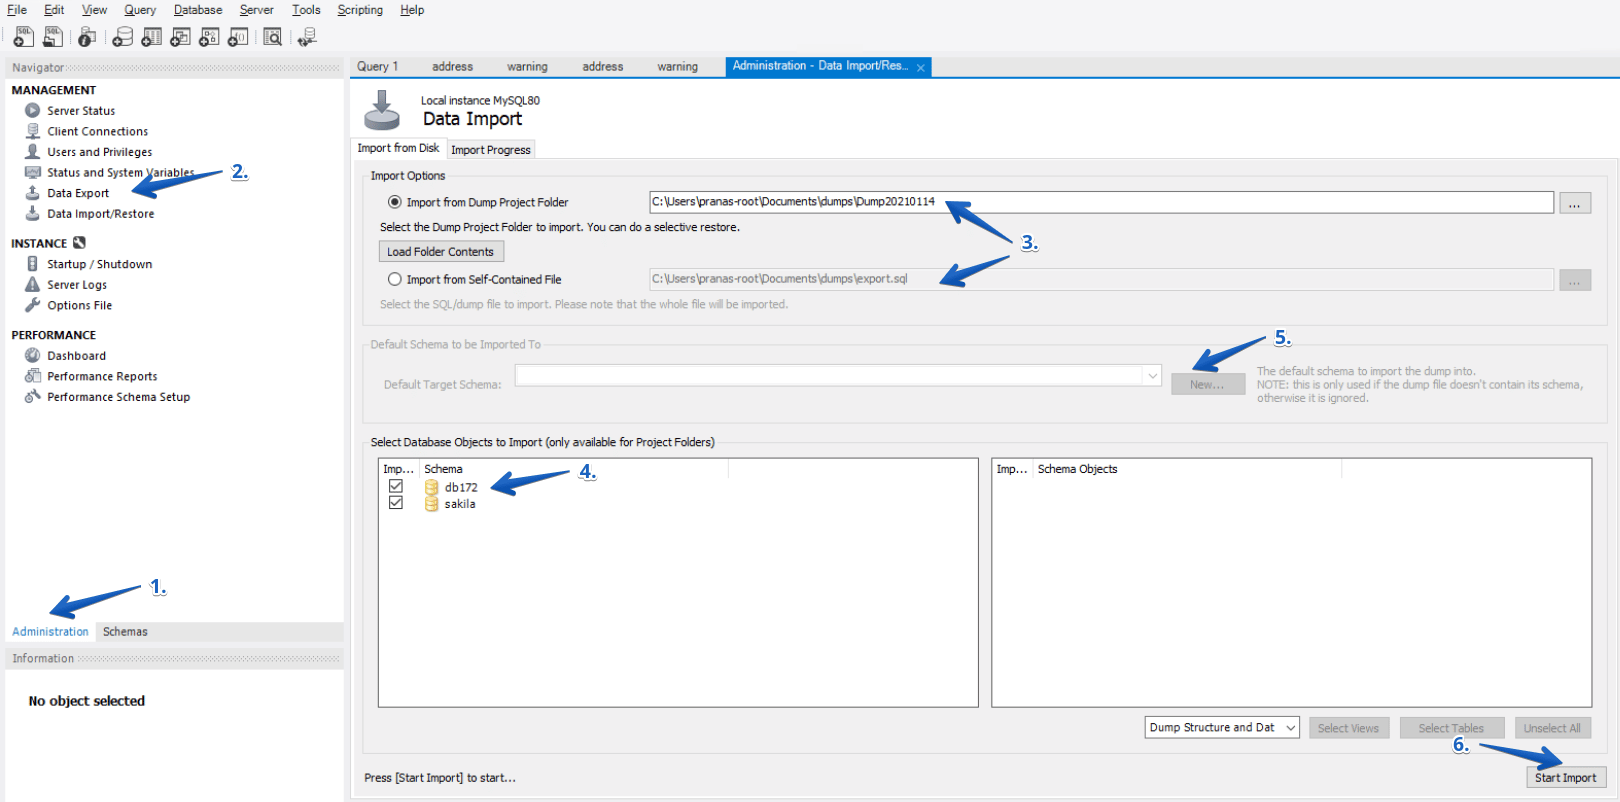
- Go to the Administration tab, on the Navigation panel (on the left by default)
- Select Data Import\Restore
- Select the source of the recovery Dump Project Folder or Self-Contained File, depending on what you selected at the backup stage
- If you used a Dump Project Folder, then you can select the databases and tables that need to be restored.
- If you use a Self-Contained File, then before restoring, you must select the schema into which you want to restore the dump. If you restore a dump to a server where the required schema does not exist, you can create it by clicking the New button.
- Press the Start Import button.
Backup using SQLBackupAndFTP
SQLBackupAndFTP is a popular utility for backing up and restoring MySQL, SQL Server, and PostgreSQL. This specialized utility is designed for the automated creation of backups and sending them to storage.
This utility not only simplifies backups but also allows you to perform a one-click restore, as well as automate the restore, which can be very useful for synchronizing data or creating a test server.
To create a MySQL database backup using SQLBackupAndFTP, follow these steps:
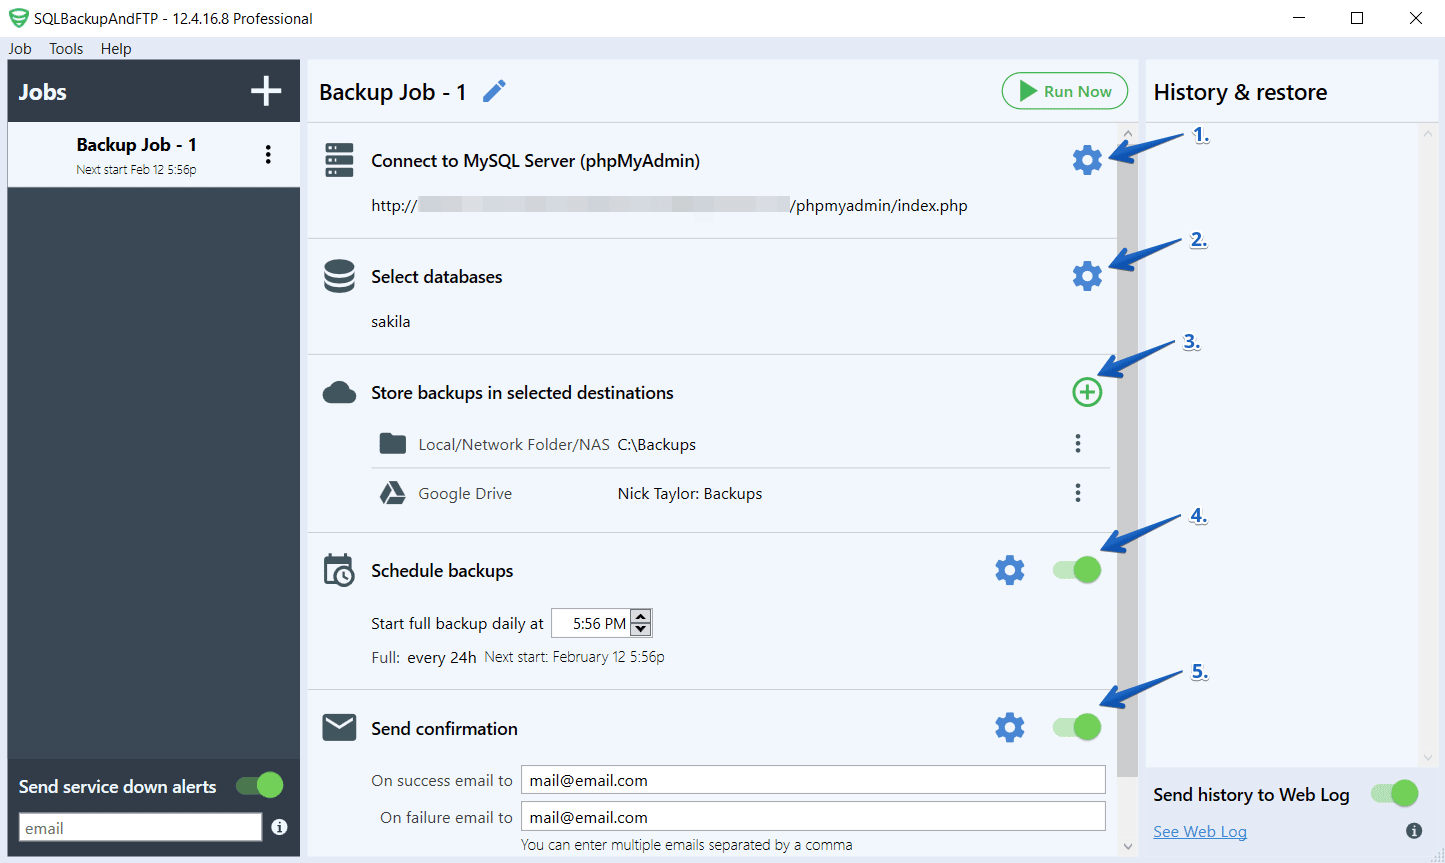
- Connect to your MySQL Server by selecting the connection type MySQL Server (TCP/IP) or MySQL Server (phpMyAdmin)
- Next, from the Select Databases section, select the databases you want to back up
- The next step is to choose where to store your backups. It can be a local or network folder, FTP, or popular cloud storage services such as Dropbox, Google Drive, Amazon S3, Azure, and others. Please note, you can specify several places where backups will be sent.
- In the Schedule Backups section, create a backup schedule
- To receive email notifications about completed backups, set the Send Confirmation option
These are the basic settings, but you can also adjust the compression level of your backups, set a password for them (using the encryption option), specify a temporary folder to do the work, set up scripts to run, and much more.
To restore the MySQL database created by SQLBackupAndFTP, just follow these steps:
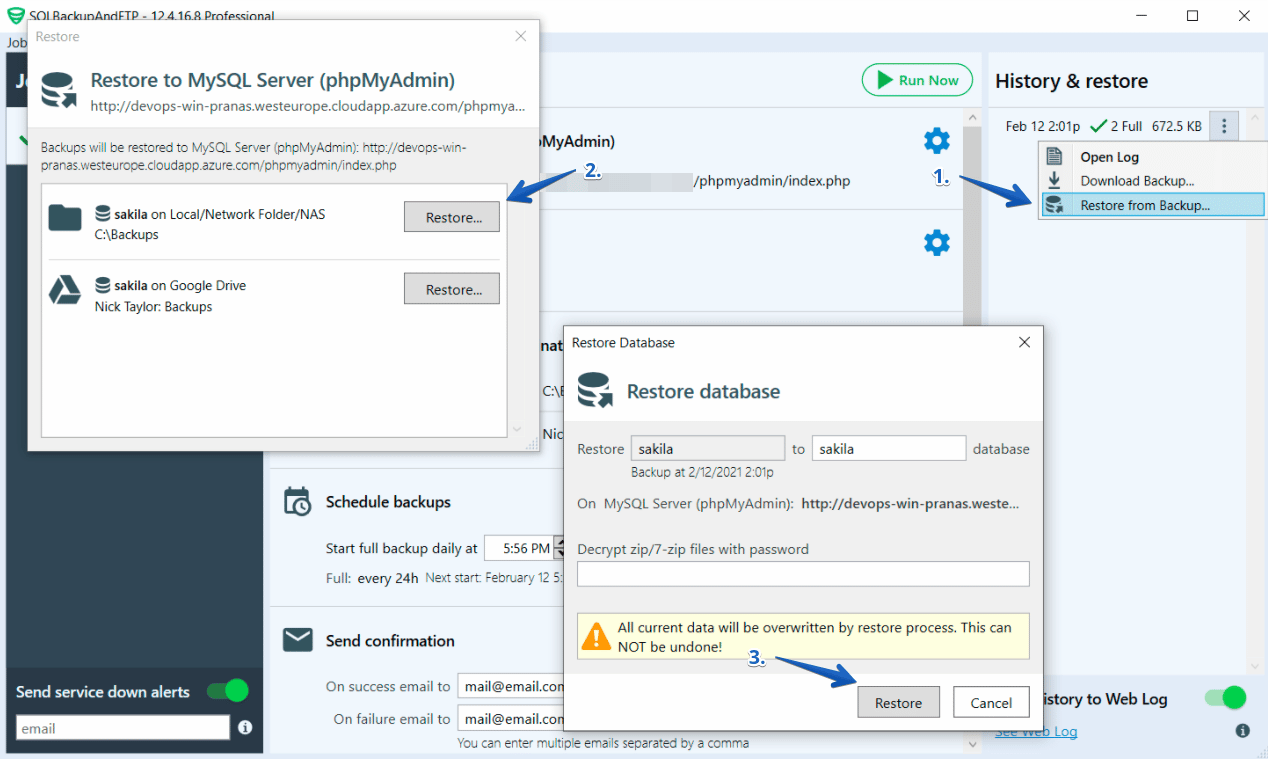
- Find the backup you want to restore in the History & Restore section on the right side of the application
- Click on three dots and select “Restore from backup…”
- Make sure the correct backup is selected and click the Restore button
- Specify the name of the database where you want to restore the backup and password, if necessary, then click Restore and confirm the launch
The main feature of SQLBackupAndFTP is that this utility not only provides a good interface for creating a backup file, but also allows you to configure all the accompanying steps: compression, encryption, cloud storage, and fail notifications.
Backup using SqlBak
Typically, a DBA has to maintain more than one database. A good solution for creating and maintaining backups on multiple servers is SqlBak.
This is an agent-based application for creating backups, compressing them, and then sending them to storage. All necessary settings are done in the browser.
To create a backup using SqlBak use the following instructions:
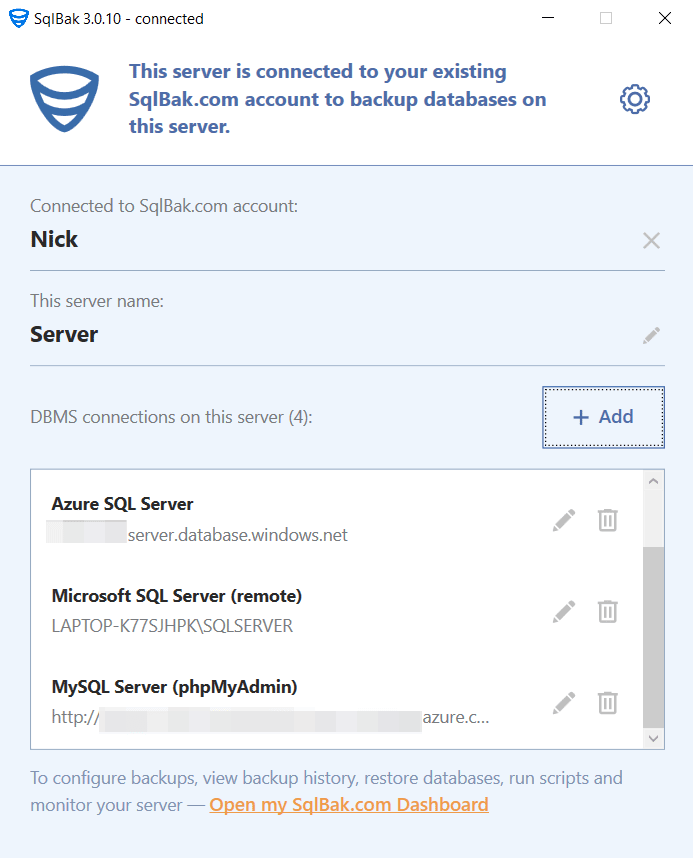
- Run SqlBak App and connect to your MySQL Server using the server type MySQL Server (TCP/IP) or MySQL Server (phpMyAdmin)
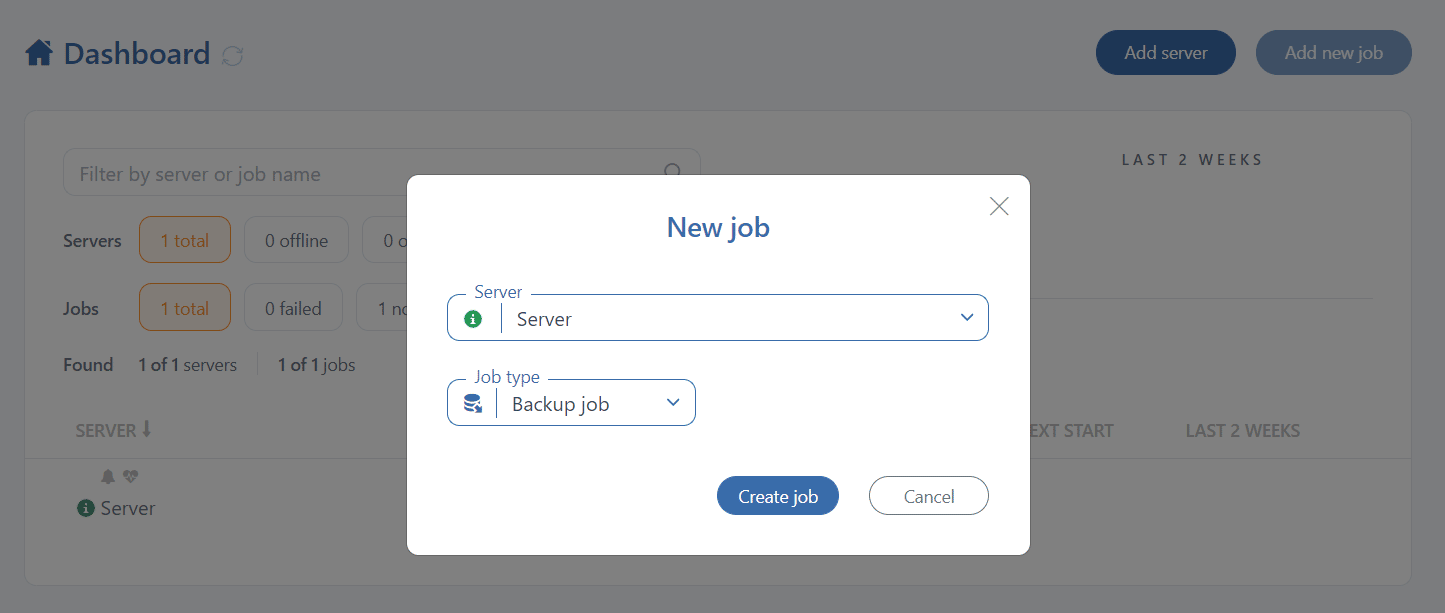
- Go to the Dashboard page and click the Add New Job button
- In the window that opens, select the server you need, set the Backup Job in the Job Type field and click Create Job
- In the Select DBMS connection section, select the connection to your MySQL Server. If you have only one connection on the server, it will be selected automatically.
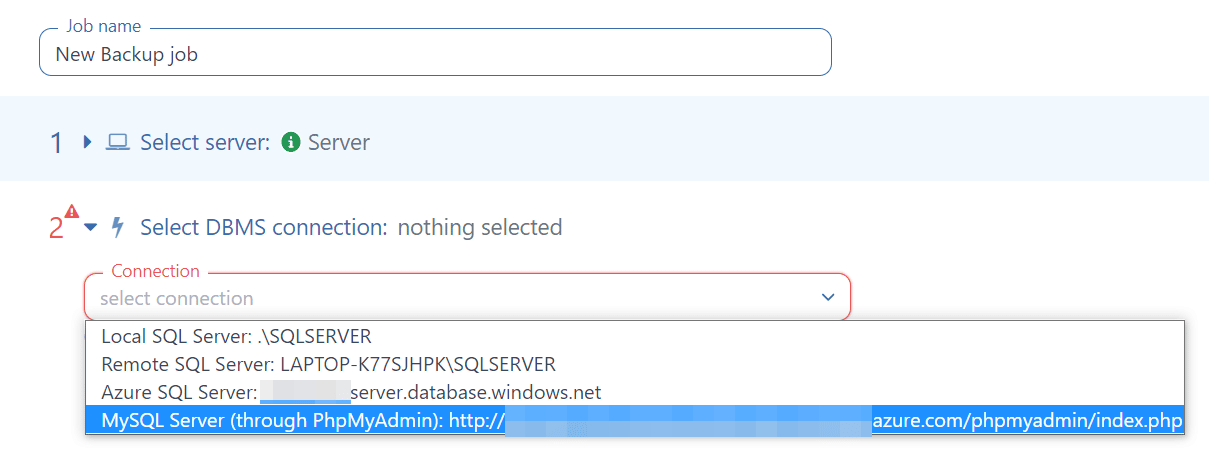
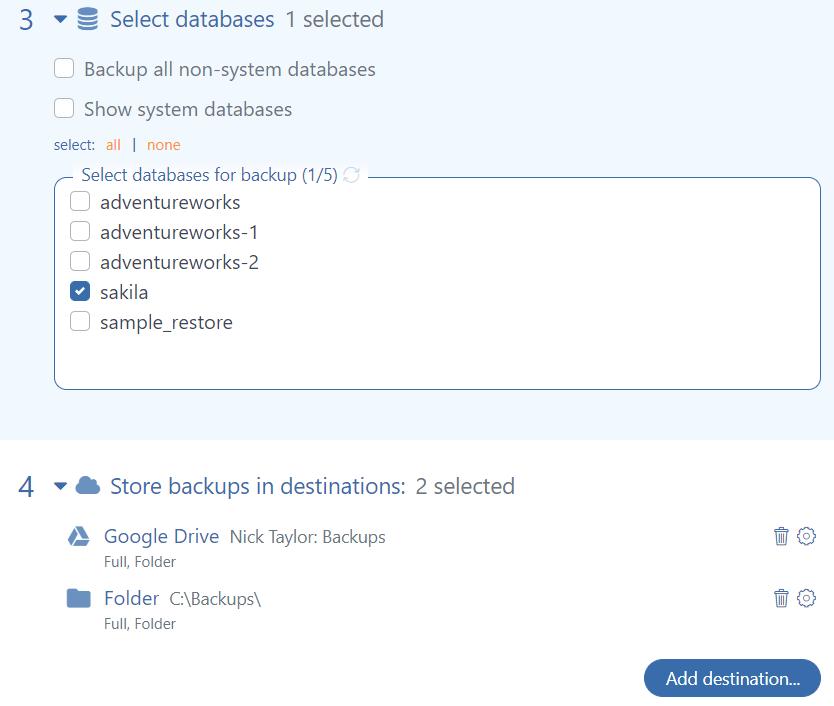
Choose the MySQL connection on the SqlBak backup job settings page - In the Select databases section, mark all databases that you want to back up
- Now you need to configure the locations where your backups will be stored. These can be local or network folders, FTP, or cloud storage like OneDrive, Amazon S3, S3 Compatible (like Google Cloud, Wasabi), etc.
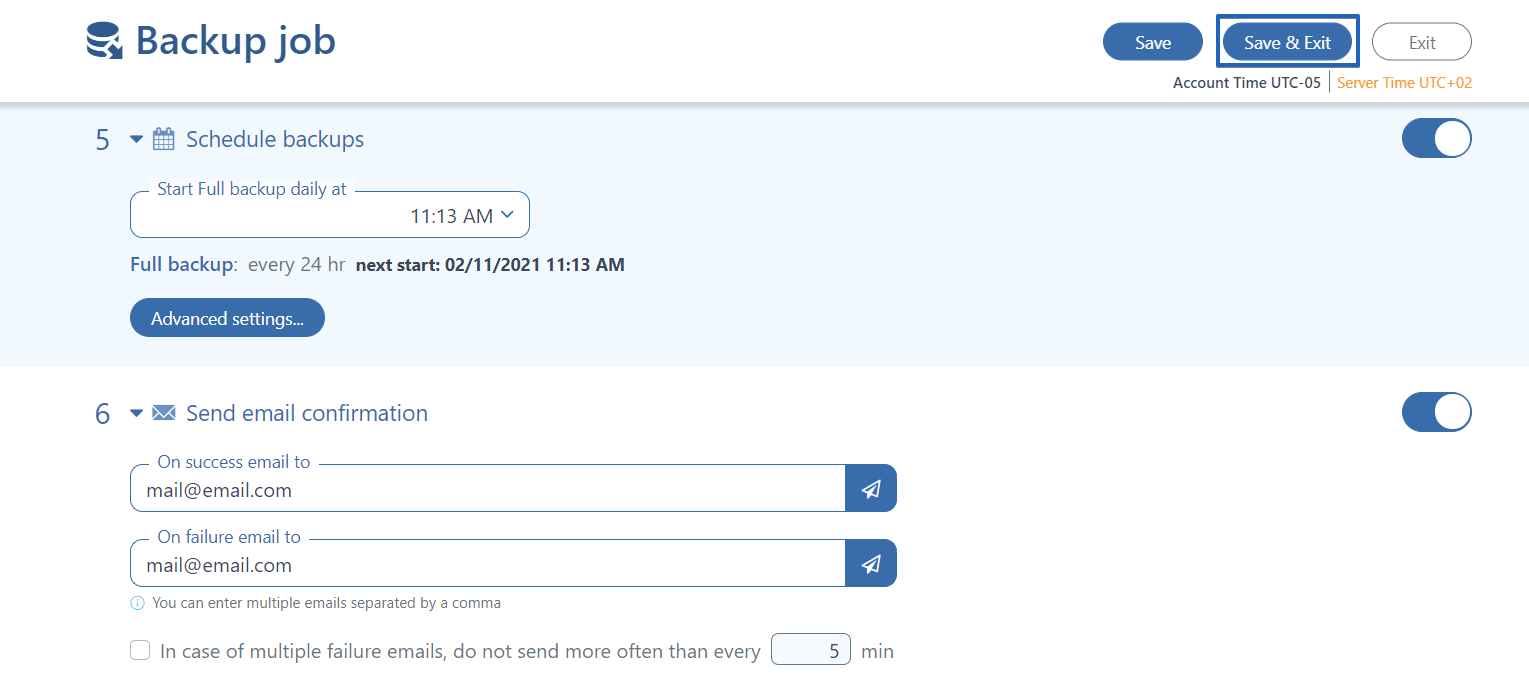
- Create a schedule to start the job
- Specify your email address for job success/fail notifications
- Click the Save & Exit button to save the settings and start the job
These are the essential settings, but you can also configure the encryption of your backups, compression, running scripts, and much more.
To restore the database from a backup created by SqlBak, you need to do the following:
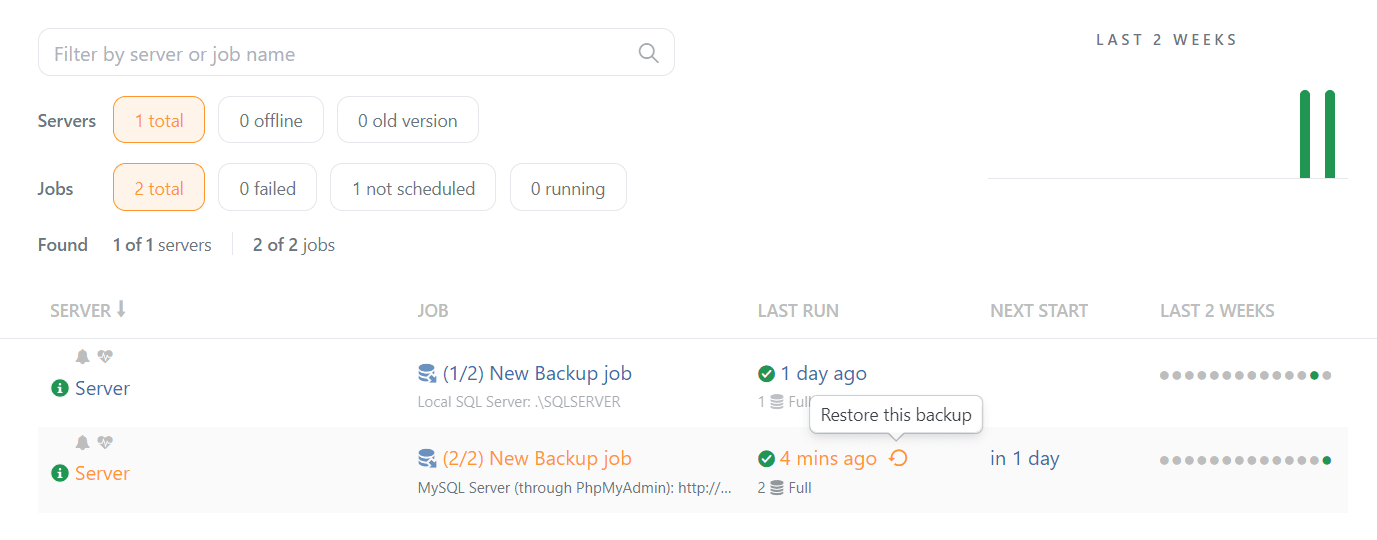
- Go to the Dashboard page and click on the Restore icon in the LAST RUN column to restore the last backup. Alternatively, go to the backup job setup page, find the backup you need in the Backup history section and click the Restore icon in the Actions column
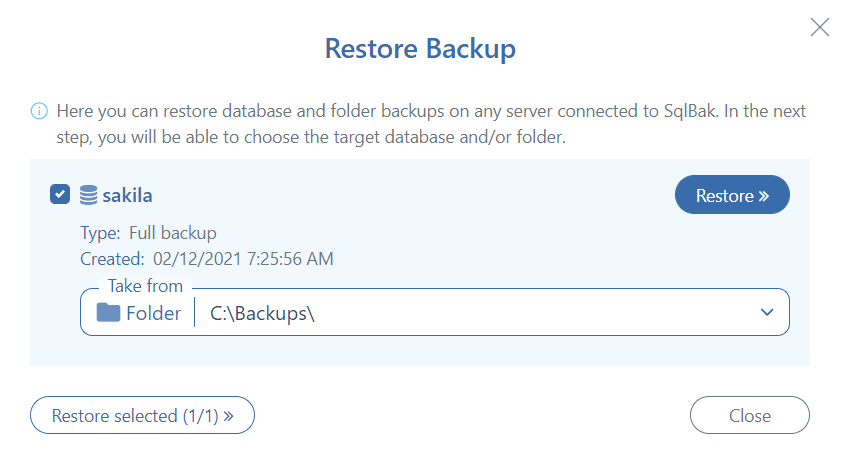
- Select the backup you need and click the Restore button
- Check the settings and start the restore
Backup using PhpMyAdmin
PhpMyAdmin is an open-source tool for administering MySQL databases through a browser. It may be an overkill to install PhpMyAdmin solely for creating backups, but if you already use this tool, you can create a backup in only five clicks.
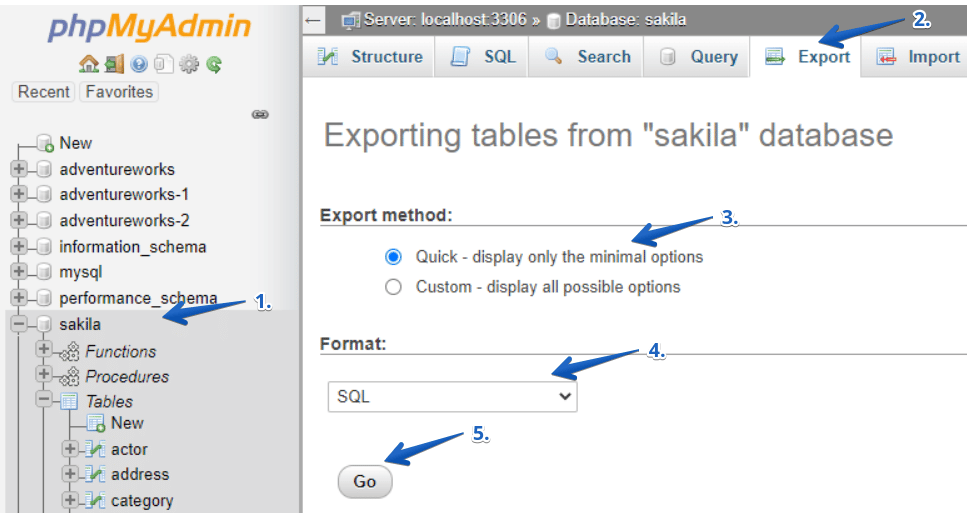
- Select the database in the left panel
- Go to the Export tab
- To back up the entire server, select Quick. If you want to backup specific databases, then you must select Custom to see additional settings.
- Select SQL format, which is the best for backup.
- Click GO.
Quite often, hosting providers do not provide direct access to a MySQL database, but instead, they provide access through PhpMyAdmin. However, as in the case of MySQL Workbench, PhpMyAdmin is a tool for working with a database, and it does not support built-in mechanisms to automate the creation of regular backups. In this case, SqlBak or SQLBackupAndFTP can help by connecting to a MySQL database over PhpMyAdmin.
How to create a physical MySQL database backup
Ultimately, any database is stored in a file or set of files. If you save these files to another location, you can later use them to restore the data from a particular time period.
Unlike logical backups, physical backups are created much faster, because it is only a matter of copying files. The restoration is also fast, for the same reason.
However, physical backups have two important disadvantages:
- Backups are portable only to other machines that have identical or similar hardware characteristics.
- The solution for creating hot backups can be too expensive for small businesses, as the only Windows tool that allows you to create a physical backup without stopping the server is MySQL Enterprise Backup.
Manual creation of a MySQL Server backup by copying data files
The easiest way to create a backup is to simply copy the contents of a MySQL data directory.
To manually create a MySQL Server backup based on files, follow the steps below:
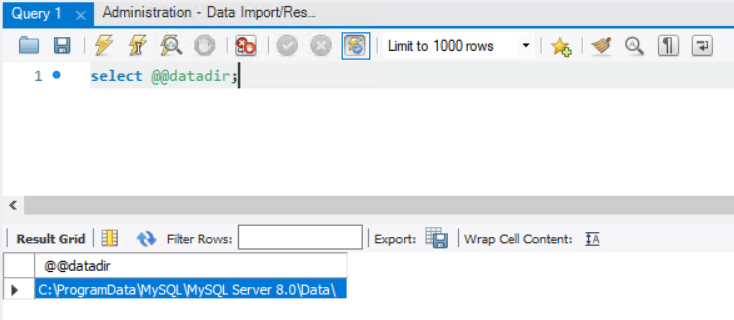
- Find MySQL Server data directory. To do this, run the following command:
select @@datadir;
The easiest way to do this is through MySQL Workbench.
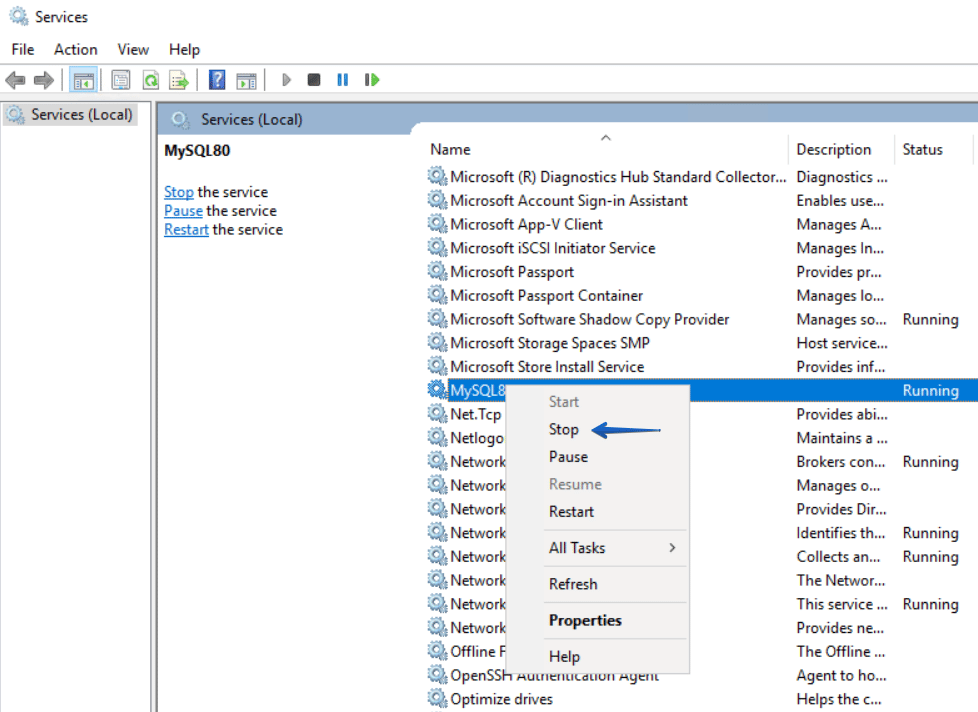
- Find and stop the MySQL Server service
- Copy or pack the contents of a MySQL Server data directory to another location
- Start MySQL Server by clicking Start in the context menu of the service.
Creating a MySQL Server backup by copying data files using a batch script
All actions described in the previous section can be performed using one batch script.
First, set values for the variable values mysql_data_dir,backup_dir, mysql_service_nameand then run the script. It will stop the service, copy the contents of the data folder to a new subdirectory, and then start the MySQL Service.
set mysql_data_dir=C:\ProgramData\MySQL\MySQL Server 8.0\Data
set backup_dir=D:\Temp
set mysql_service_name=MySQL80

NET STOP %mysql_service_name%
set mysql_backup_folder=%backup_dir%\mysql-backup-%DATE:~-4%-%DATE:~4,2%-%DATE:~7,2%-%time::=.%
mkdir %mysql_backup_folder%
xcopy /e /k /h /i "%mysql_data_dir%" "%mysql_backup_folder%"
NET START %mysql_service_name%
Database restoration from files
Follow the steps below to restore your data:
- Stop MySQL Service
- Empty MySQL Server data directory completely
- Copy the saved data to the data directory
- Start the service
Using mysqlbackup utility
The main disadvantage of the previous method is the need to stop MySQL Server. And although copying itself should take little time, even a short shutdown of the server may be unacceptable.
For a windows server, Oracle Corporation has developed a MySQL Enterprise backup product that allows you to create hot physical backups.
This solution includes a console utility – mysqlbackup, which allows creating physical backups. It is as easy to use as mysqldump.
The following command creates a backup file in the directory d:\Temp\EnterpriseBackup.
mysqlbackup --user=root --password --backup-image=backup.mbi \ --backup-dir=D:\Temp\EnterpriseBackup backup-to-image
–backup-image – Backup file name
–backup-dir – Directory in which backup will be created
To restore data from backups, you will need to perform preparatory steps, namely to stop the MySQL Service and clear the MySQL Server data directory. Then you need to use the same utility to restore data but with different parameters.
mysqlbackup --datadir=C:\ProgramData\MySQL\MySQL Server 8.0\Data\ --backup-image=backup.mbi --backup-dir=D:\Temp\EnterpriseBackup copy-back-and-apply-log
–datadir – MySQL Server data directory
–backup-image – Backup file name
–backup-dir – The directory containing the backup file.
The mysqlbackup utility supports on-the-fly compression, a partial backup, incremental backup, and many other features. Details are available here.
The main drawback of this solution is the need to purchase MySQL Enterprise, which can be expensive for small and medium-sized businesses.
Bottom line
Remember that protecting your data isn’t just about creating a backup file. It will be necessary to ensure the transfer of the backup file to storage and to regularly delete old backups in order to prevent the storage from overflowing.
Whether you create a batch script for an automated MySQL Server backup using mysqldump / mysqlbackup , or use SqlBak\SQLBackupAndFTP, the main thing is not to forget that you are creating a backup so that you can restore it later. So test your restore scripts from time to time.
Hopefully, these instructions will help you find the right backup procedures that work the best for your needs.

