Backup is a critical part of database operations. Incremental backups can significantly reduce the performance load on a PostgreSQL server. This article covers the process of creating incremental backups of PostgreSQL on Windows, as well as restoring them.
What is an Incremental Backup?
An incremental backup is not a backup of the entire database, but only of the changes that have occurred since the last backup. To restore an incremental backup, not only is the backup itself needed, but also all previous backups in the chain, up to the initial full database backup.
Starting with PostgreSQL 17, full support for incremental backups has been introduced (previously, the alternative was backup WAL files). It is implemented based on a physical backup of the PostgreSQL data directory, which leads to several important considerations to keep in mind when performing backups:
-
A physical backup can only be restored on the same version of the PostgreSQL server on which it was created.
-
Restoring a backup requires a full restart of the PostgreSQL server.
-
Backup and restore are only possible for the entire server—you cannot work with individual tables, schemas, or databases.
-
When restoring, PostgreSQL settings will also be overwritten (the
postgresql.confconfiguration file is located in the data directory).
Backup Tools
To perform backups, you need two utilities: pg_basebackup.exe and pg_combinebackup.exe.
Both tools are located in the PostgreSQL bin directory. For PostgreSQL 17, the default path is as follows:
C:\Program Files\PostgreSQL\17\bin
To use these utilities, you need to navigate to this directory in the console. However, you can add this path to the PATH environment variable, and then the utilities pg_basebackup.exe and pg_combinebackup.exe can be run from anywhere. See how to do this in this article.
Preparation
In order to perform incremental backups in PostgreSQL, you need to set a specific parameter in the postgresql.conf file and restart the PostgreSQL service.
summarize_wal = on
Detailed instruction on how to enable the summarize_wal parameter in PostgreSQL. This must be done before creating the first base (full) backup.
To avoid entering the password each time, it’s convenient to set the PGPASSWORD environment variable:
set PGPASSWORD=<your password>
Base (Full) backup
A base backup is created using the following command:
pg_basebackup.exe --username=postgres --pgdata=D:\backups\postgresql\base
Parameters:
-
--username– The username used to connect (the password for this user is specified in thePGPASSWORDenvironment variable). -
--pgdata– The path to an empty directory where the full backup will be created.
The output directory will essentially contain a copy of the PostgreSQL data directory. However, it will also include a backup_manifest file, which is required to create the first incremental backup.
First Incremental backup
To create an incremental backup, you must specify the path to the backup_manifest file from the previous full backup:
pg_basebackup.exe -U postgres --pgdata=D:\backups\postgresql\inc1 --incremental=D:\backups\postgresql\base\backup_manifest
Parameters:
-
--username– The username used to connect (the password is specified in thePGPASSWORDenvironment variable). -
--incremental– Indicates that an incremental backup should be created. This parameter must point to thebackup_manifestfile from the previous base (full) backup. -
--pgdata– The path to an empty directory where the backup will be created.
Subsequent Incremental backups
Each subsequent incremental backup is created in the same way as the first one. However, in the --incremental parameter, you must specify the path to the backup_manifest file from the most recent incremental backup.
pg_basebackup.exe -U postgres --pgdata=D:\backups\postgresql\inc2 --incremental=D:\backups\postgresql\inc1\backup_manifest
pg_basebackup.exe -U postgres --pgdata=D:\backups\postgresql\inc3 --incremental=D:\backups\postgresql\inc2\backup_manifest
pg_basebackup.exe -U postgres --pgdata=D:\backups\postgresql\inc4 --incremental=D:\backups\postgresql\inc3\backup_manifest
This process can be repeated as many times as needed, with each new incremental backup pointing to the backup_manifest of the most recent previous backup.
⚠️ Note: Make sure to keep the entire chain of backups (full + all incremental) intact—deleting any one of them will make restoration impossible.
Next, let’s look at how to restore a PostgreSQL server using these backups.
Restore
1. The first step in the restore process is to stop the PostgreSQL server.

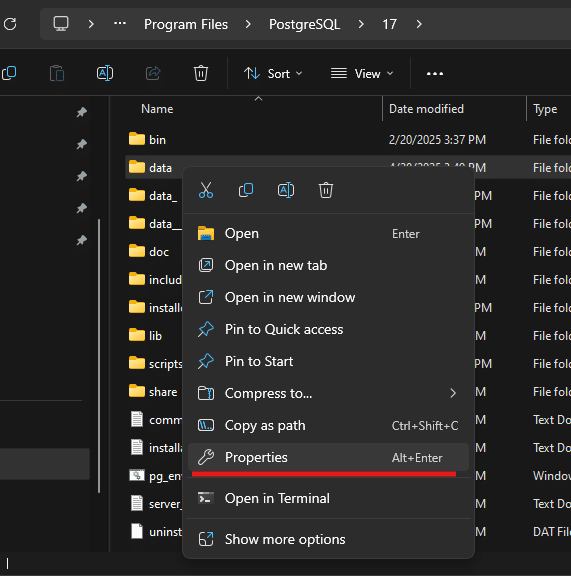
Then, you need to either move or delete the existing data from the directory: C:\Program Files\PostgreSQL\17\data
To perform the restore, you need to combine all backups using the pg_combinebackup utility. This is done with a single command. If you’re restoring directly into the pgdata directory, you will most likely need to run the command as Administrator:
C:\Program Files\PostgreSQL\17\bin>pg_combinebackup.exe --output="c:\Program Files\PostgreSQL\17\data" "c:\temp\pg\base\" "c:\temp\pg\inc1\" "c:\temp\pg\inc2\" "c:\temp\pg\inc3\" "c:\temp\pg\inc4\"
Parameters:
-
--output– The data directory where the backup will be restored. You can restore directly toC:\Program Files\PostgreSQL\17\dataif it is empty.
After this parameter, provide the list of paths to the base and incremental backups, in order.
2. You need to specify the restore_command in the postgresql.conf file (located at C:\Program Files\PostgreSQL\17\data):
restore_command = 'copy "%p" "%p"'
This command defines how WAL files should be retrieved during the restore process. However, since all WAL files are already located in the pg_wal directory, there is no need to move anything. Therefore, the copy command simply copies the files to themselves.
3. To let the PostgreSQL server know that it is in recovery mode, you need to create an empty file named: restore.signal. Place it in the directory: C:\Program Files\PostgreSQL\17\data.
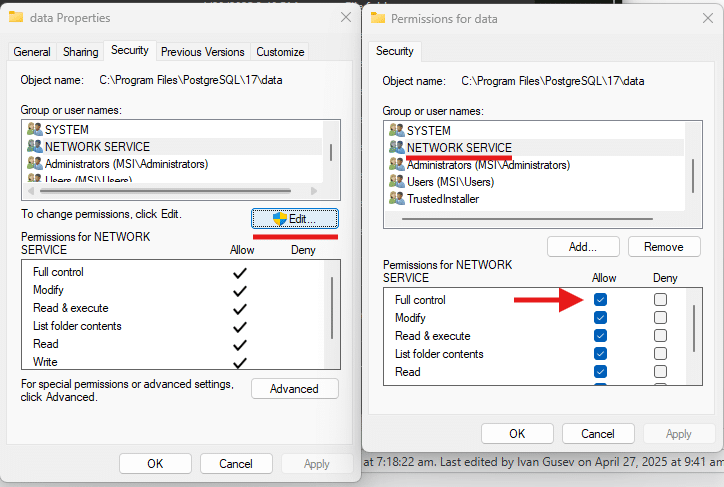
4. Make sure the permissions on the pgdata directory are correct. The simplest way is to reassign them manually to ensure the PostgreSQL server account has the necessary access:
By default, on Windows, the PostgreSQL server runs under the NETWORK SERVICE user. Grant this user Full Control permissions on the pgdata directory.
If this permission is already enabled, uncheck and then re-check the Full Control box, and click OK:
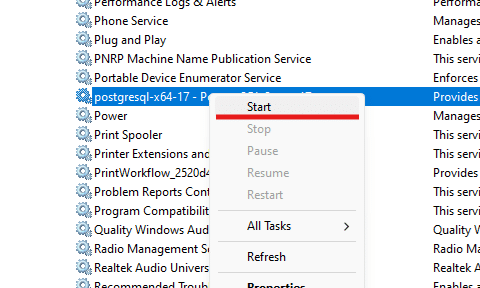
5. After completing all the steps above, you can start the PostgreSQL server and connect to it as usual:
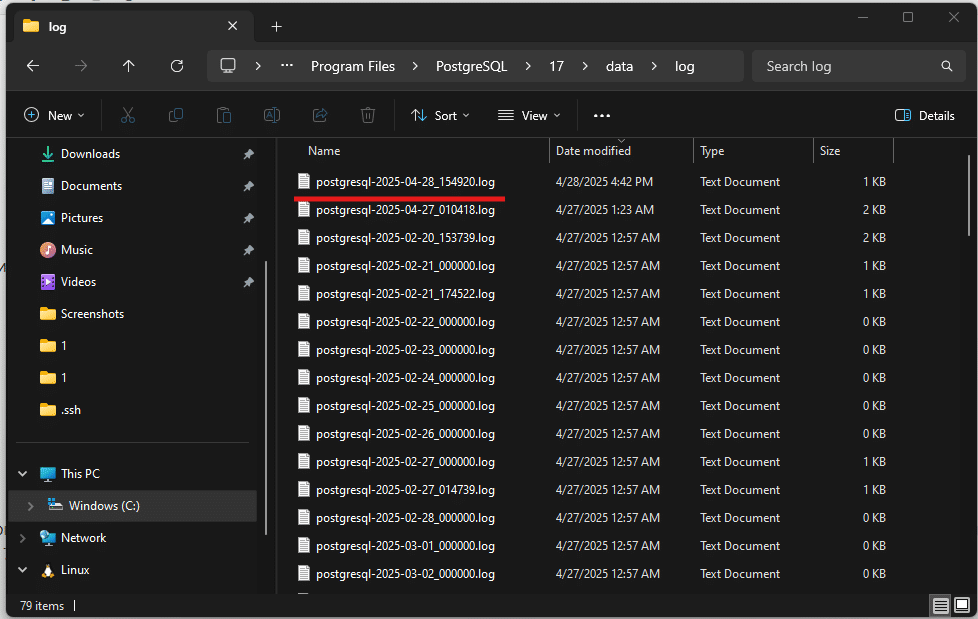
6. If you can successfully connect to the server, the restoration was completed successfully. However, if the PostgreSQL service fails to start, you should check the logs.
The logs are located in: C:\Program Files\PostgreSQL\17\data\log. Sort the files by date and review the latest log file to identify the issue:
🆕 Incremental backup support in SQLBackupAndFTP (Alpha Version)
We’ve added support for PostgreSQL 17 incremental backups in a new version of SQLBackupAndFTP.
🔗 Download the SQLBackupAndFTP with PostgreSQL 17 incremental backups support:
https://sqlbackupandftp.com/download
You can install it over your existing version — all your settings will be preserved.
Configuration steps
To use incremental backups with PostgreSQL 17, make sure WAL summarization is enabled on your PostgreSQL server.
See detailed instructions here: https://blog2.sqlbak.com/how-to-enable-wa…on-in-postgresql/
1. Connecting to your PostgreSQL server
When setting up your backup job, choose PostgreSQL Server (Physical backup) as the server connection type:
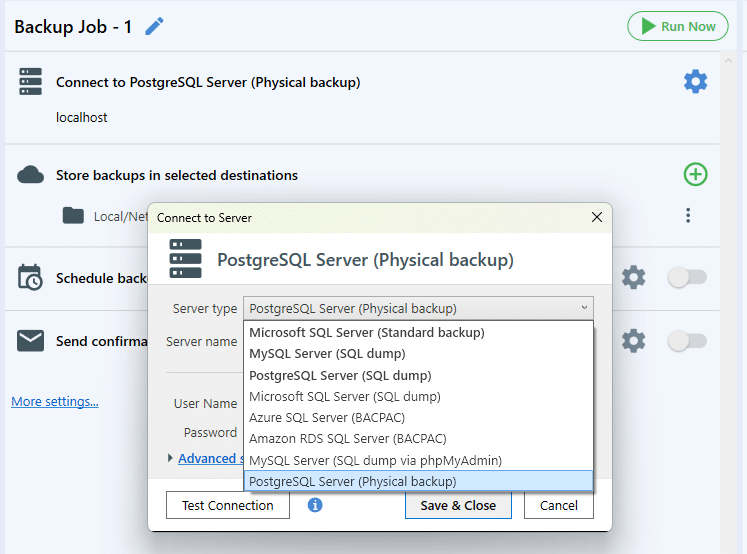
In the connection window, specify:
-
Server name (default:
localhost) -
Port (default:
5432) -
Username and Password
Once filled in, click Test Connection and save the settings.
More details here: https://sqlbackupandftp.com/docs/docs/job-settings/backup-job/connection-settings/postgresql/
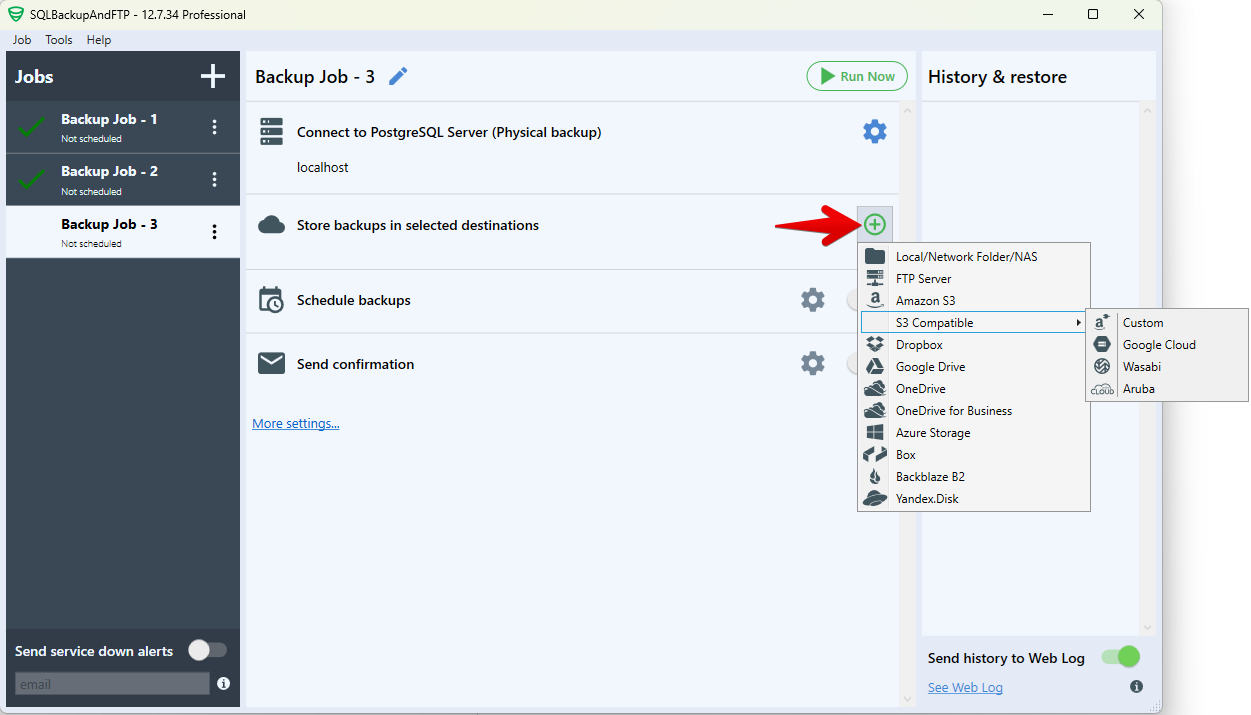
SQLBackupAndFTP allows you to store backups in multiple locations, including:
-
Cloud storage: Amazon S3, S3 Compatible, Dropbox, OneDrive, OneDrive for Business, Azure Storage, Box, Backblaze B2
-
FTP/SFTP servers
-
Local or Network folders/NAS
To add a destination:
-
Click the “+” icon under the Store backups in selected destinations section.
-
Choose your preferred storage option.
You can configure:
-
Multiple destinations
-
Retention policy for old backups
-
Backup type selection (e.g., full only, incremental only)
-
Emergency destination for failover
More about destinations setup find: https://sqlbackupandftp.com/docs/docs/job-settings/backup-job/destinations/
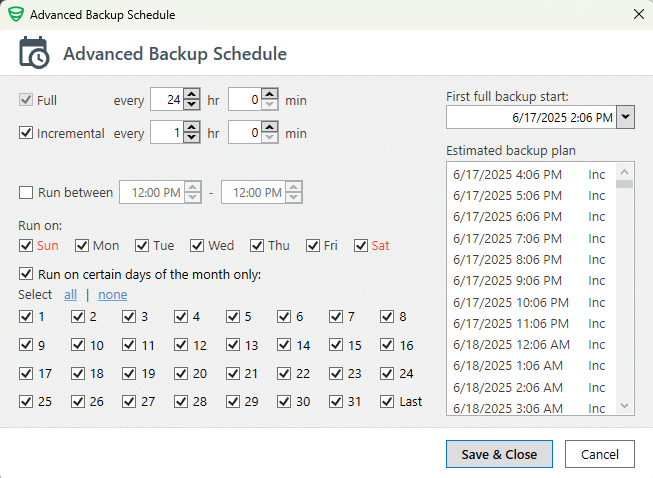
To automate your backups:
-
Enable the Schedule backups option.
-
Click the gear icon next to it to open advanced scheduling options.

You can configure:
-
Backup types (FULL & INCREMENTAL) and their specific time intervals
-
Run between time windows
-
Days of the week or month to run the job
-
First backup start time
Use the Estimate backup plan section to preview the backup schedule and confirm everything is correctly configured.
For further configuration options, see the documentation: https://sqlbackupandftp.com/docs/docs/job-settings/backup-job/connection-settings/postgresql/
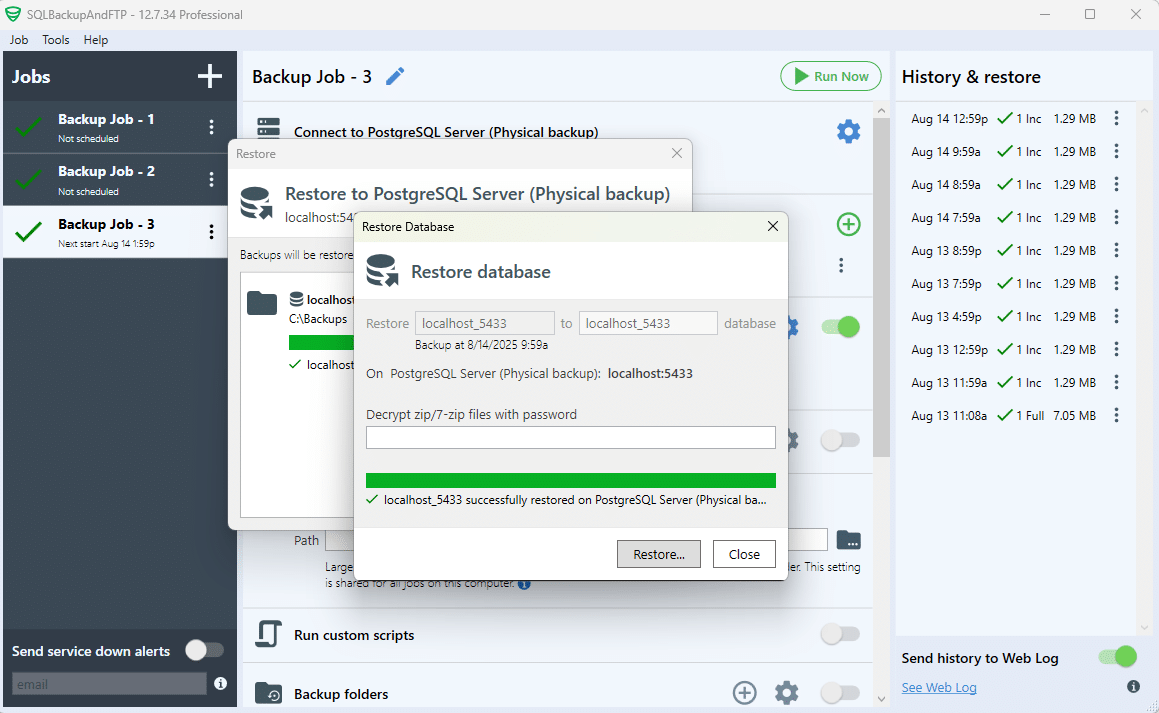
How to restore the PostgreSQL database using SQLBackupAndFTP
SQLBackupAndFTP provides two easy ways to restore your backups:
Option 1: Restore from history
If the backup was created with SQLBackupAndFTP:
-
Go to the “History & Restore” panel
-
Find your backup
-
Click the ⋮ (three dots) → Restore from backup
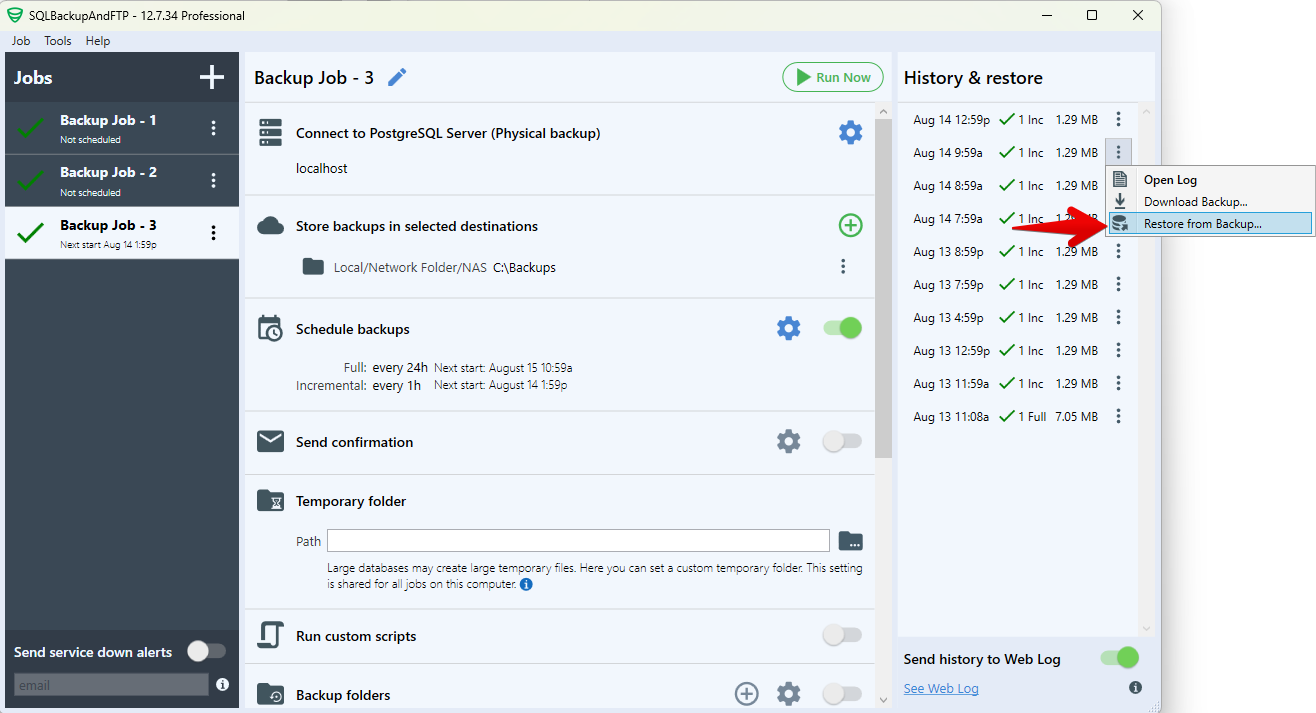
You’ll be able to:
-
Select the database and destination
-
Change the target database name (optional)
-
Enter archive password (if set)
Option 2: Use a Restore Job
If the backup was created externally (e.g. via pg_dump), use the Restore Job option from the main screen to upload and restore manually. See step-by-step instructions here: https://sqlbackupandftp.com/docs/docs/job-settings/restore-job/