SqlBak has an API that allows it to integrate with other applications and services.
This article explains how to integrate SqlBak and Zabbix.
Sending job results to Zabbix
1. Export the template to Zabbix. It contains items for job results (status, date, backup type).
- Create a JSON file with the following content:
{
    "zabbix_export": {
        "version": "7.0",
        "template_groups": [
            {
                "uuid": "a571c0d144b14fd4a87a9d9b2aa9fcd6",
                "name": "Templates/Applications"
            }
        ],
        "templates": [
            {
                "uuid": "fb9a8d93479048efacce5da3198a513e",
                "template": "SqlBak Success  Failed",
                "name": "SqlBak",
                "groups": [
                    {
                        "name": "Templates/Applications"
                    }
                ],
                "items": [
                    {
                        "uuid": "c3f591104a4a4146af8e62627c28ad53",
                        "name": "SqlBak Job Status",
                        "type": "TRAP",
                        "key": "sqlbak.job.result",
                        "delay": "0",
                        "trends": "0",
                        "value_type": "CHAR",
                        "description": "Item for tracking the results of the last backup via SqlBak. Use the zabbix_sender utility in the backup job trigger to set this value.",
                        "triggers": [
                            {
                                "uuid": "2eed1a227d0248a196f0aa5e9ff96113",
                                "expression": "last(/SqlBak Success  Failed/sqlbak.job.result)=\"Failed\"",
                                "name": "SQL Backup Job Failed",
                                "priority": "HIGH",
                                "description": "This trigger is activated when an SqlBak Backup job fails. It monitors the result of the SQLBak job and generates a high severity event if the job result is \"Failed\". This helps in promptly identifying and addressing backup issues to ensure data protection."
                            }
                        ]
                    },
                    {
                        "uuid": "f519190234a5486fa7bc0a25daa27adf",
                        "name": "SqlBak Job SqlBackupType",
                        "type": "TRAP",
                        "key": "sqlbak.job.sqlbackuptype",
                        "delay": "0",
                        "trends": "0",
                        "value_type": "CHAR",
                        "description": "Item for tracking the sql-type of the last backup via SqlBak. Use the zabbix_sender utility in the backup job trigger to set this value."
                    },
                    {
                        "uuid": "b3a1d21165a74dc6bc7e2d6d52ce467d",
                        "name": "SqlBak Job Timestamp",
                        "type": "TRAP",
                        "key": "sqlbak.job.timestamp",
                        "delay": "0",
                        "trends": "0",
                        "value_type": "CHAR",
                        "description": "Item for tracking the date of the last backup via SqlBak. Use the zabbix_sender utility in the backup job trigger to set this value."
                    }
                ]
            }
        ]
    }
}
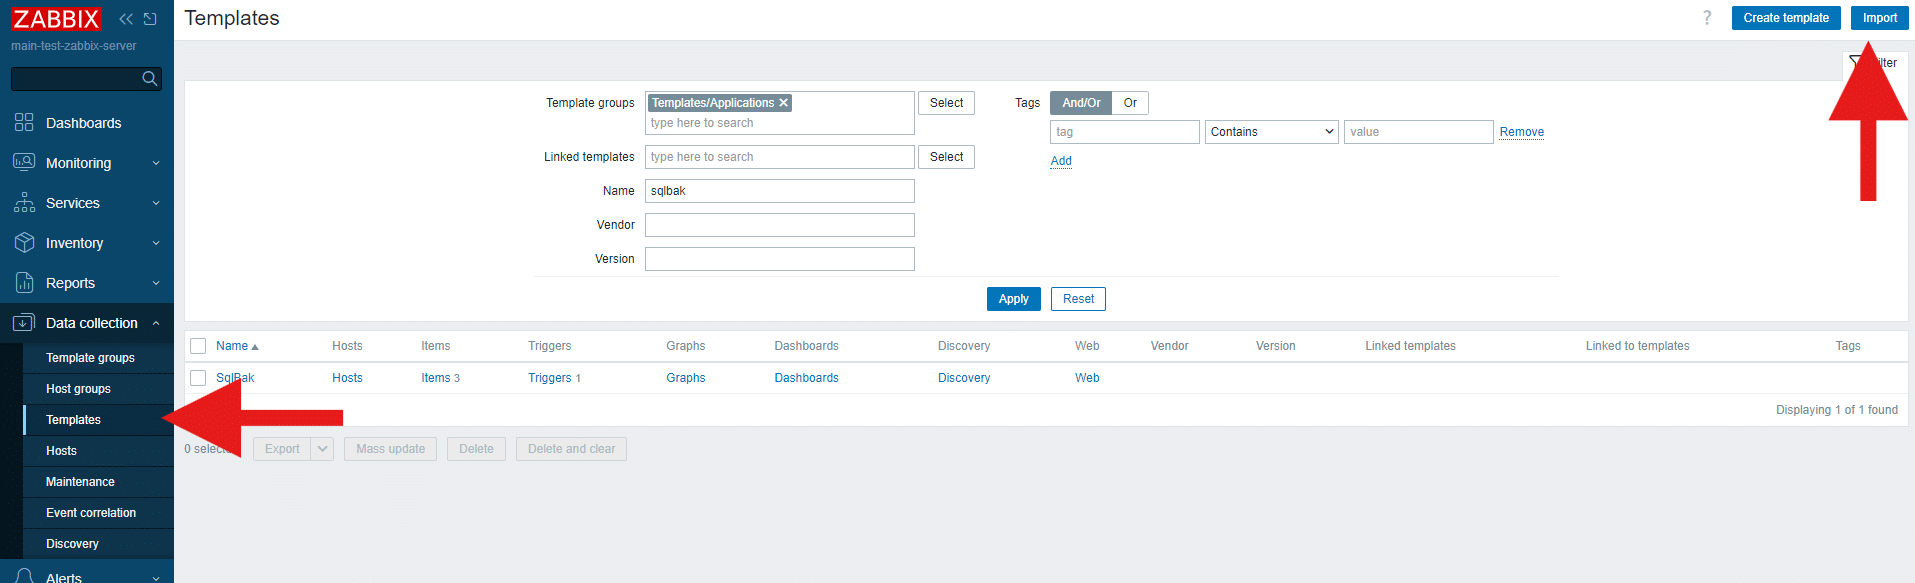
- Import the file in the Templates section:
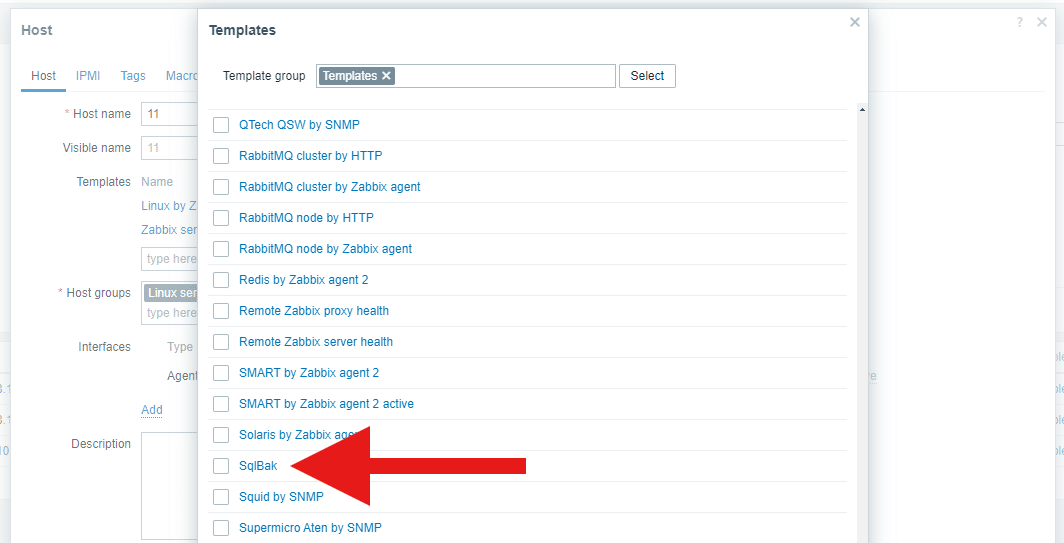
2. Add the template to the host in the host settings:
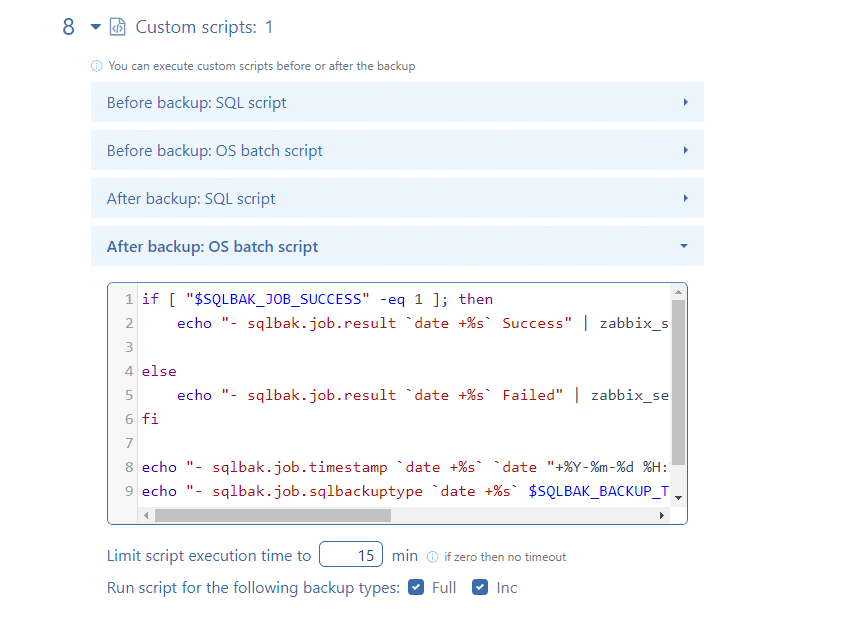
3. In the backup job, add an after-backup script that will send data to Zabbix using the zabbix_sender utility (which can be downloaded from the official Zabbix website):
if [ "$SQLBAK_JOB_SUCCESS" -eq 1 ]; then
    echo "- sqlbak.job.result `date +%s` Success" | zabbix_sender -c /etc/zabbix/zabbix_agent2.conf -T -i  -

else
    echo "- sqlbak.job.result `date +%s` Failed" | zabbix_sender -c /etc/zabbix/zabbix_agent2.conf -T -i  -
fi

echo "- sqlbak.job.timestamp `date +%s` `date "+%Y-%m-%d %H:%M:%S"`" | zabbix_sender -c /etc/zabbix/zabbix_agent2.conf -T -i  -
echo "- sqlbak.job.sqlbackuptype `date +%s` $SQLBAK_BACKUP_TYPE" | zabbix_sender -c /etc/zabbix/zabbix_agent2.conf -T -i  -
This will allow you to add information about the latest backups to the dashboard:
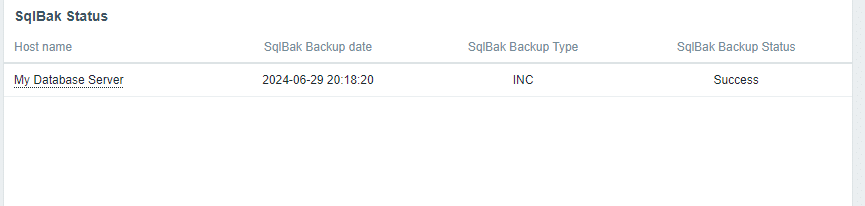
Additionally, in case of a backup job failure, notifications will be displayed in the Current Problems section on the dashboard:

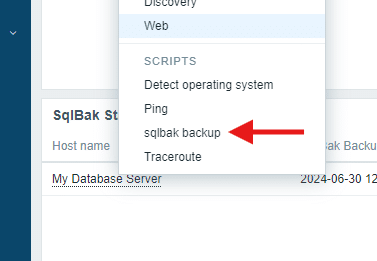
Starting a backup job from Zabbix
To initiate a backup job from Zabbix, you can add a script that will start the backup job, like this:
sudo sqlbak -rj > /dev/null 2>&1 &
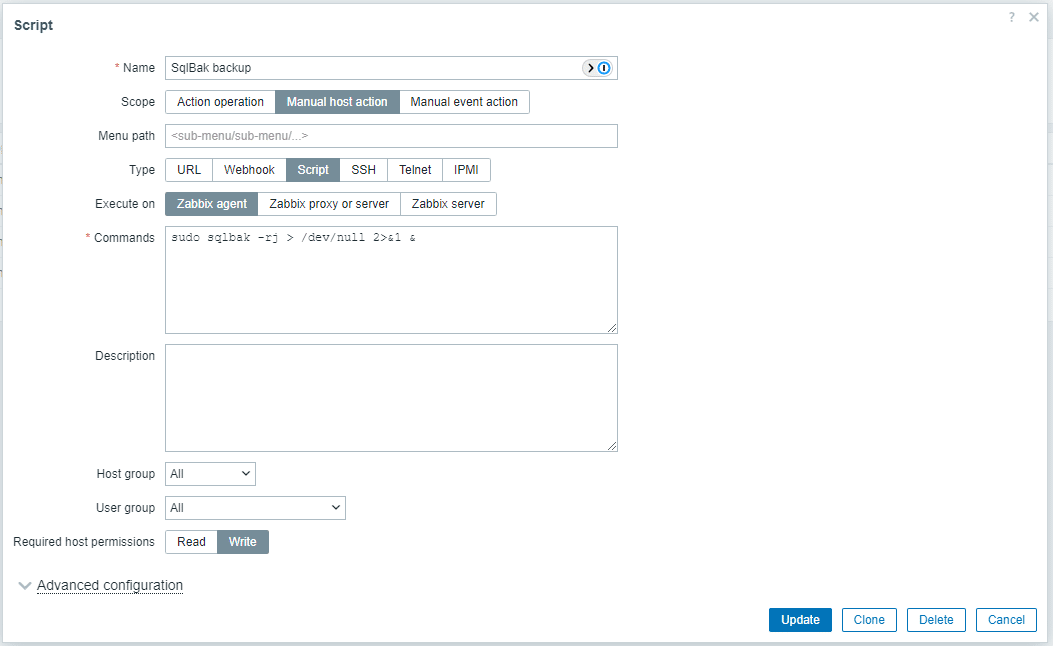
EnableGlobalScripts=1
And in the agent configuration (/etc/zabbix/zabbix_agent2.conf), specify the same command to start the backup job:
AllowKey=system.run[sudo sqlbak -rj > /dev/null 2>&1 &]
Now you can start the backup job simply by selecting the corresponding script when clicking on the host: