This article looks at different ways to back up SQL Server, from classic and conventional to exotic and situational.
But first, a few words of theory.
Backup types
SQL Server supports the following backup types:
Logical. Data is stored in an open format, for example, as an SQL script to recreate database objects and fill them with data. Such backups take longer, but you can view and modify them before restoring.
Physical. Data in the backup is in the same format that the database stores on the disk. Such backups are usually created and restored much faster because it is just copying data without transformations, but you will not be able to change something before restoring.
Hot. A backup is done without stopping the database. Very useful in a production environment.
Incremental backups contain only the data that has changed since the last Full or incremental backup. This greatly reduces the size of the backup.
Partial. The backup does not contain all the data from the database, but only the specified schema or table. Useful if the database contains a lot of data that does not need to be backed up (temporary data, logs).
Let’s take a closer look at what tools can be used to make such backups in SQL Server.
The main way to create backups
SQL Server can create hot physical backups. Such backups are fast and do not burden SQL Server. The result of such a backup is a file with the .bak extension on a local disk or in a network folder.
By SQL
Open SQL Server Management Studio and run the following command:
BACKUP DATABASE [AdventureWorks] TO DISK = 'C:\Backup\AdventureWorks.bak'
To restore data, run this command:
RESTORE DATABASE [AdventureWorks] FROM DISK = 'C:\Backup\AdventureWorks.bak'
By user interface
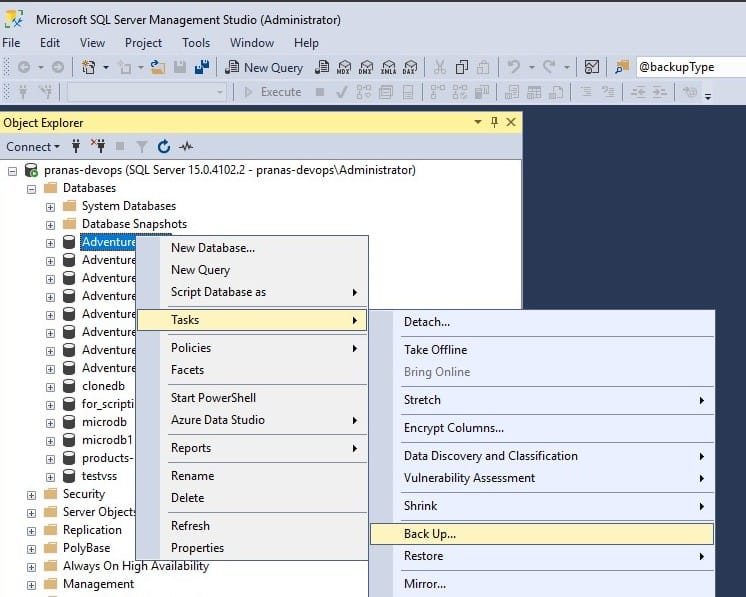
The main SQL Server administration tool is SQL Server Management Studio (SSMS). Creating a backup in it is easy:
Right-click on the database, then go to Tasks ⇒ Back Up…
In the next window, select the directory where you want to save the backup. Click the “Remove” button to remove the default path to the backup file, and then “Add” and select a directory.
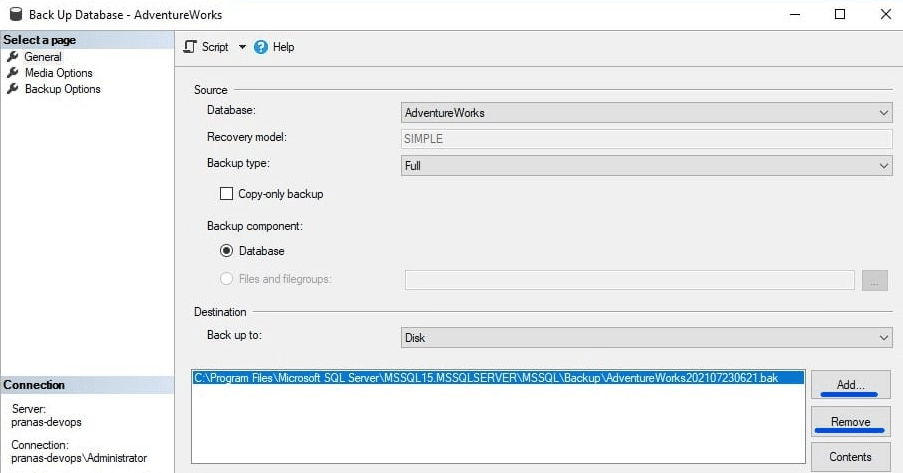
Please note that if you connect to an SQL server using a login and password, then the NT Service\MSSQLSERVER user must have write permissions to this directory.
This window has three tabs — General, Media Options, Backup Options. Explore them to understand what options are there. For example, on the last tab, you can turn on compression, so the backup file will be compressed on the go. This significantly reduces the size of the backup, while significantly increasing the load on the SQL Server.
By SQLBackupAndFTP
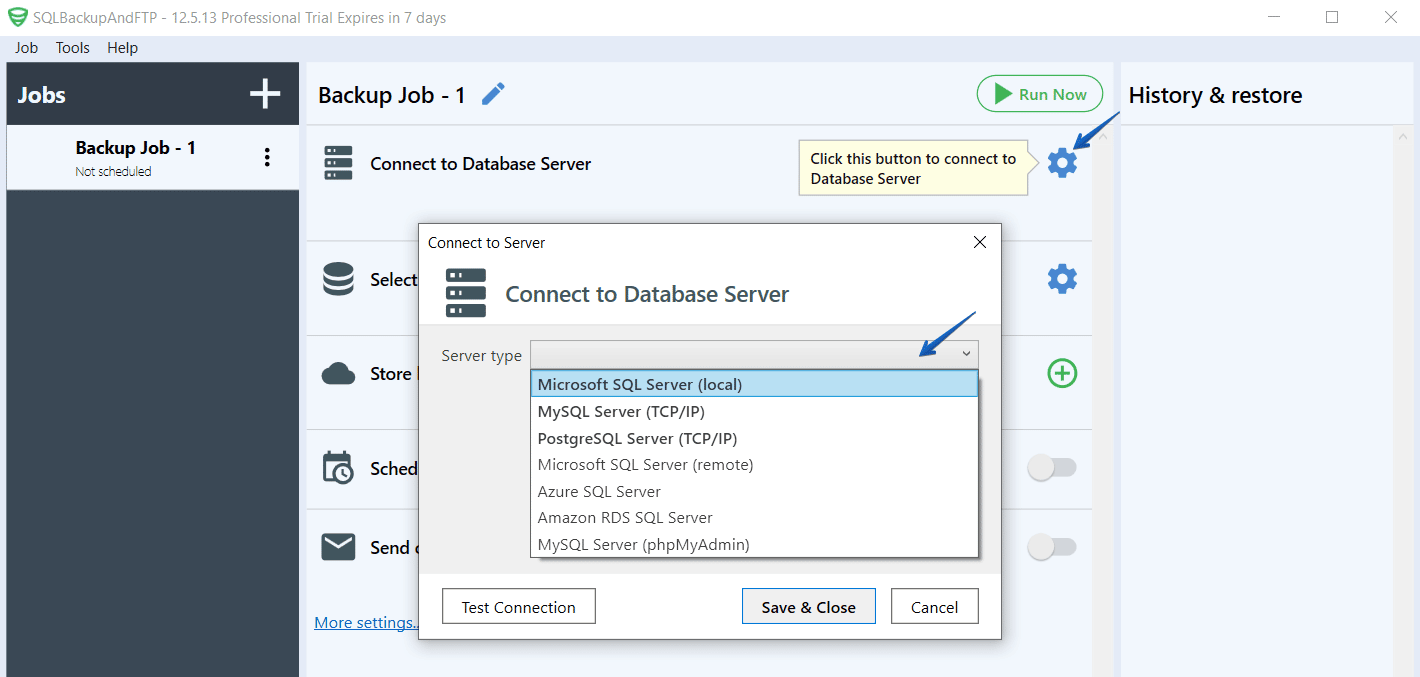
SQLBackupAndFTP is a popular backup utility. This utility creates databases backups and immediately sends them to the cloud storage on a selected schedule. The interface of the tool is very simple, and in order to configure the entire backup process, you do not need to know the SQL language, batch or PowerShell scripts.
Download and install SQLBackupAndFTP. Once the application is installed, launch it and set the connection to your SQL Server. It can be done at the “Connect to Database Server” section by clicking the gear icon. Choose “Microsoft SQL Server (local)” as your server type and use your credentials to connect.
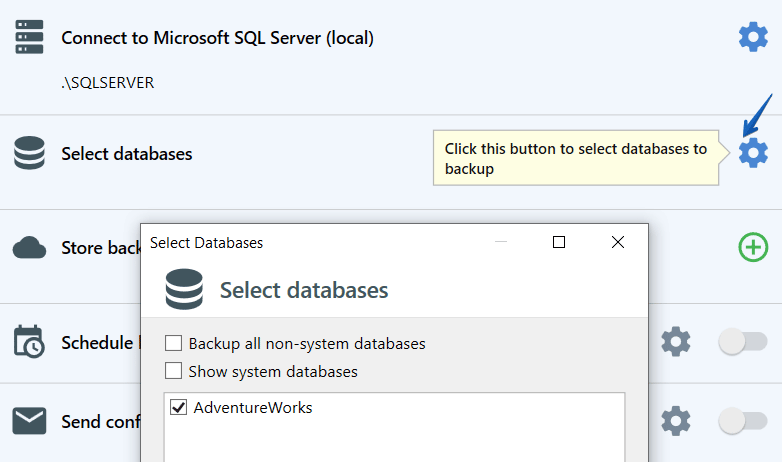
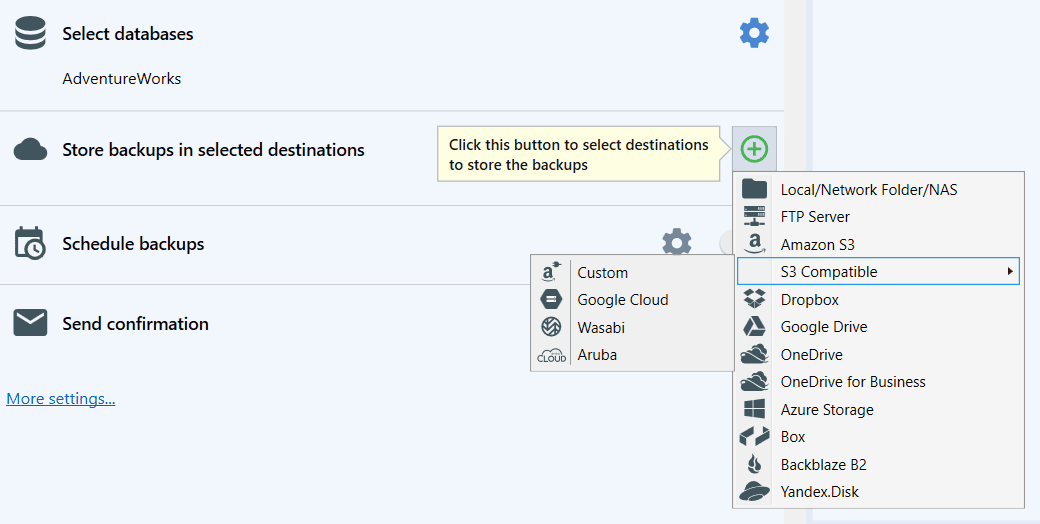
The next step is to choose the databases you need to backup. It can be done at the “Select databases” section
Now choose a place where the backups should be stored. Note, that you can specify multiple destinations.
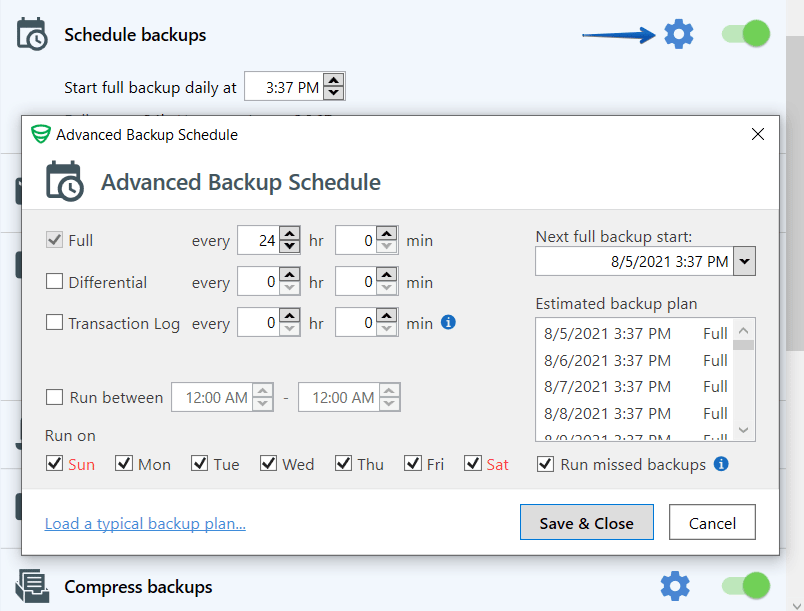
Set a backup schedule. The advanced settings can be found by clicking the “gear” icon in the “Schedule backups” section.
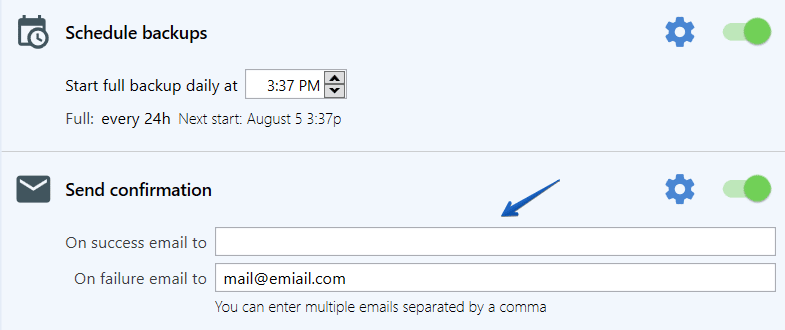
If you prefer to get email notifications if a backup job failed or was successful, specify your email or emails into the appropriate boxes in the “Send confirmation” section.
That’s it, your backup job is ready and will be run according to the specified schedule. You can also set compression and encryption for your backups, add custom scripts before or after the backups, and many other options.
By Command Line
You can run backup and restore commands from the command line using the sqlcmd utility. This utility is installed with SQL Server.
sqlcmd -U sa -P "my-secret-password" -Q "BACKUP DATABASE [AdventureWorks] TO DISK = 'C:\Backup\AdventureWorks.bak'"
Use the following command to restore your backup:
sqlcmd -U sa -P "my-secret-password" -Q "RESTORE DATABASE [AdventureWorks] FROM DISK = 'C:\Backup\AdventureWorks.bak'"
Running through the command line can be especially useful in backup automation scripts.
A few words about incremental backups
The main advantage of incremental backups is that they can be done much more frequently. They take up little space and do not overload the server. The more often you make backups, the more restoration points you have.
There are two types of incremental backups in SQL Server: differential and transaction log backups.
Before creating an incremental backup, you need to make a full backup.
BACKUP DATABASE [AdventureWorks] TO DISK = N'D:\Backups\full.bak'
A differential backup contains only the data that has changed since the last full backup. To create a differential backup, run the following command:
BACKUP DATABASE [AdventureWorks] TO DISK = N'D:\Backups\diff.bak' WITH DIFFERENTIAL
To restore a differential backup, you first need to restore the full backup with the NO RECOVERY option, and then the differential backup.
RESTORE DATABASE [AdventureWorks] FROM DISK = N'D:\Backups\full.bak' WITH REPLACE, NORECOVERY
RESTORE DATABASE [AdventureWorks] FROM DISK = N'D:\Backups\diff.bak' WITH RECOVERY
Transaction log backups contain only what has changed after the creation of the previous transaction log backup or a full backup.
BACKUP LOG [AdventureWorks] TO DISK = N'D:\Backups\log1.bak'
You can make some changes to the database, and do the log backup again:
BACKUP LOG [AdventureWorks] TO DISK = N'D:\Backups\log2.bak'
To restore a backup from the log2.bak file, you will also need the log1.bak and full.bak files:
RESTORE DATABASE [AdventureWorks] FROM DISK = N'D:\Backups\full.bak' WITH REPLACE, NORECOVERY
RESTORE DATABASE [AdventureWorks] FROM DISK = N'D:\Backups\log1.bak' WITH NORECOVERY
RESTORE DATABASE [AdventureWorks] FROM DISK = N'D:\Backups\log2.bak' WITH RECOVERY
To create a transaction log backup, the Recovery Model of the database must be set to Full.
Incremental backups can be created not only through SQL commands but also through the SQL Server Management Studio user interface or SqlBackupAndFtp
Alternative ways to back up your data
Backup via SQL’s BACKUP DATABASE command is fast and does not load the database. However, in some cases it is not possible:
- It is not possible to back up a remote server. More precisely, you can perform a backup, but to access the file, you need to have access to the server file system.
- The resulting backup is not in an open format, and cannot be viewed or edited until it is restored.
- To create a database backup, you must be able to log in to SQL Server, as well as have privileges to back up the database.
Export Data-Tier Application
Data-Tier Application is a stand-alone unit of database deployment that contains all database definitions such as a table, view, users, etc. As a result of an export, you get an archive with a set of XML files. This functionality is primarily intended for transferring data between different SQL servers. However, this feature can also be used to create a compressed logical backup.
You can select which objects you want to add to the backup. This way you can use export for partial backup.
Important note. Export Data-Tier Application is not executed within a single transaction. Therefore, the data may be exported in an inconsistent state, for example, a record in a table may reference a foreign key that is not available in another table. To avoid this, it is advisable to take a snapshot of the database before exporting.
CREATE DATABASE [AdventureWorks_Snapshot] ON (NAME = AdventureWorks_data, FILENAME = 'd:\Backups\AdventureWorks2017.snap') AS SNAPSHOT OF [AdventureWorks]
A snapshot is not a physical copy of a database. Immediately after creation, the snapshot will take up almost no space. But it will grow every time the original database changes. After you have finished export, delete the snapshot.
By SQL Server Management Studio
The simplest way to execute Export Data-Tier Application is through SSMS user interface.
- Right-click the database
- Tasks ⇒ Export Data Tier Application
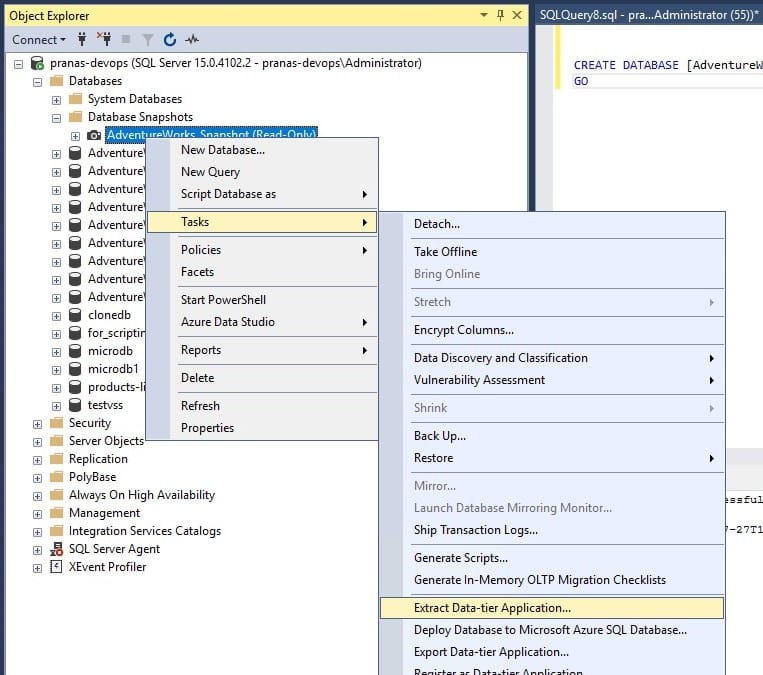
Exporting a Data-Tier Application in SQL Server Management Studio - On the second tab, specify the path to the file to save the data
- Optional: on the Advanced tab, you can select specific tables for backup
- Click “Next” and then “Finish”
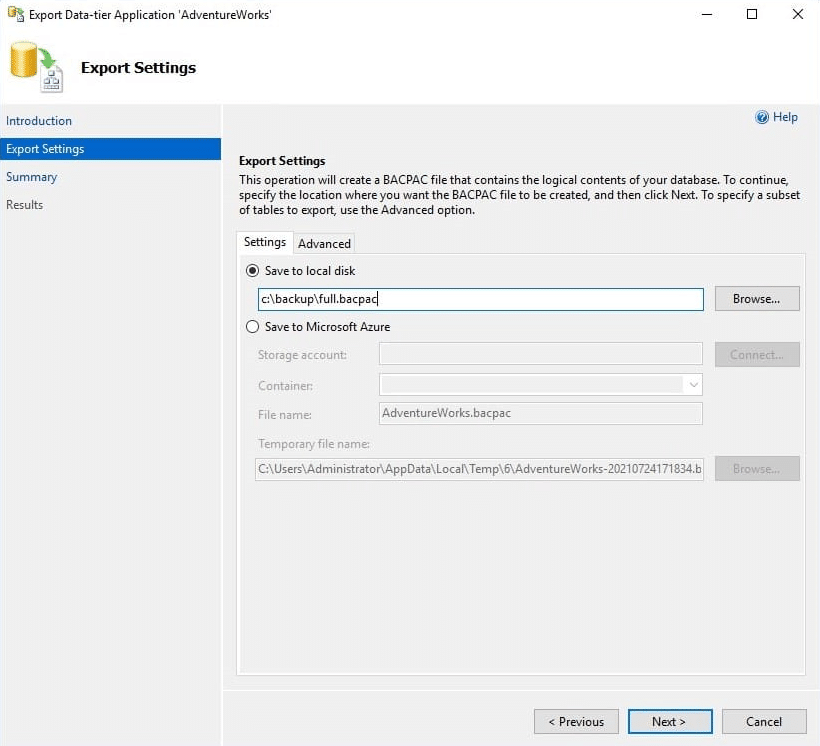
Configuring the Export Data-Tier Application in SQL Server Management Studio
To restore, right-click on “Databases” and select “Import Data-Tier Application.”
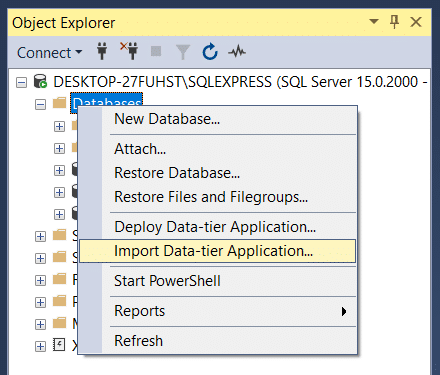
In the window that opens, specify the path to the .bacpac file.
By sqlpackage.exe
An alternative way to perform an export data-tier application is to use the sqlpackage.exe utility. It can be downloaded from the official website.
To export the database, run the following command:
sqlpackage.exe /TargetFile:"d:\Backups\export.bacpac" /Action:Export /SourceServerName:"localhost" /SourceDatabaseName:"AdventureWorks" /SourceUser:"sa" /SourcePassword:"my-secret-password"
You can also restore data from .bacpac via sqlpackage
c:\utils\sqlpackage.exe /SourceFile:"d:\Backups\export.bacpac" /Action:Import /TargetServerName:"." /TargetDatabaseName:"target-database" /TargetUser:"sa" /TargetPassword:"my-password"
Do not forget to delete the snapshot after the backup is completed:
DROP DATABASE [AdventureWorks_Snapshot]
Generate SQL script
In MySQL and PostgreSQL, the main way to create a backup is to generate an SQL script to recreate the database. SQL Server also has such a method, although it is not the main one.
Script generation is not a transactionally consistent operation, so you need to create a temporary snapshot as described above.
By SQL Server Management Studio
- Right-click the database
- Tasks ⇒ Generate scripts…
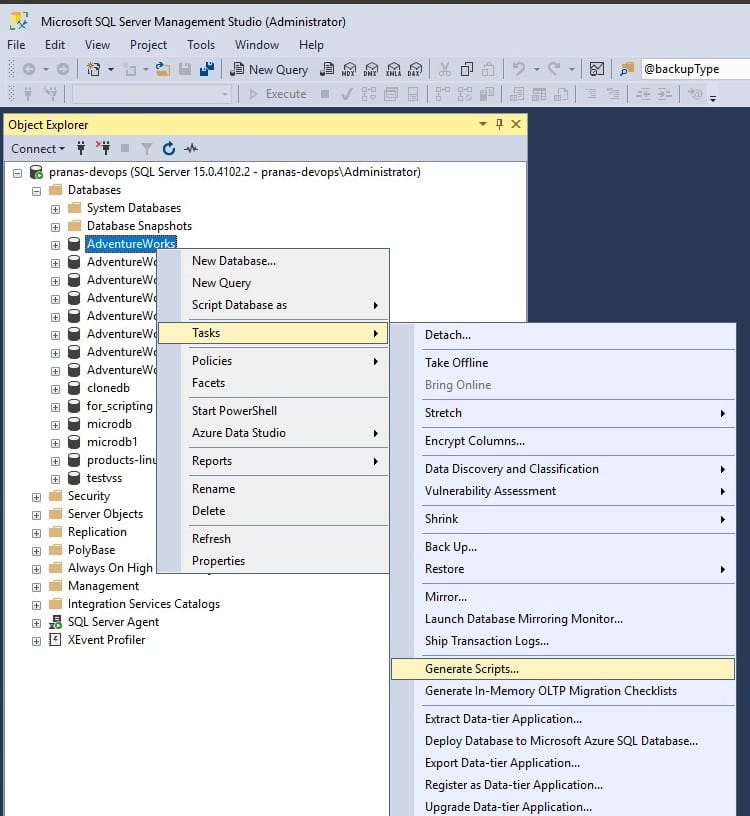
Steps to generate SQL script from SSMS: Right-click the database, go to Tasks, then Generate scripts… - On the third tab, specify the path to the saved file, go to advanced options and specify the Types of Data Script in the Schema and Data value
- Then click Next ⇒ Next ⇒ Finish
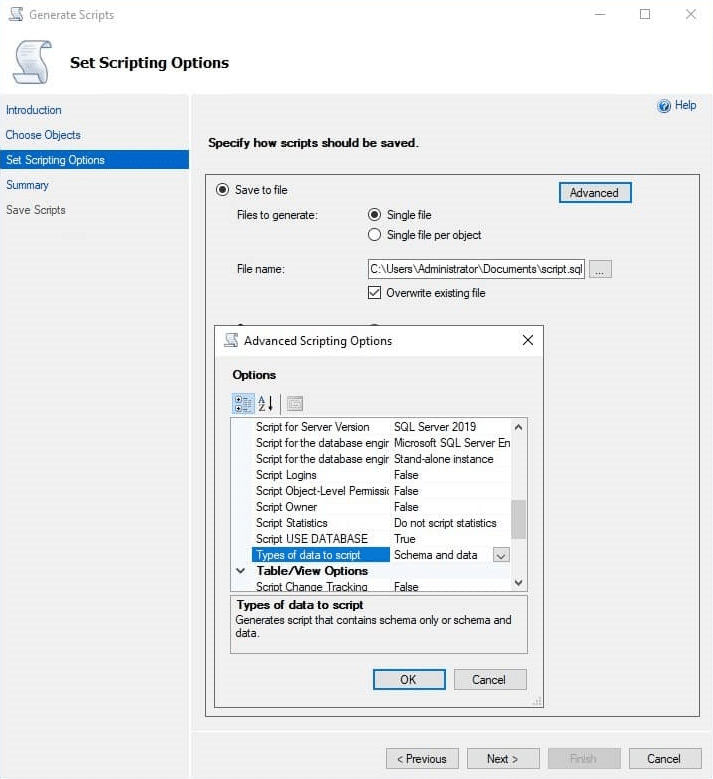
Specify the file path and set the script types in SSMS
If you created a snapshot for a transactionally consistent backup, be sure to delete it.
By mssql-scripter
You can also generate an SQL script through the command line, for this, you need to use the mssql-scripter utility.
This is a Python package installed via pip. You can download the python installer here, and you can check out how to install the package on GitHub.
To create a backup, run the following command:
py -m mssqlscripter -S localhost -d AdventureWorks --schema-and-data -f d:\Backups\AdventureWorks.sql
How to restore SQL Script
If the resulting script is not large, you can restore it using SSMS by simply copying it into the SQL editor window. However, a text editor is not designed to run large scripts. Instead of an editor, you can run a backup using the sqlcmd utility.
sqlcmd -i d:\Backups\AdventureWorks.sql
File or Volume backup
At the level of a file system, a database is a collection of files. If you copy these files to the backup storage, they can be used to restore the state of the database at the time of copying.
You cannot just copy the file of the active database, it will be damaged. However, this problem can be solved. Windows has a Volume Shadow Copy service that helps the external backup service notify the software about the start of the backup, so the program can free the file it needs for the backup. For this trick to work, it is necessary that both the program that works with the file and the program that makes the backup be able to integrate with Volume Shadow Copy. SQL Server supports Volume Shadow Copy, and most file backup services do too.
By Windows Server Backup
As an example, consider backing up your database files with Windows Server Backup (WSB). The program is part of the Windows server. It is not connected by default. You can enable it via Add Roles and Feature.
Before creating a backup, you need to understand what files the database consists of. To do it, go to SQL Server Management Studio and right-click on the database, and select Properties.
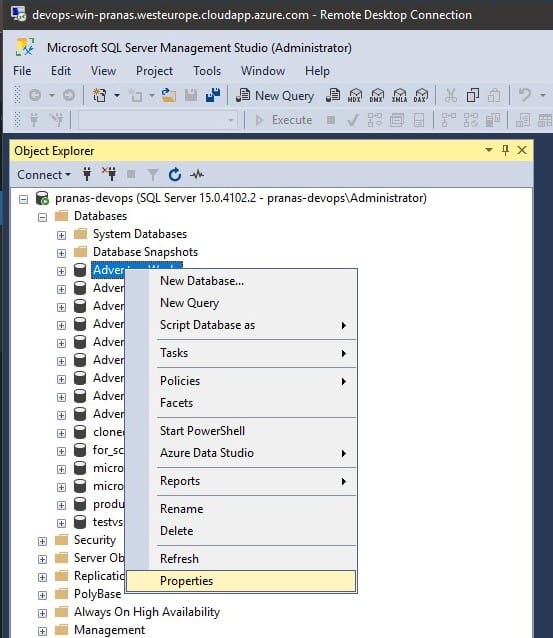
In the window, go to the Files section. At the end of the table, there will be paths to the database files.
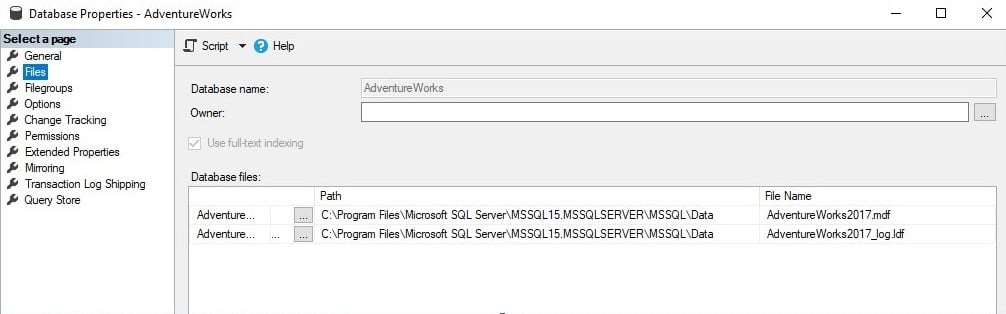
These files will need to be included in the backup.
To open the Windows server backup management interface, press win + r and type wbadmin.msc
- Click “Backup Once.”
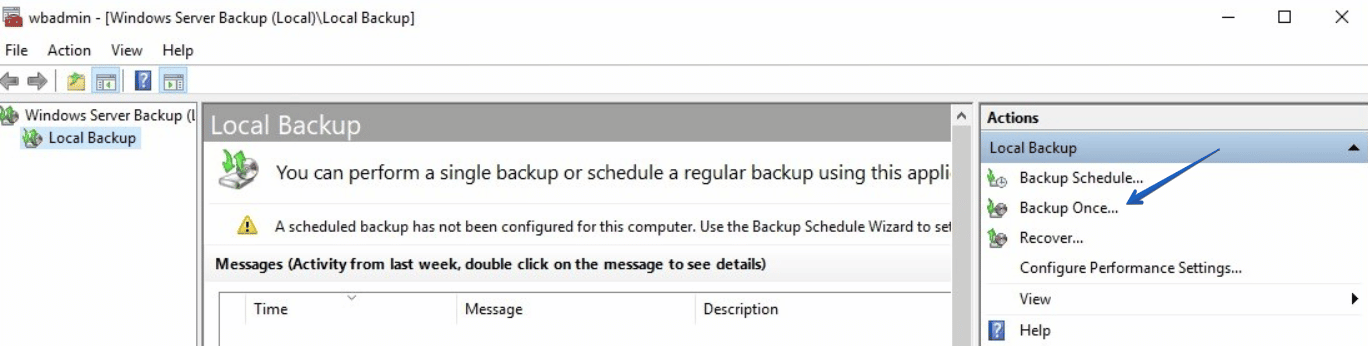
In the Windows Server Backup management interface, click “Backup Once” to start a one-time backup - Select “Different Options.”
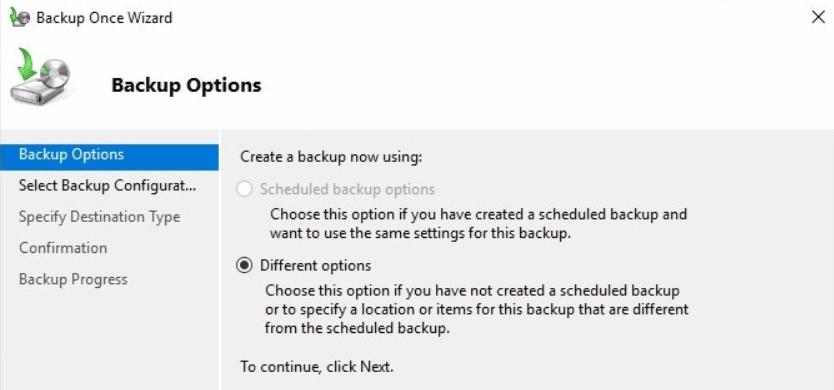
In the Backup Once wizard, click ‘Different Options’ to proceed with custom backup settings - Select “Custom.”

Choose the “Custom” option to specify the files for backup - Add items.
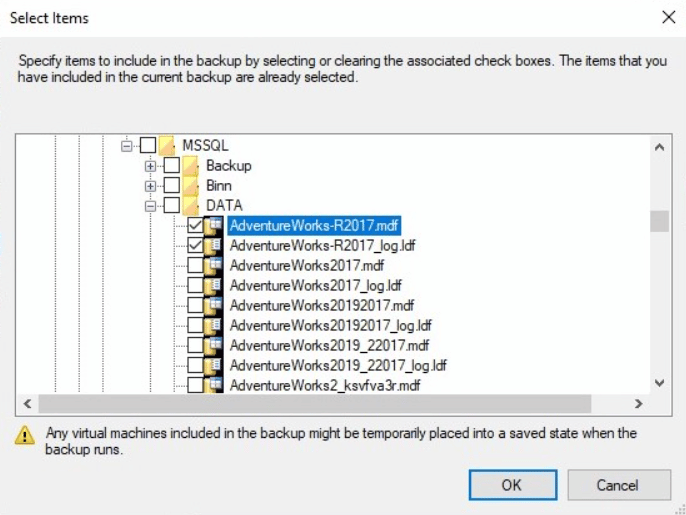
Select and add specific items to include in your backup on Windows Server - Specify where to back up to disk or shared folder.
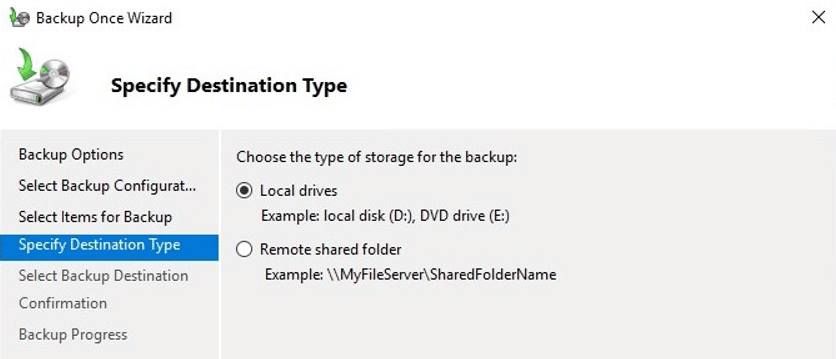
Choose where to back up your files, either to a disk or a shared folder - Specify a drive

Choose a drive to save your backup in the Backup Once Wizard interface or UNC path.

Define the UNC path for the backup location in Windows Server - Confirm and run the backup.
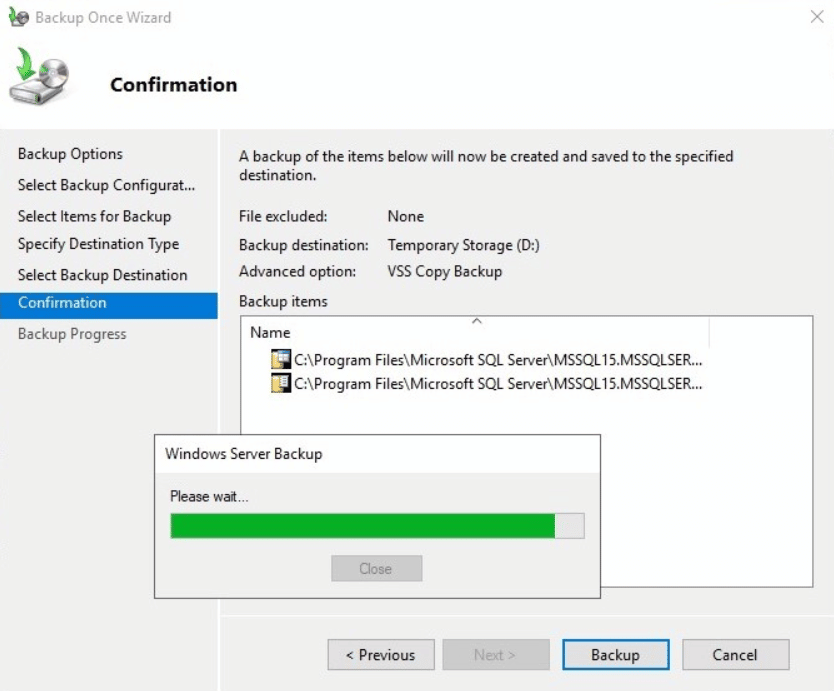
Final step to confirm and initiate the backup in Windows Server
Restore Windows Backup
Before restoring, you must first stop SQL Server (go to the list of services, find SQL Server ⇒ right-click ⇒ stop)
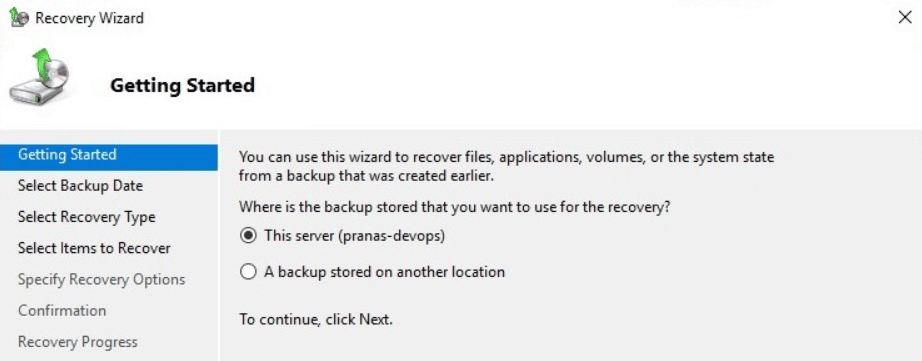
You can restore a backup created through WSB only with WSB. To do this, open the interface, and on the right, click “Restore.”
- Select the storage location for the backup. If you select “A backup stored on another location” then the next step is to specify the UNC path to the directory that contains the WindowsImageBackup directory.
Choose the storage location for your Windows backup - Select the date on which you want to recover data. The list of available dates will be compiled based on scanning the location specified in the previous step.
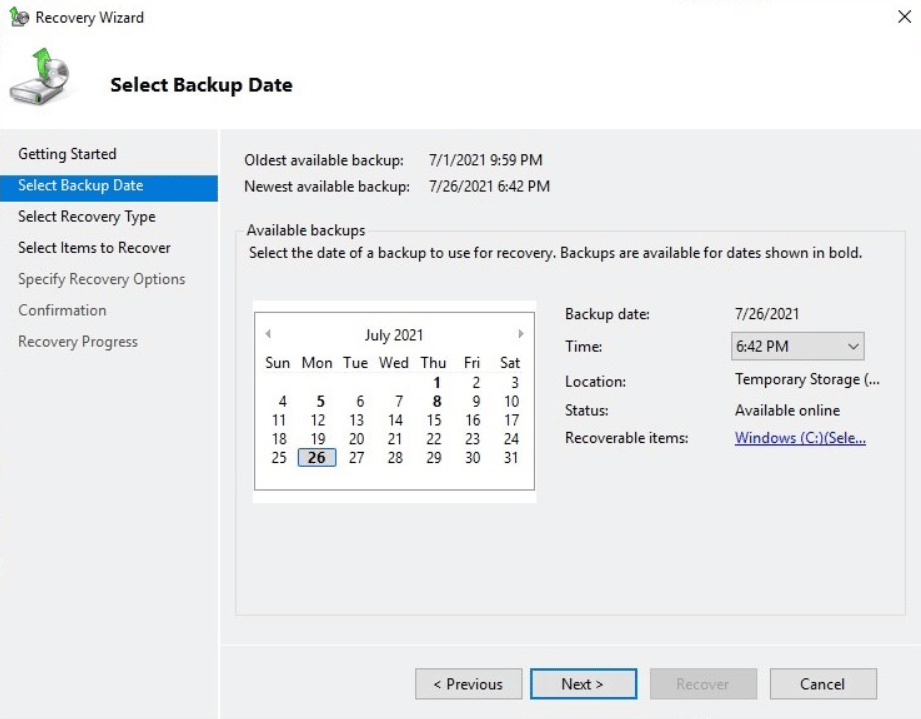
Choosing a backup date for data recovery in Windows Backup Restore - Select Files And Folders.
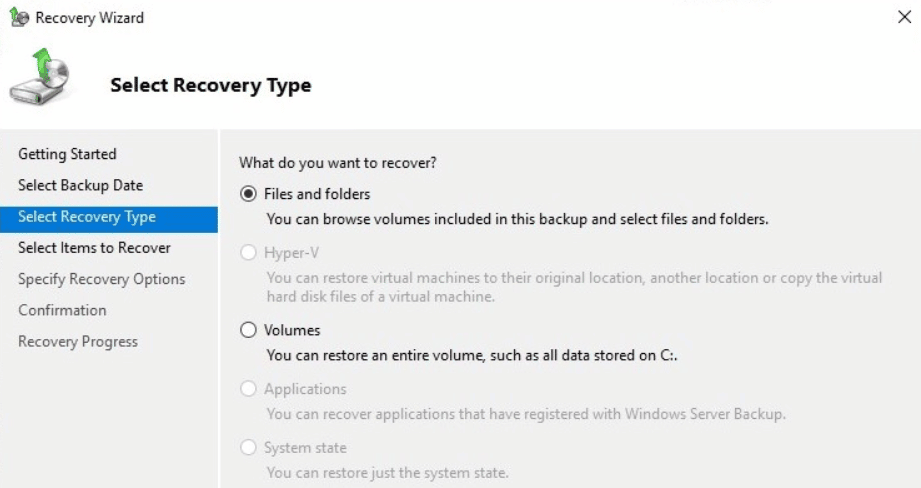
Select “Files And Folders” in the Recovery Wizard - Select the files you want to restore.
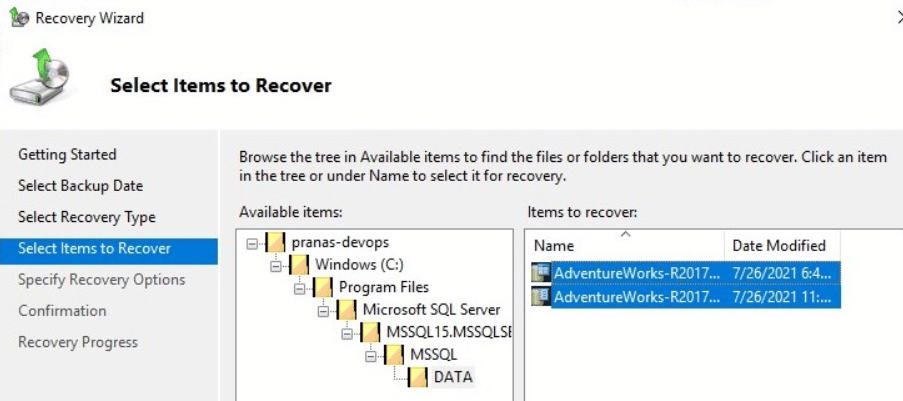
Select the files you want to restore in the Windows Backup interface - Select “Original location.”
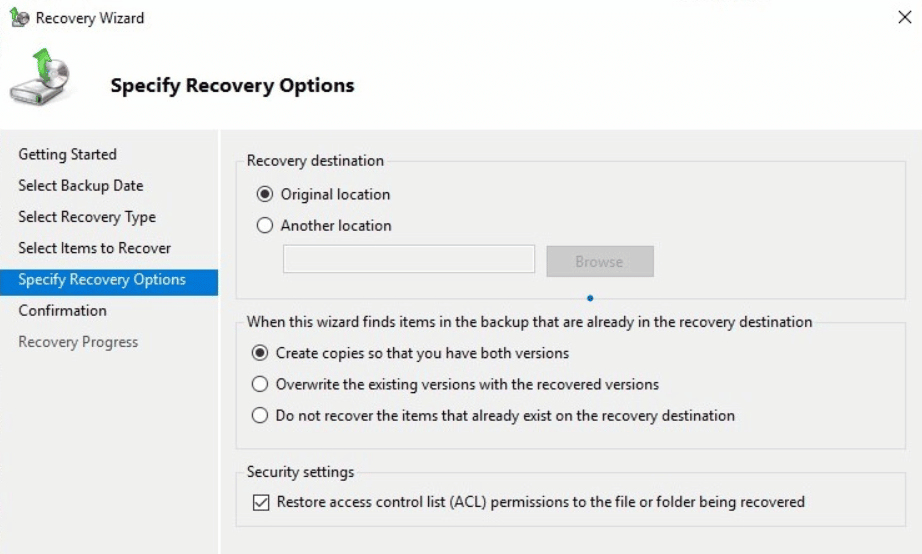
Selecting the “Original location” option during the Windows backup restore process. - Click “Recover.”
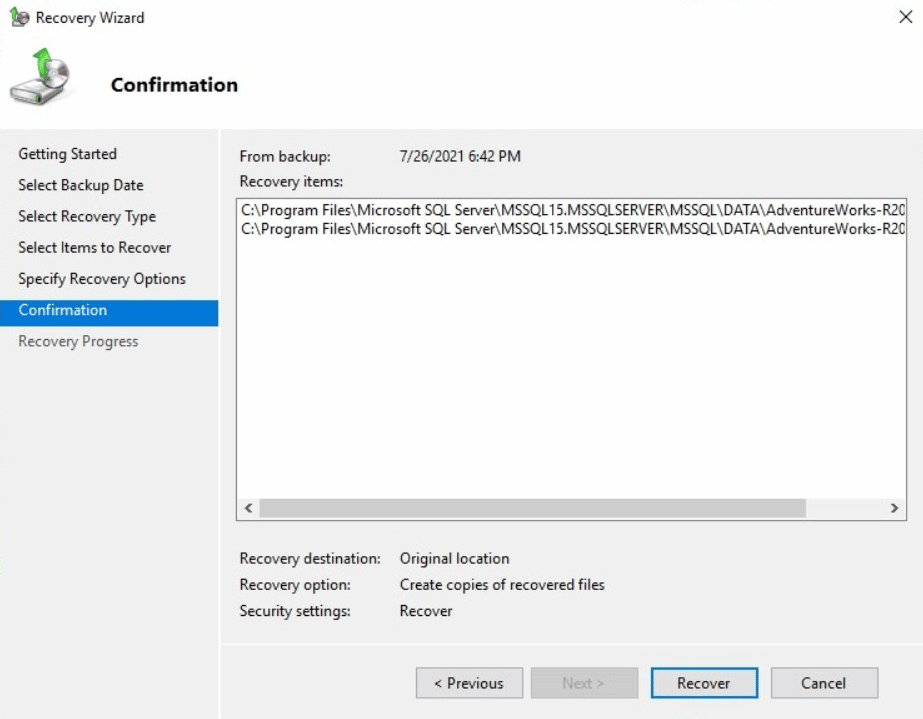
Click the “Recover” button to begin restoring your selected files and folders to their original location.
Remember to start SQL Server after the restoration is complete.
Bottom line
A good practice for SQL Server backups is to create a hot physical backup based on BACKUP DATABASE. It can be created either by running an SQL command, or through SSMS, or SQLBackupAndFtp. To create backups, use differential or transaction log backups more often.
If you do not have access to the file system of the server on which the SQL Server is located, then you can use logical backup through script generation or export data-tier application.
On the other hand, if you do not have access to SQL Server, but you have access to the machine on which it is installed, then you can use Windows Server Backup, as well as any other tool for backing up the volume or entire virtual machines.
The article describes not only how to make backups, but also how to restore the backups you created. People tend to leave out this information. Remember that a backup is created so that later it can be restored. Test your backups.
Wishing you all good backups 🙂