When you perform SQL Server backups on an industrial scale, it is easy to get confused with the created backup files, as the backup itself consists of binary data, making it impossible to understand by simply opening it in a text editor.
In this article, we will look at what SQL Server offers to avoid getting lost in the created backups, as well as general recommendations for backup management.
Naming Backup Files
Let’s start with the basics: naming the backup file. You can include information directly in the backup file’s name that will help you understand what is in the backup file.
Poor example:
backup.bak
Good examples:
SQLProd01_SalesDB_Full_20240616_1900.bak
From this name, it is immediately clear that this is a full backup of the SalesDB from the SQLProd01 server, created on 2024-06-16 at 19:00.
SQLProd01_SalesDB_Log_20240616_1915.trn
And from this name, it is clear that this is a transaction log backup.
Attributes NAME and DESCRIPTION
Not all information can be packed into the file name, but additional details can be specified in the NAME and DESCRIPTION parameters.
In these fields, it is advisable to include information related to the logic or process associated with the backup.
For example, you can indicate how and why the backup was created:
BACKUP DATABASE [db3] TO DISK = N'c:\temp\SQLProd01_SalesDB_Full_20240616.bak'
    WITH
        NAME = N'Manual backup via SSMS',
        DESCRIPTION = N'For testing purposes, task #2116343',
    COPY_ONLY;
or
BACKUP DATABASE [db3] TO DISK = N'c:\backups\SQLProd01_SalesDB_Full_20240616.bak'
    WITH
         NAME = N'Scheduled backup via SQL Server Agent',
         DESCRIPTION = N'Regular daily backup'
There is also the EXPIREDATE parameter, where you can specify a date after which the backup is considered outdated and can be deleted. This value is typically used in SQL Server Agent maintenance plans.
The values specified in the NAME and DESCRIPTION fields can be seen in two places.
- In the backup history. You can view the backup history for the last 7 days like this (pay attention to the fields
bs.nameandbs.description):
SELECT
    bs.user_name,
    bs.database_name,
    bs.backup_start_date,
    bs.backup_finish_date,
    DATEDIFF(SECOND, bs.backup_start_date, bs.backup_finish_date) AS backup_duration_secs,
    CASE bs.type
        WHEN 'D' THEN 'FULL'
        WHEN 'L' THEN 'Log'
        WHEN 'I' THEN 'DIFFERENTIAL'
    END AS backup_type,
    bs.backup_size,
    bmf.physical_device_name,
    bs.name, /* NAME */
    bs.description /* DESCRIPTION */
FROM
    msdb.dbo.backupmediafamily AS bmf
    INNER JOIN msdb.dbo.backupset AS bs ON bmf.media_set_id = bs.media_set_id
WHERE
    (CONVERT(datetime, bs.backup_start_date) >= GETDATE() - 7)
    and bs.database_name like '%'
ORDER BY
    bs.backup_start_date desc;
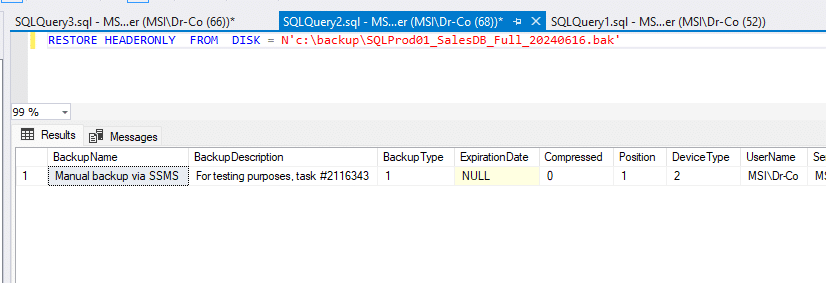
2. In the RESTORE HEADER command. This command is applied to the backup file and allows you to understand what is contained within it, including the NAME and DESCRIPTION fields specified during the backup creation.
RESTORE HEADERONLY FROM DISK = 'c:\backup\SQLProd01_SalesDB_Full_20240616.bak'
Files comprising the database
A SQL Server database typically consists of two or more files: a data file and a transaction log file. The paths to these files are stored in the backup, and when restoring the database from backup, the DBMS attempts to recreate these files. However, it is not always possible to restore with the exact file paths. To determine which files comprised the database, you can use the following query.
RESTORE FILELISTONLY FROM DISK = 'c:\backup\SQLProd01_SalesDB_Full_20240616.bak'

Monitor your backups
SQL Server provides various tools to understand which backups are being made or have been completed. You can track both previously completed backups and check which backups are currently in progress.
We have an article that covers various methods for monitoring backups and restores of SQL Server databases:
SQL Server Backup Monitoring Guide.
Automate your backups
One of the main advantages of automating backups is that you don’t need to remember to perform them manually. Additionally, the automation scripts themselves serve as documentation for your backup strategy.
We have written several articles on automating SQL Server backups:
How to Backup SQL Database Automatically via SQL Server Agent
How to automate SQL Server database backups
How to backup and restore SQL Server on Linux
Automated SQL Server Backups to Amazon S3 on Windows
Test the restore and write instructions for emergency recovery
After creating backups, it’s crucial to ensure that you can restore everything. During the restore testing process, document your steps. This way, you’ll have instructions you can use if you ever need to perform an emergency recovery.
Example of instructions:
1. Backups are stored in AWS S3:
    a. Bucket link = https://us-east-1.console.aws.amazon.com/s3/buckets/backup?region=us-east-1&bucketType=general&prefix=MsSQLBackups/&showversions=false.
    b. AWS login credentials are stored in a password manager.
2. To restore a backup to a specific date, find the closest full backup to the date, locate a transaction log backup after the date and all transaction log backups between these backups.
3. Download these backups locally.
4. Open SSMS, go to Object Explorer -> Restore, Device -> ... > Add, navigate to the directory where the downloaded backups are stored, and select all of them.
5. Click Destination -> Timeline -> Specific Date and Time, specify the date.
6. On the Files tab, verify the paths to the backup files.
7. Click OK to restore the database.
Another version of instructions for recovery without SSMS, especially relevant for Linux:
1. Backups are stored in AWS S3:
    a. Bucket link = https://us-east-1.console.aws.amazon.com/s3/buckets/backup?region=us-east-1&bucketType=general&prefix=MsSQLBackups/&showversions=false.
    b. AWS login credentials are stored in a password manager.
2. To restore a backup to a specific date, find the closest full backup to the date, locate a transaction log backup after the date and all transaction log backups between these backups.
3. Download the backups

aws s3 cp s3://backups/SQLProd01_SalesDB_Full_20240616.bak c:\backups\
aws s3 cp s3://backups/SQLProd01_SalesDB_Log_20240616_1915.trn c:\backups\
aws s3 cp s3://backups/SQLProd01_SalesDB_Log_20240616_1930.trn c:\backups\
aws s3 cp s3://backups/SQLProd01_SalesDB_Log_20240616_1945.trn c:\backups\

4. Restore the full backup with NORECOVERY

sqlcmd -S MyServer -U sa -P myPassword -Q "RESTORE DATABASE [SalesDB] FROM DISK = 'C:\backups\SQLProd01_SalesDB_Full_20240616.bak' WITH MOVE 'SalesDB_Data' TO 'C:\MSSQL\Data\SalesDB_Data.mdf', MOVE 'SalesDB_Log' TO 'C:\MSSQL\Logs\SalesDB_Log.ldf', NORECOVERY"

5. Restore the transaction log backup, the last one, with RECOVERY.

sqlcmd -S MyServer -U sa -P myPassword -Q "RESTORE LOG [SalesDB] FROM DISK = 'C:\backups\SQLProd01_SalesDB_Log_20240616_1915.trn' WITH NORECOVERY"
sqlcmd -S MyServer -U sa -P myPassword -Q "RESTORE LOG [SalesDB] FROM DISK = 'C:\backups\SQLProd01_SalesDB_Log_20240616_1930.trn' WITH NORECOVERY"
sqlcmd -S MyServer -U sa -P myPassword -Q "RESTORE LOG [SalesDB] FROM DISK = 'C:\backups\SQLProd01_SalesDB_Log_20240616_1945.trn' WITH STOPAT = '2024-06-16T19:45:00', RECOVERY"
Using third-party utilities
SqlBackupAndFtp and SqlBak for SQL Server backup management offers an intuitive interface that helps navigate backups created by these tools, even years after setup. In case of any issues, these utilities allow for one-click database restoration.
Reliable backups!