Restoring SQL Server databases from backup files is an important task for database administrators. In this article, we will discuss what backup files are and how to load a BAK file into SQL Server.
- What are BAK files in SQL Server?
- Restore SQL Server DB via SSMS
- Restore BAK file via SQLBackupAndFTP
- Restore MS SQL Server database via SQL commands
- Useful SQL Server restore options
- Restore SQL Server backup via command line
- Restore SQL Server backup via PowerShell
- MS SQL Recovery vs MS SQL Server Restore
What are BAK files in SQL Server?
BAK files are files created by SQL Server, with the file extension .bak, that contain one or more backups of SQL Server databases. They are designed to restore databases to the state they were in at the time the backup was created.
These files are a physical copy of the data from the database files (.mdf и .ldf) and are not intended to be viewed directly in a text editor.
Importing a BAK file in SQL Server involves restoring a database. You can restore databases from these files using T-SQL commands, graphical utilities such as SQL Server Management Studio or SQLBackupAndFTP, as well as from the command line.
There are several graphical user interface tools available.
Restore SQL Server DB via SSMS
SQL Server Management Studio is the primary tool for working with SQL Server, typically installed through the SQL Server installation launcher. To perform a restore of an MSSQL database, follow these instructions:
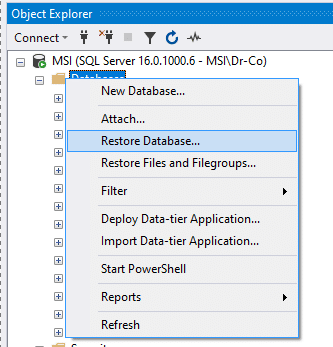
- In the Object Explorer section, right-click on Databases and select Restore Database:
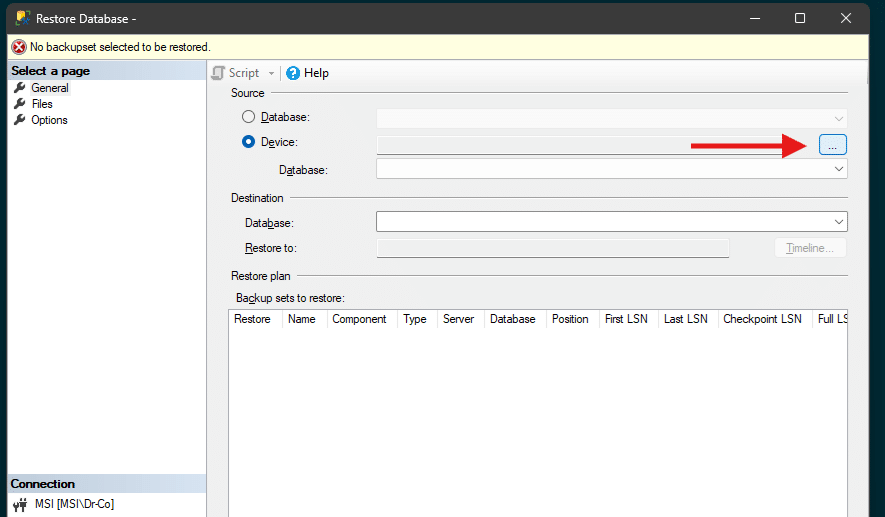
2. To restore from a file, select Device and click ...
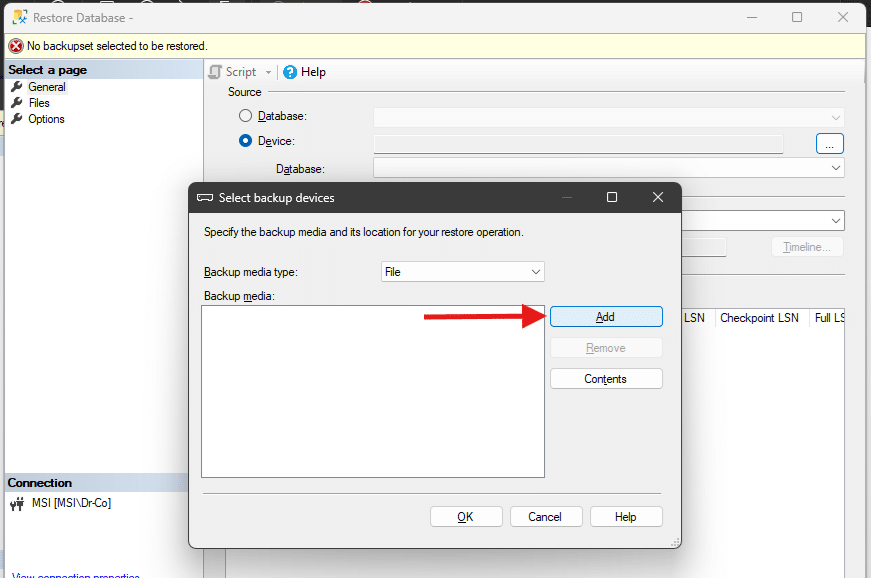
3. Click Add to select the file:
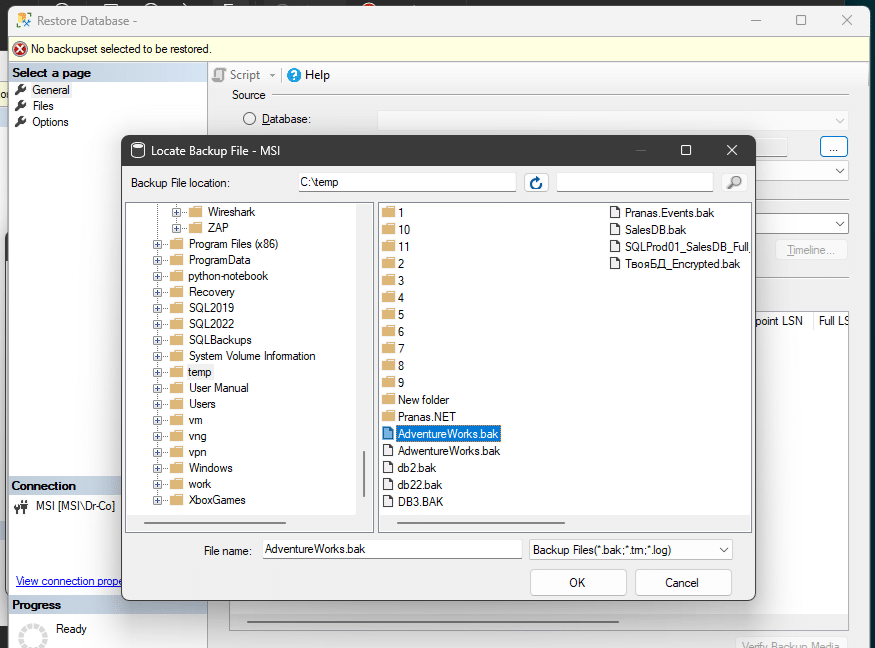
4. Select the .bak file that you want to restore
To view files in this window, the user running SQL Server must have access to the directory:
If you need to restore a backup set consisting of multiple files (such as a chain of transaction log backups), select all of them in this window using multi-select.
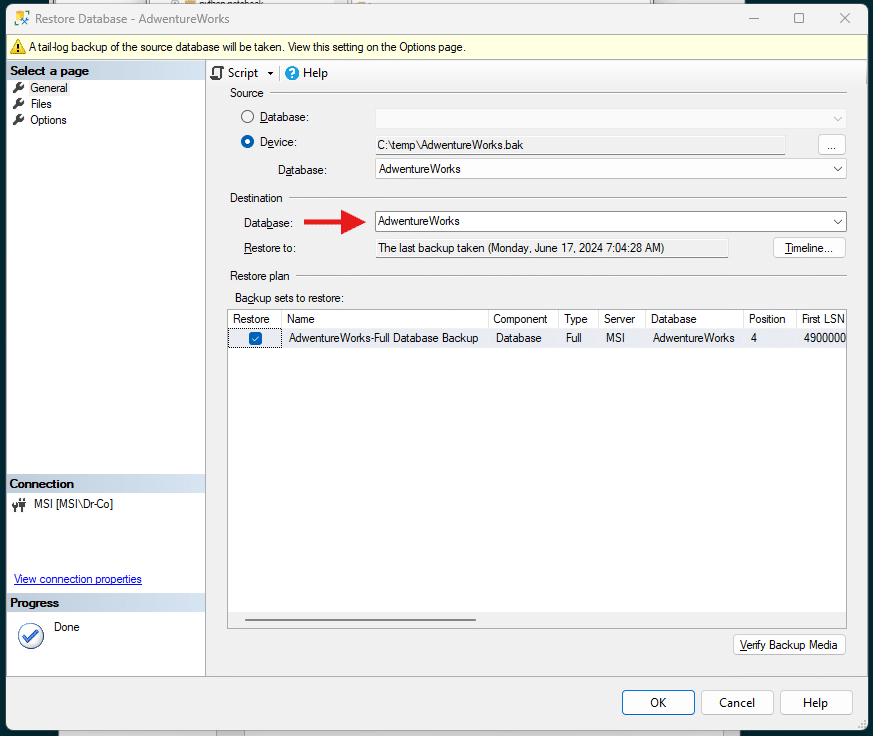
5. Click OK and verify the name of the database you plan to restore:
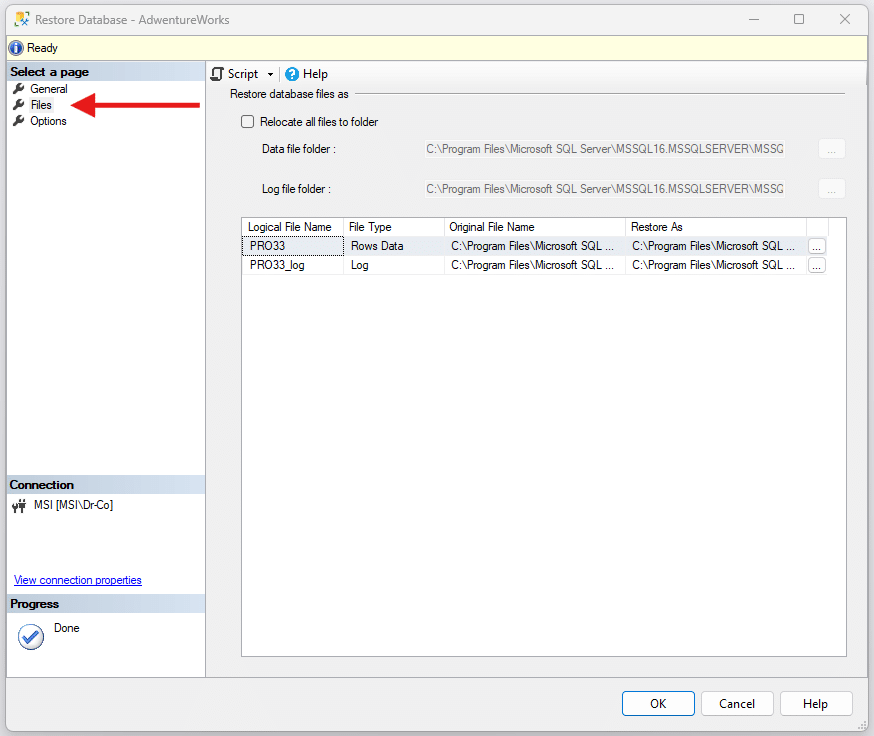
6. Navigate to the Files section, where paths to the database files that will be created are specified. They will automatically be set to the same values as those of the original database. If the database already exists and you are restoring the same database under a different name, the files are likely to be in use, so you’ll need to specify different paths.
Ensure that the SQL Server user has access to the directories specified in the Files section:
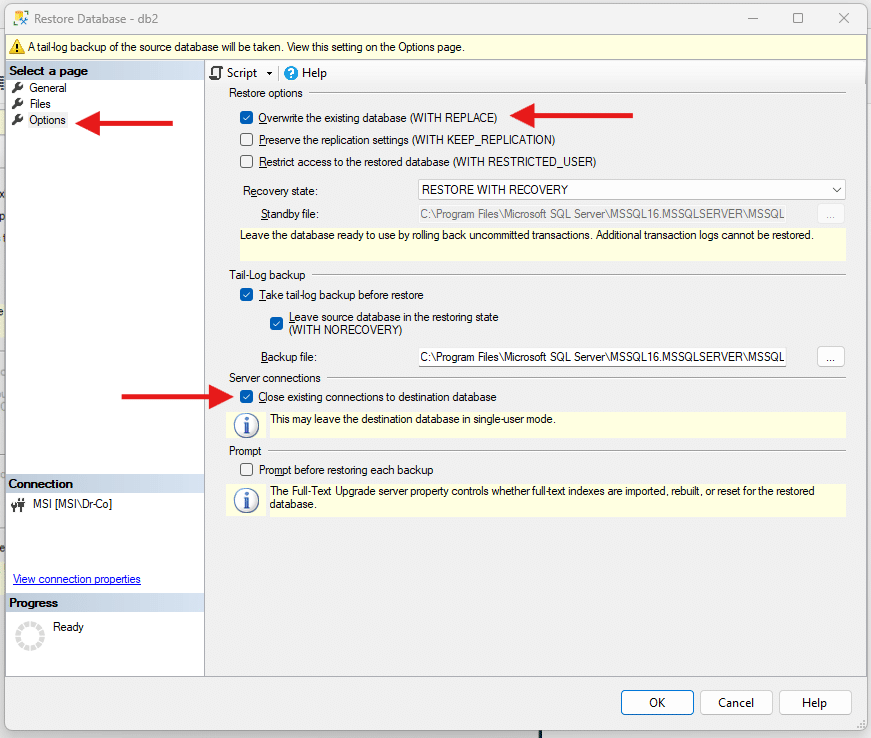
7. If the database with the name specified in step 5 already exists, in the Options section, check the box Overwrite the existing database (WITH REPLACE) and also select the option Close Existing connections…:
8. Click OK, and if everything is fine, the database will be restored from the BAK file.
Restore BAK file via SQLBackupAndFTP
SQLBackupAndFTP is an application for performing backups and restores for SQL Server, which can be downloaded from the official website.
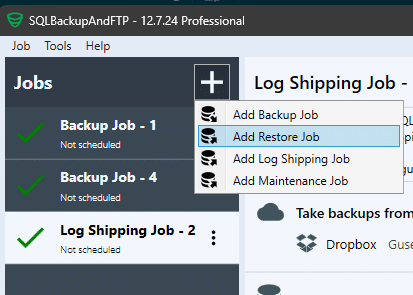
To restore an MSSQL database from a BAK file, create a restore job in SQLBackupAndFTP:
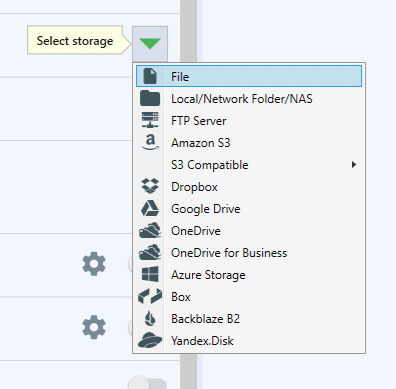
In the Takes Backup From section, select File:
Next, specify the database connection (if necessary), the database name, and an email address where you will receive notifications with the restore results:
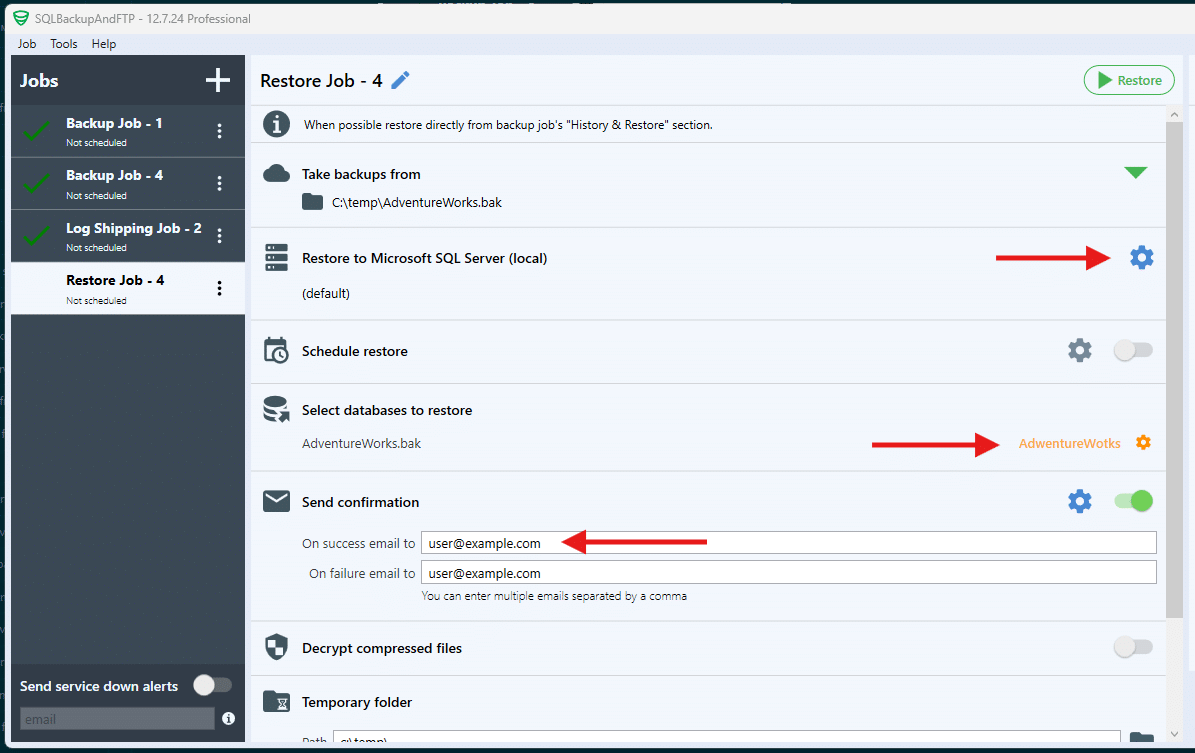
Click Restore:

SQLBackupAndFTP can also restore an entire backup set if the backups were created using SQLBackupAndFTP. To do this, instead of selecting a specific file, you need to choose the directory in the cloud storage where the backups are stored. SqlBackupAndFTP will then display the available dates for the restore.
Restore MS SQL Server database via SQL Commands
Restore an existing database
You can’t restore a database if other users are connected to it. So the first thing you need to do is set the database to single-user mode, which will disconnect any other user sessions:
ALTER DATABASE [DatabaseName] SET SINGLE_USER WITH ROLLBACK IMMEDIATE
To restore a database from a .bak file using T-SQL commands, you can use the following syntax:
RESTORE DATABASE [DatabaseName]
FROM DISK = 'C:\Backup\DatabaseName.bak'
WITH REPLACE, RECOVERY, STATS=5;
Where:
– DatabaseName is the name of the database you want to restore
– Backup.bak is the path to your BAK file
– REPLACE indicates that the existing database will be overwritten
– RECOVERY specifies that the database will be restored and made available for use
After that, you need to set the database back to multi-user mode:
ALTER DATABASE [DatabaseName] SET MULTI_USER
Restoring a database under a different name
If you are restoring a database under a different name, you need to change the paths to the database files, as the default paths stored in the backup file are likely already occupied by the existing database.
Use the command RESTORE FILELISTONLY to find the logical file names of the database:
RESTORE FILELISTONLY FROM DISK = 'C:\Backup\AdwentureWorks.bak';
Afterward, you can use the obtained file names to restore the database under a different name.
Please note that the user under which SQL Server operates must have access to the directories where you plan to place the database files.
RESTORE DATABASE [NewAdwentureWorks] FROM
    DISK = 'C:\Backup\AdwentureWorks.bak'
WITH
    MOVE 'AdwentureWorks' TO 'C:\Program Files\Microsoft SQL Server\MSSQL16.MSSQLSERVER\MSSQL\DATA\NewAdwentureWorks.mdf',
    MOVE 'AdwentureWorks_log' TO 'C:\Program Files\Microsoft SQL Server\MSSQL16.MSSQLSERVER\MSSQL\DATA\NewAdwentureWorks_log.ldf',
RECOVERY, STATS=5;
Where:
– NewAdwentureWorks is the new database name
– AdwentureWorks and AdwentureWorks_log are logical file names of the database files obtained from the RESTORE FILELISTONLY command. For them, new paths need to be specified.
– RECOVERY indicates that the database will be restored and made available for use.
Restoring differential backups
Differential backups (diff) are backups that contain only changes made since the last full backup. Differential backups themselves are BAK files but they depend on the previous full backup.
First, you need to restore the previous FULL backup WITH NORECOVERY, which will make the database unavailable for connection but allow you to restore the diff backup with the WITH RECOVERY flag, making the database available for connection.
Example syntax for restoring a database from a differential backup:
RESTORE DATABASE [DatabaseName]
FROM DISK = 'C:\Backup\AdwentureWorks_full.bak'
WITH NORECOVERY, STATS=5;

RESTORE DATABASE [DatabaseName]
FROM DISK = 'C:\Backup\AdwentureWorks_diff.bak'
WITH RECOVERY;
Restoring transaction log backups
Transaction log backups are backups that contain information about all transactions that occurred since the last transaction log backup. Usually, transaction log backup files have the .trn extension, but they can also have the .bak extension.
To restore a database from a transaction log, you first need to restore the last FULL database backup WITH NORECOVERY, then restore all transaction log backups between the FULL backup and the target backup also with WITH NORECOVERY, and finally, restore the last transaction log backup WITH RECOVERY.
Example syntax for restoring a database from a transaction log:
RESTORE DATABASE [DatabaseName]
FROM DISK = 'C:\Backup\AdwentureWorks_full.bak'
WITH NORECOVERY, STATS=5;

RESTORE DATABASE [DatabaseName]
FROM DISK = 'C:\Backup\AdwentureWorks_log1.trn'
WITH NORECOVERY;

RESTORE DATABASE [DatabaseName]
FROM DISK = 'C:\Backup\AdwentureWorks_log2.trn'
WITH NORECOVERY;

RESTORE LOG [DatabaseName]
FROM DISK = 'C:\Backup\AdwentureWorks_log3.trn'
WITH RECOVERY;
When restoring through SSMS, it is easiest not to restore the backups separately. Instead, when selecting files, choose both the full backup and all the necessary transaction log backups from the file list. SQL Server Management Studio will automatically sort the backups in the correct order.
Useful SQL Server restore options
Progress display during restore
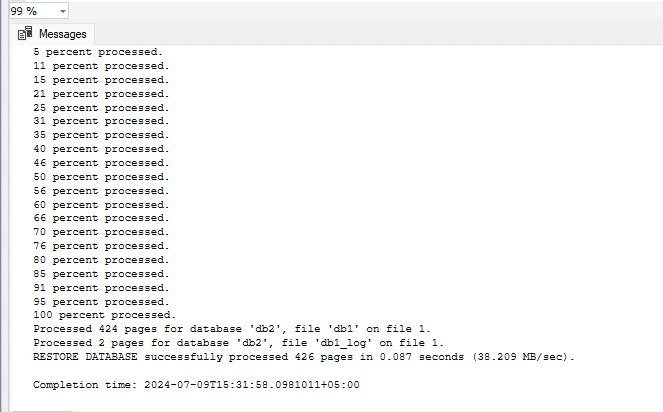
In the SQL commands above, the parameter STATS=5 is used when restoring a full backup. This parameter displays the percentage of completion for the command, which is particularly useful when restoring large databases.
How to restore a backup to a specific date
If you are restoring a chain of transaction log backups, you can use the STOPAT parameter to restore the database to a specific date and time. To do this, specify the STOPAT parameter with the desired date and time in the last transaction log backup.
Example syntax for restoring a database from a transaction log backup to a specific date:
RESTORE DATABASE [DatabaseName]
FROM DISK = 'C:\Backup\AdwentureWorks_full.bak'
WITH NORECOVERY, STATS=5;

RESTORE DATABASE [DatabaseName]
FROM DISK = 'C:\Backup\AdwentureWorks_log1.trn'
WITH NORECOVERY;

RESTORE DATABASE [DatabaseName]
FROM DISK = 'C:\Backup\AdwentureWorks_log2.trn'
	WITH NORECOVERY;

RESTORE LOG [DatabaseName]
FROM DISK = 'C:\Backup\AdwentureWorks_log3.trn'
WITH STOPAT = '2024-07-01 12:00:00.000', RECOVERY;
You can specify any date, but for the action to be effective, the date must fall within the period covered by the transaction log backup.
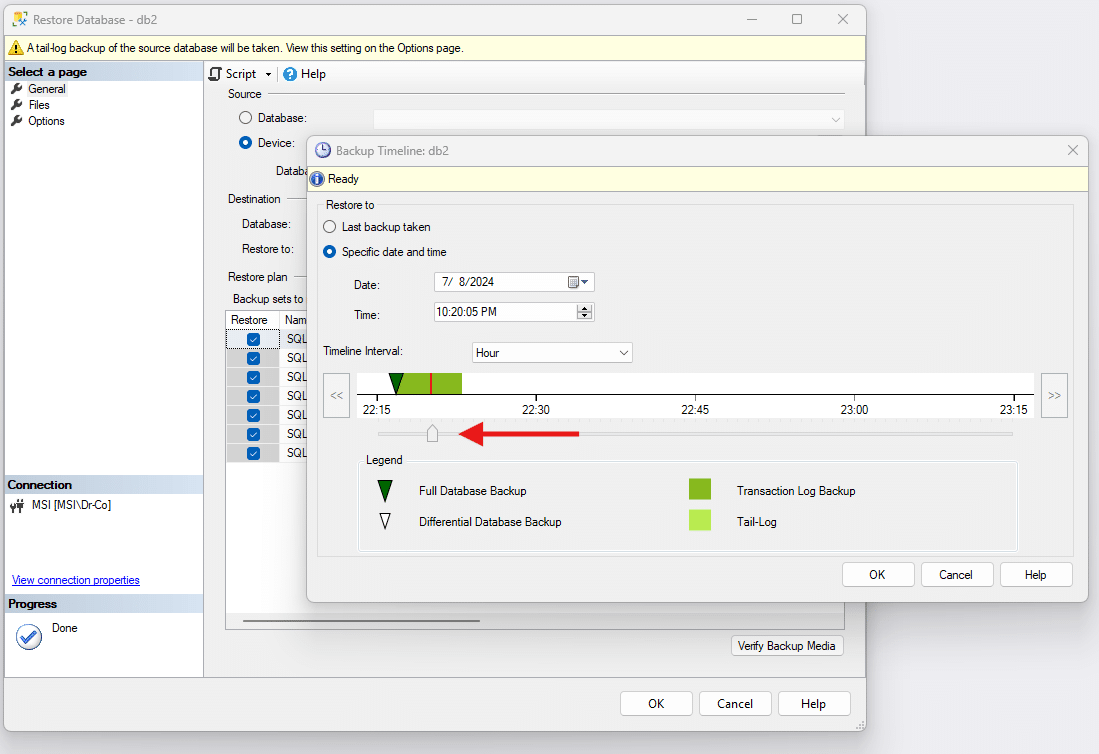
Through SQL Server Management Studio, you can select the restore point on a timeline:
Backup verification options
VERIFYONLY — backup verification without restore
The VERIFYONLY option allows you to check the backup’s integrity without actually restoring it. In this command, you only need to specify the path to the BAK file, not the database name.
RESTORE VERIFYONLY FROM DISK = 'C:\Backup\AdwentureWorks_full.bak'
CHECKSUM — checksum verification during restoration
When restoring a database using the CHECKSUM option, SQL Server will verify the checksums of the data pages during the restoration process.
This helps detect any data corruption that does not prevent the restoration but may still affect the integrity of the restored data:
RESTORE DATABASE [DatabaseName]
FROM DISK = 'C:\Backup\AdwentureWorks_full.bak'
WITH CHECKSUM, RECOVERY;
Restore SQL Server backup via command line
MS SQL restore bak file via sqlcmd
The sqlcmd utility is a command-line interface for executing SQL commands. Using it, you can run a restore command as follows:
sqlcmd -S ServerName -d master -Q "RESTORE DATABASE [AdwentureWorks] FROM DISK = 'C:\Backup\AdwentureWorks.bak' WITH REPLACE, RECOVERY;"
Where:
– ServerName is your SQL Server name
– DatabaseName is the database name you want to restore
– C:\Backup\AdwentureWorks.bak is the path to your .bak file
Restore SQL Server backup via PowerShell
PowerShell also provides the ability to restore databases from .bak files. To do this, you can use the SqlServer module and the following script:
Install-Module -Name SqlServer
Restore-SqlDatabase -ServerInstance "." -Database "DatabaseName" -BackupFile "C:\Backup\AdwentureWorks.bak" -ReplaceDatabase -NoRecovery
Where:
– ServerName is your SQL Server name
– DatabaseName is the database name you want to restore
– C:\Backup\AdwentureWorks.bak is the path to your .bak file
Restoring a database via PowerShell under a different name (with file replacement)
If database files already exist on the disk and are being used by another database, you need to specify paths for the database files. This can be done using the -RelocateFile option. Here’s an example:
$RelocateData = New-Object Microsoft.SqlServer.Management.Smo.RelocateFile("AdwentureWorks", "c:\db\AdwentureWorks.mdf")
$RelocateLog = New-Object Microsoft.SqlServer.Management.Smo.RelocateFile("AdwentureWorks_log", "c:\db\AdwentureWorks_log.ldf")
Restore-SqlDatabase -ServerInstance "." -Database "AdwentureWorks" -BackupFile "c:\backup\db2202407082216.bak" -RelocateFile @($RelocateData,$RelocateLog)
MS SQL Recovery vs MS SQL Server Restore
The terms “Restore” and “Recovery” are often confused and used interchangeably, but in SQL Server they are distinctly separate:
SQL Server Restore — this is the physical process of copying data from a BAK file into the database files. Typically, this is done using the RESTORE DATABASE command.
SQL Server Recovery — this is the logical process of bringing a database back to a functional state after a failure. It includes restore operations as well as transaction log rollback operations.
If your backup consists of a single file, the restore command performs both Restore and Recovery operations simultaneously:
RESTORE DATABASE [AdwentureWorks]
FROM DISK = 'C:\Backup\AdwentureWorks.bak'
WITH REPLACE, RECOVERY;
However, if you also use the full recovery model and need to perform a restore transaction log, each individual command is a restore, and the entire process is a recovery.
/* The entire script is - recover SQL server */


/* restore */
RESTORE DATABASE [DatabaseName]
FROM DISK = 'C:\Backup\AdwentureWorks_full.bak'
WITH NORECOVERY, STATS=5;


/* restore */
RESTORE DATABASE [DatabaseName]
FROM DISK = 'C:\Backup\AdwentureWorks_log1.trn'
WITH NORECOVERY;


/* restore */
RESTORE DATABASE [DatabaseName]
FROM DISK = 'C:\Backup\AdwentureWorks_log2.trn'
WITH NORECOVERY;


/* restore, but this last operation uses the RECOVERY option which brings the database online, thus completing the SQL server recover. */
RESTORE LOG [DatabaseName]
FROM DISK = 'C:\Backup\AdwentureWorks_log3.trn'
WITH STOPAT = '2024-07-01 12:00:00.000', RECOVERY;
To convert a BAK file to SQL
Directly converting a BAK file to .sql is not possible.
However, you can achieve this indirectly by restoring the database under a different name on your SQL Server instance, and then performing scripting using utilities such as mssql-scripter or by using the Generate Script operation in SSMS for the database.
To restore an individual table from a backup
Simply extracting a table from a backup directly is not possible. However, there is a workaround using a temporary database.
If the above warning hasn’t deterred you, here’s a brief guide on how you might restore an individual table.
1. Restore the database under a different name, for example, TempDB:
RESTORE DATABASE TempDB
FROM DISK = 'c:\Backup\OriginalDB.bak'
WITH MOVE 'OriginalDB_Data' TO 'c:\Temp\temp.mdf',
MOVE 'OriginalDB_Log' TO 'c:\Temp\temp_log.ldf';
USE TempDB;
SELECT * INTO OriginalDB.dbo.MyTable
FROM TempDB.dbo.MyTable;
DROP DATABASE TempDB;
In the Object Explorer section, RIGHT_click on Databases and select Restore Database:
— need to add RIGHT_ in the statement above
Through SQL Server Management Studio, you can select the restore point on a timeline:
— and how do I get to the “Backup Timeline db2” screen?
Hello,
Thank you for your message — and for your helpful suggestions!
You’re absolutely right to point out that we should clarify the action involving the right-click in Object Explorer. Regarding your question, “How to access the ‘Backup Timeline’ screen in SSMS?”, here’s the correct step-by-step process:
1) In Object Explorer, right-click on Databases and select Restore Database…
2) In the Restore Database window in the left-hand panel, click on “General”.
3) Under the “Restore to” section, click the “Timeline…” button — this opens the Backup Timeline window.
4) In the Backup Timeline window:
– Select “Specific date and time”
– Use the slider or manually enter the desired restore time.