If your MySQL database is running in Docker, backing it up is no more complicated than backing up a database installed directly on the server. However, there are tips, tricks, and best practices that can simplify the process.
Everything you need for a backup is already in the container
mysqldump is a utility for creating logical backups of MySQL databases. It generates a .sql dump file of the database. This utility is specifically designed for backup MySQL and is included as part of the MySQL server, which means it is already in the container.
This tool allows you to create hot backups, meaning there is no need to stop MySQL to perform the backup.
To restore a backup created this way, you simply execute the instructions in the dump file using the mysql utility, which is also included in the container.
Backup MySQL database in Docker container
The command for creating a backup:
docker exec <container-name> mysqldump -u<user> -p<password> --all-databases > mysql-backup.sql
This command creates a backup of all databases in the container and saves it as a file named mysql-backup.sql, which will appear in the host system directory where the command was executed:
-
<container-name>: the name of the container running the MySQL database -
<user>: the username -
<password>: the password for the user
Example of a MySQL backup command in Docker:
docker exec root_db_1 mysqldump -uroot -ppassword --all-databases > backup.sql
Restore MySQL database in Docker container
The general command to restore a backup is as follows:
docker exec <container-name> mysql -u<user> -p<password> < mysql-backup.sql
The same parameters should be used as in the backup command.
Example of a MySQL restore command in Docker:
docker exec root_db_1 mysql -uroot -ppassword < backup.sql
How to improve this backup
A single backup is good, but there might be situations where you accidentally back up a broken database. For example, you might delete an important table by mistake and not notice it immediately, and during that time, a backup of the damaged database is created. In such cases, you won’t be able to restore the correct data.
To avoid this, it’s recommended to create backups regularly and retain them for a certain period. For instance, you could schedule daily backups and keep them for a week.
MySQL backup in a container with compression and a filename including the current date
To save space, it’s a good idea to compress backups. This can be done during the creation of the backup. Adding the current date to the backup filename ensures that a new file is created each time instead of overwriting the existing one.
Linux
Here’s an example of the command:
docker exec mysql_container mysqldump -uroot -ppassword --all-databases | gzip > backup_$(date +%Y-%m-%d).sql.gz
You can restore this backup using the following command:
gunzip < backup_2024-12-08.sql.gz | docker exec -i mysql_container mysql -uroot -ppassword
Widows (powershell)
On Windows, it’s more convenient to use the 7-Zip archiver from the command line. Install it using the following command:
winget install --id=7zip.7zip -e
Now you can back up all databases in the container using the following command:
docker exec mysql_container mysqldump -u root -pmy-secret-pw --all-databases | & 'C:\Program Files\7-Zip\7z.exe' a -si "backup_$(Get-Date -Format 'yyyy-MM-dd').sql.7z"
You can restore the backup using the following command:
& 'C:\Program Files\7-Zip\7z.exe' e -so "backup_2024-12-08.sql.7z" | docker exec -i mysql_container mysql -u root -pmy-secret-p
Simple daily backups with Docker-Compose
Using Docker-Compose for automating backups is a truly convenient solution. It not only centralizes the configuration but also makes it easy to transfer settings to another server. Here’s how you can set up regular MySQL backups using Docker-Compose.
In this example, an additional MySQL container is created, which performs backups of the primary database via a health check and deletes backups older than 7 days:
version: '3.8'

services:
  db:
    image: mysql
    environment:
      MYSQL_ROOT_PASSWORD: password
    volumes:
      - ./data:/var/lib/mysql

  mysql-backup:
    image: mysql
    depends_on:
      - db
    volumes:
      - ./backups:/backup
    entrypoint: ["sh", "-c", "sleep infinity"]
    healthcheck:
      test:
        - "CMD-SHELL"
        - >
          export MYSQL_PWD=password &&
          DUMP_FILE=/backup/backup_$$(date +%F_%H-%M-%S).sql &&
          ERROR_LOG=/backup/error.log &&
          mysqldump -h db -u root --all-databases > $$DUMP_FILE 2>> $$ERROR_LOG &&
          find /backup -type f -name "backup_*.sql" -mmin +7 -exec rm -f {} \;
      interval: 24h
      timeout: 5h
      retries: 1
Unfortunately, it is not possible to set the start time for the healthcheck service. The first backup will be performed 24 hours after the mysql-backup container starts.
Start the mysql-backup container after adding it to docker-compose.ym (there is no need to restart all services):
docker-compose start mysql-backup
SqlBak
SqlBak is a agent-based service for database backups that allows you to back up a database and upload it to the cloud. It supports sending backups to Local Disk, network directories, FTP, SFTP, FTPS, NAS, local or network folders, Google Drive, Dropbox, OneDrive, Box, Amazon S3 (and any S3-Compatible storage), Azure Storage, Backblaze B2, Yandex.Disk, and also enables restoring them with just a few clicks.
To connect SqlBak to a MySQL database, you can simply add it to your docker-compose.yml file. Don’t forget to specify the secret key, which you can find on the Download page after registration.
version: '3.3'
services:
 db_mysql:
  image: mysql
  restart: always
  environment:
    MYSQL_ROOT_PASSWORD: example
  networks:
   - overlay
 sqlbak:
  image: pranasnet/sqlbak
  volumes:
   - sqlbak_local_data:/opt/sqlbak
   - backup_folder:/tmp/sqlbak
  environment:
   sqlbak_key: [secret-key]
   sqlbak_name: sqlbak_agent
   db_type: mysql
   user: root
   password: example
   host: db_mysql
  networks:
   - overlay
volumes:
 sqlbak_local_data:
 backup_folder:
networks:
 overlay:
After adding SqlBak to the docker-compose.yml file, start it:
docker-compose start sqlbak
After that, you can configure the backup on the website sqlbak.com.
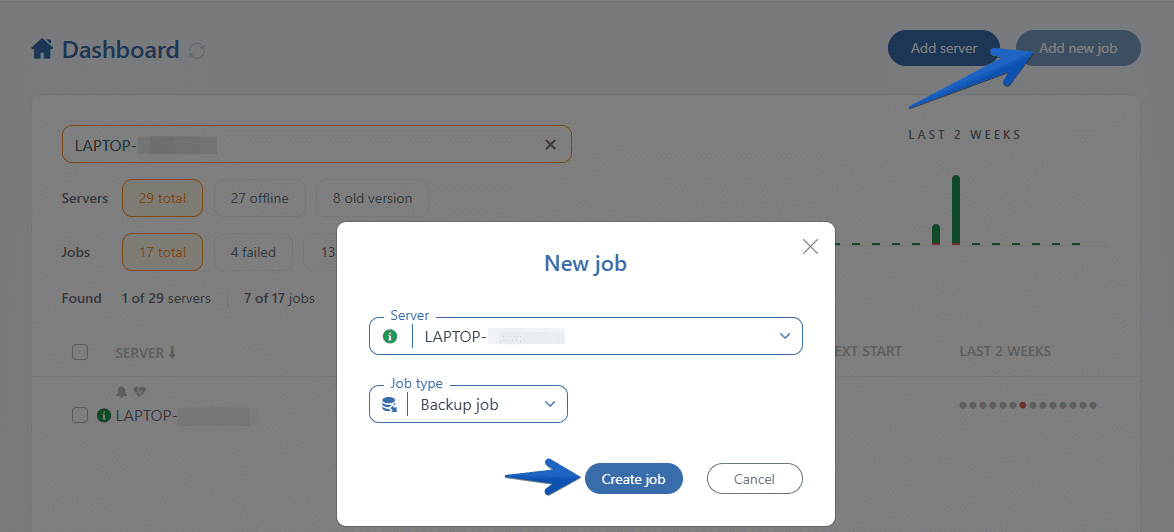
1. Open the Dashboard page and click on the Add new job button to create a new backup job:
2. At the opened window, please choose the databases you are going to backup:

3. The next step is to set the destinations where the backups will be stored, for example, a local folder and Google Drive:

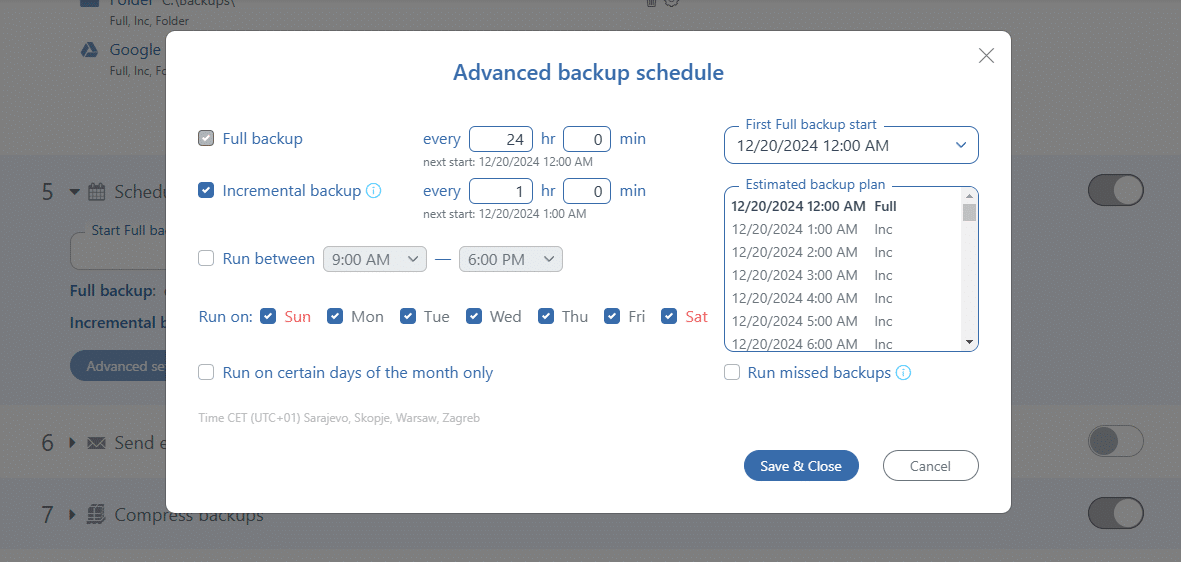
4. Now you can set a schedule when a backup job should be run:
5. And the last setting from the minimum set is the notification setting:

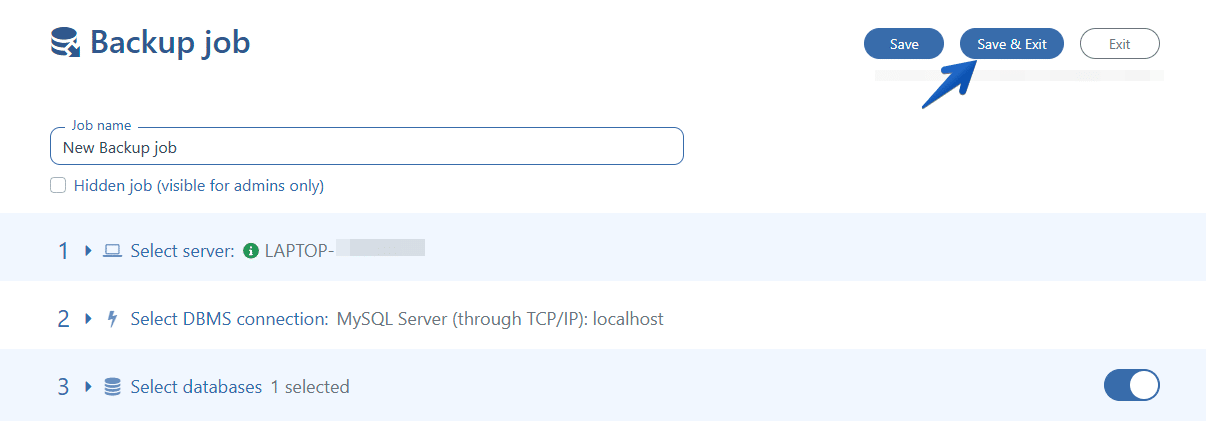
That’s all, to run the backups according to the schedule you need to save the settings by clicking the Save & Exit button at the top of the page:
Restore
The backups can be easily restored by clicking the “restore” icon on your backup job’s settings page. Just choose a backup you need to restore, click the “restore” icon and follow the instructions. If it is a full or incremental backup, all the needed backups will be restored automatically:
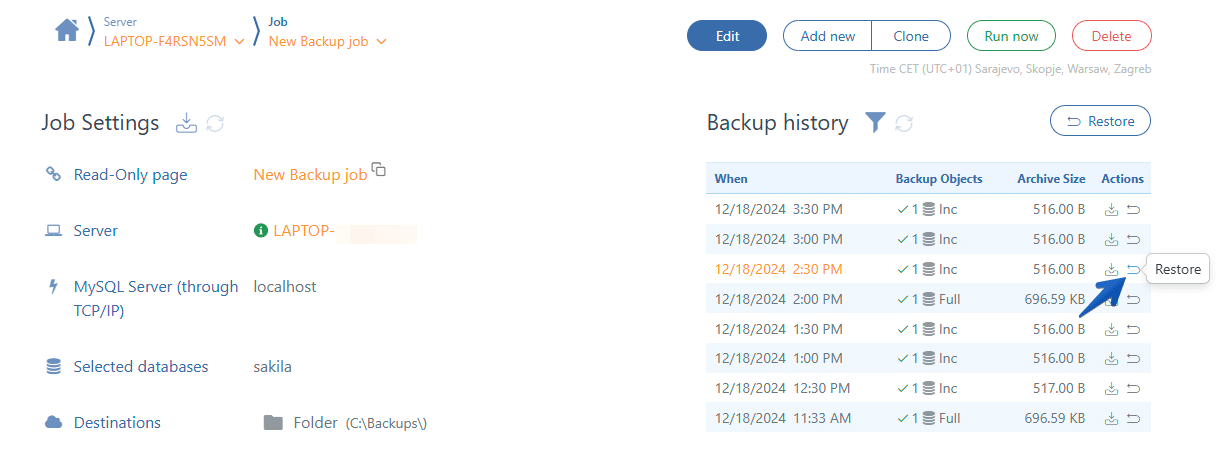
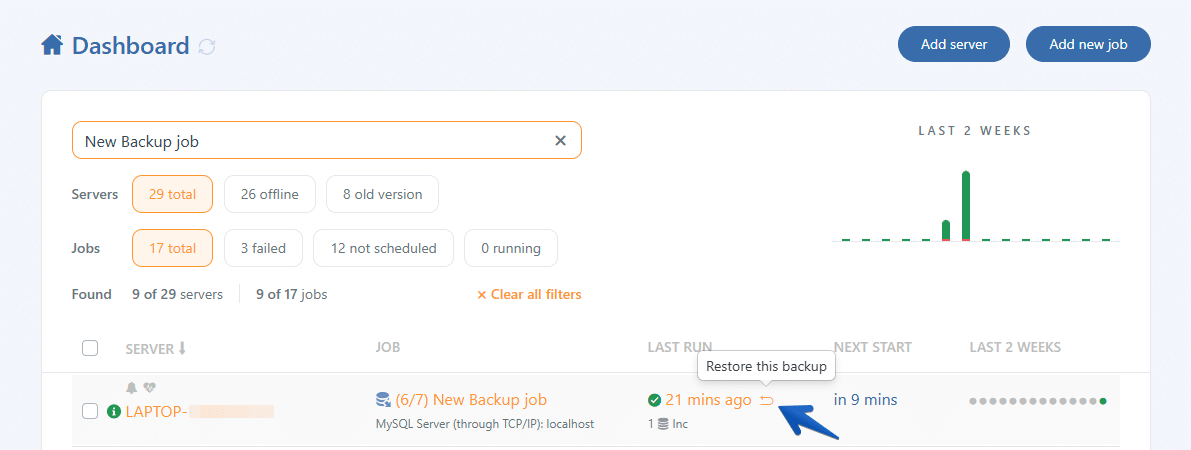
Also, the very last backup can be restored from your “Dashboard” page, just click the “restore” icon at the “LAST RUN” column:
About cold backups
The methods described above allow for a hot backup of MySQL, meaning you don’t need to shut down the database to create the backup.
A cold backup, on the other hand, involves backup the database while it is stopped. With the database turned off, you can safely copy the volume containing the data. This method has its advantages and disadvantages:
Advantages
- Cold backup faster
Disadvantages
- Requires shutting down the database
- Access to the server’s file system is necessary
- The backup can only be restored on the same version of MySQL
To perform a cold backup, start by stopping the container:
docker stop <container-name>
and copy the volume:
docker cp <container-name>:/var/lib/mysql /path/to/backup
Cold backups are typically considered a bad practice and are included in this article for informational purposes. However, there are scenarios where cold backups might be preferable. For instance, if you are using the ZFS file system, you can instantly create snapshots of files, making cold backups a viable option.
Conclusion
Backup isn’t just an extra task; it’s about peace of mind. Automate your backups, avoid storing them on the same server where the container resides, periodically test the restore process, and may luck always be on your side.🙂
