Scheduling SQL Server backups can be done in various ways, including using SQL Server Agent, PowerShell, third-party tools or through scripts with Windows Scheduler.
This article will explore different methods for scheduling MSSQL backups in more detail, as well as best practices for timing and frequency of scheduled backups.
Tools for automating backups
Scheduled automatic SQL database backup using SSMS
SQL Server Agent is a built-in tool in SQL Server for automating administrative tasks, including creating backups. Through the SSMS interface, you can create a SQL Server Agent backup job that will run according to a schedule.
Instructions for scheduling backups through SQL Server Management Agent
1. Ensure that SQL Server Agent is enabled and set to start automatically:
-
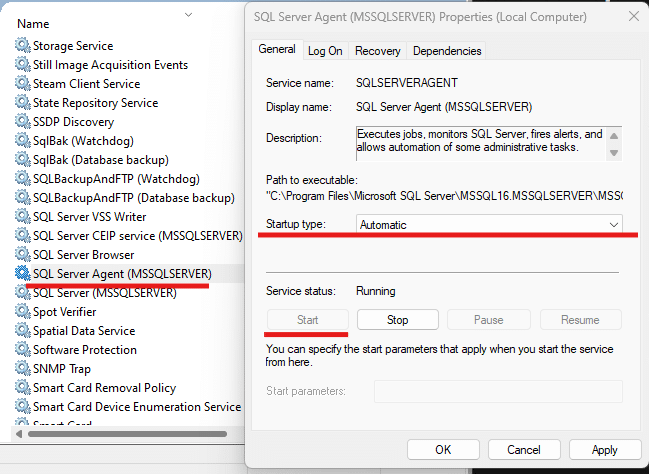
- Press Win+R, type “services,” and press Enter
- Find “SQL Server Agent (MSSQLSERVER)” and make sure it is set to Automatic
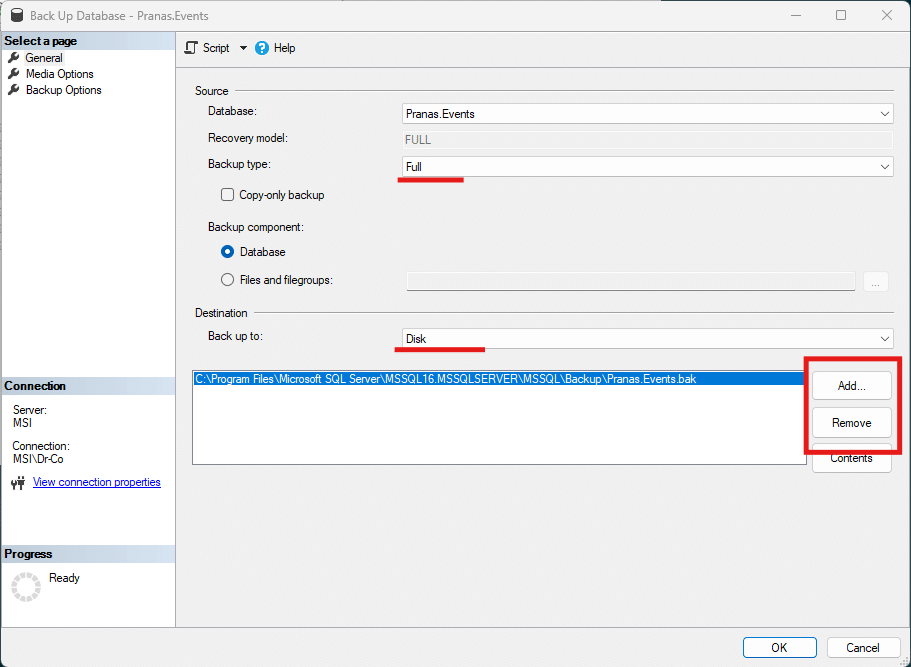
2. Select the database for which you plan to set up regular backups and click on Task -> Backup
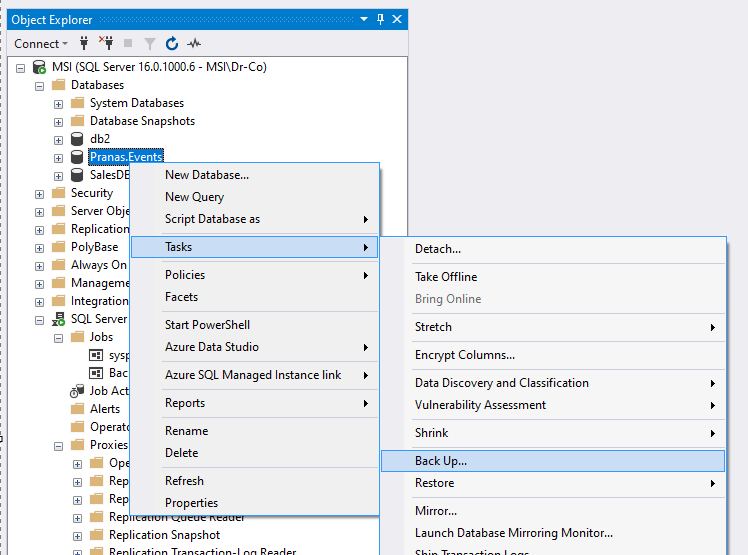
3. On the General tab, make sure that the “Backup type” is set to Full and that “Back up to” is set to Disk. Below, you will see the path where the backup will be saved. If you need to specify a different path, click Remove, and then Add… to set the desired path. Please note that all backups will be stored in this file.
4. On the Backup Options tab, specify the retention period for the backups. After the specified number of days from creation, the backups will be deleted.
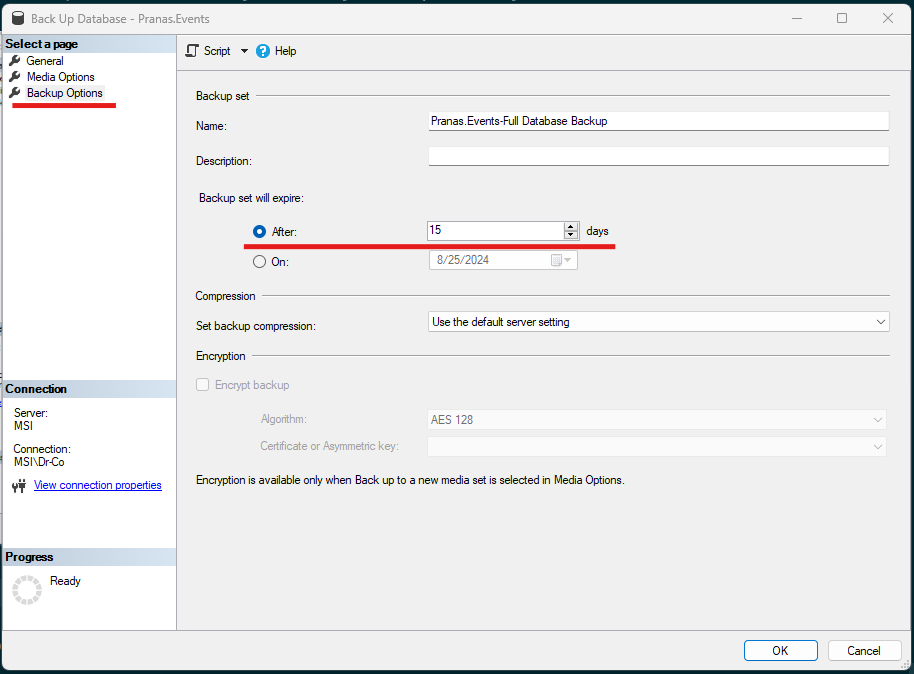
5. DO NOT CLICK OK. Instead, find the Script button at the top and select Script Action to Job.

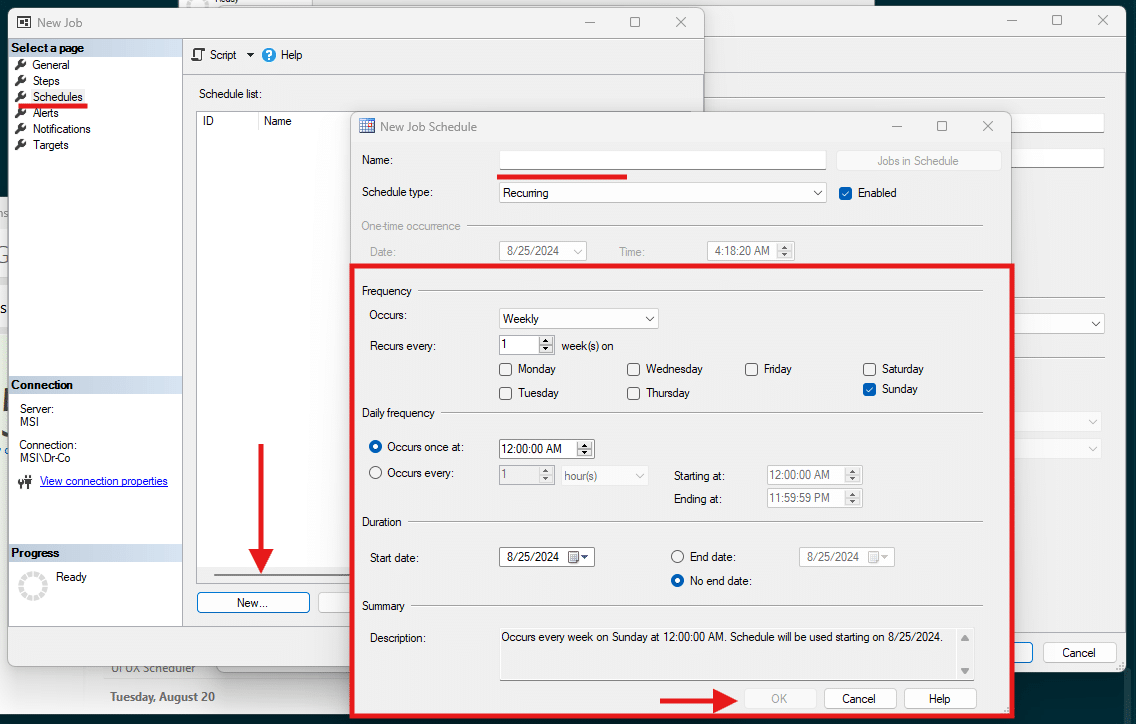
6. A window for creating a backup job for the agent will open. Go to the Schedules section and click New… Then, enter a name of your choice in the Name field and set the schedule. After that, click OK in this window and in the job creation window for SQL Server Agent.
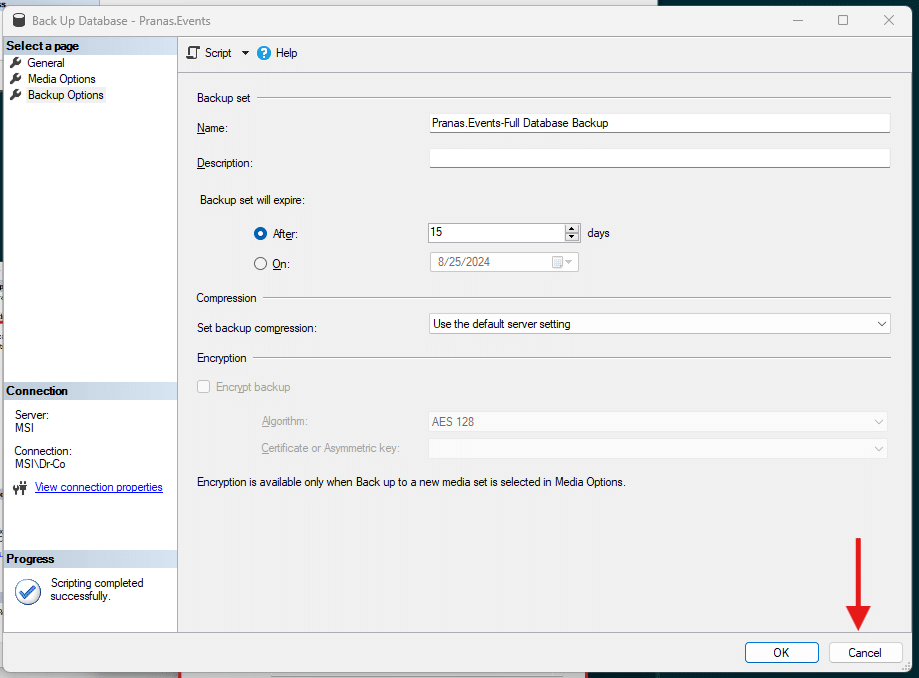
7. In the backup creation window, click Cancel
8. In the list of backup agent jobs, the newly created job should appear. Click Start Job at Step… to test its functionality.
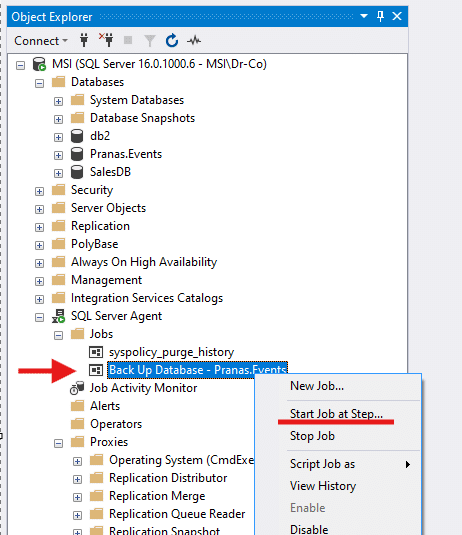
9. Make sure that the backup was created
Advantages of automating backups via SQL Server Agent
- SQL Server Agent is installed along with SQL Server
- Easy to set up a basic backup option
Disadvantages
- Backups have to be done in a single file
- Backups can only be done to disk or Azure cloud
- The interface is not user-friendly for configuring more complex backup scenarios, such as periodic differential backups or email notifications
SqlBackupAndFTP
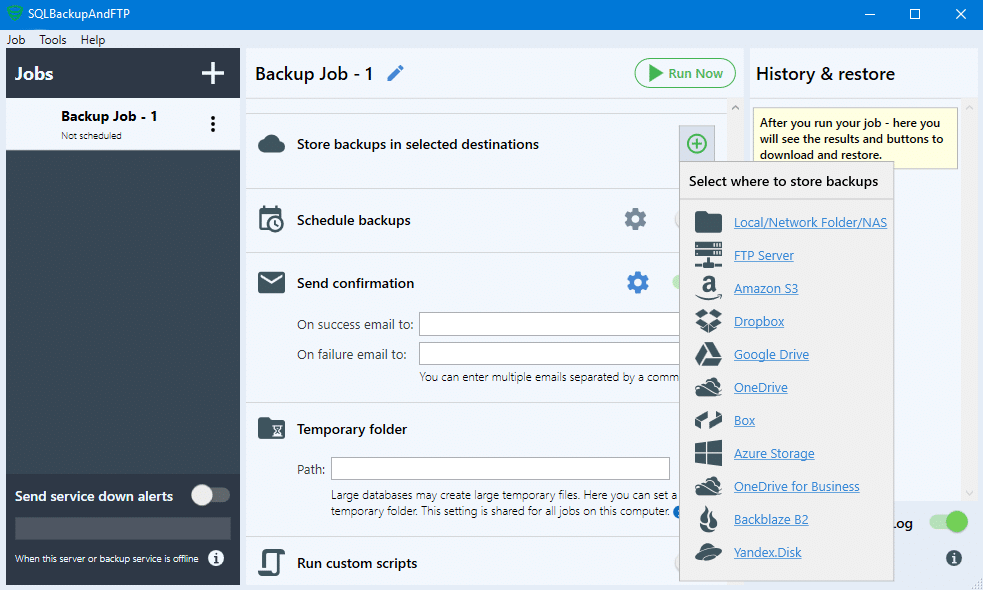
SqlBackupAndFTP is a third-party application that allows you to automate the process of creating SQL Server backups. It provides an easy-to-use interface for scheduling backups in typical regular backup scenarios. The backup can be saved to FTP, FTPS, NAS, local or network folder, Google Drive, Dropbox, OneDrive, Box, Amazon S3 (and any S3-Compatible storage), Azure Storage, Backblaze B2, Yandex.Disk or transferred via SSH.
The application provides a detailed log of all actions performed, from which you can restore the backup in just a few clicks.
Additionally, the application allows you to set up email notifications for backups, configure encryption and compression.
Scheduled automatic SQL database backup using SQLBackupAndFTP
Instructions for scheduling backups through SQLBackupAndFTP:
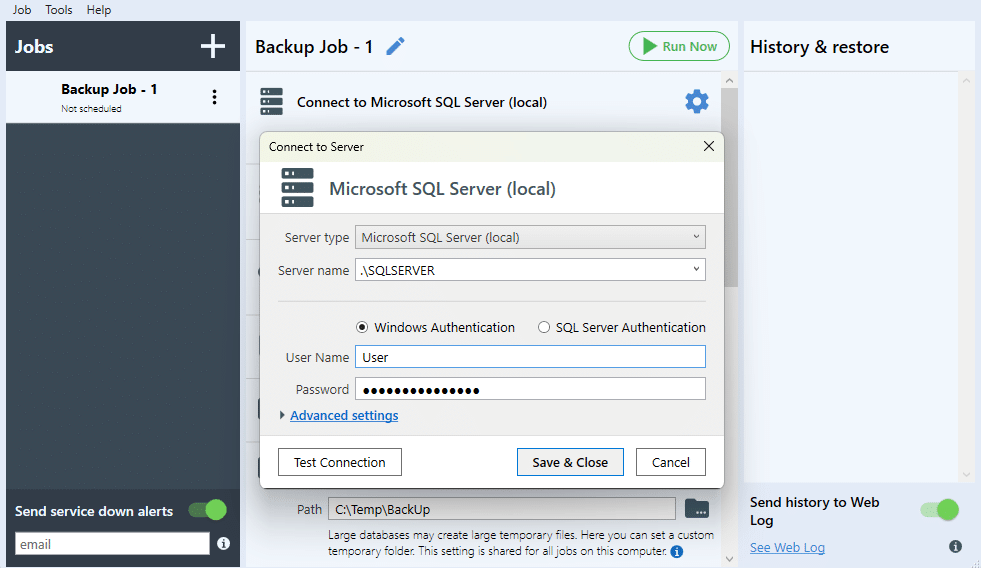
1. Download, install it, run and connect to your SQL Server:
2. Select the databases to backup:
3. Select the destination where to store the backups — for example a network folder. Press Test to check the connection, then click Save & Close:
4. Create a backup schedule. Enable “Schedule backups” and set the desired time for simple full daily backups. For Differential and Transaction log backups, as well as other advanced options, click the gear icon to access the “Advanced backup schedule” settings.

5. Compression of backup file is set by default and you can enable encryption of backup if you want to:
6. Press the Run Now button to test the job. Once confirmed, the job will automatically run according to the schedule set in the program:
Advantages of scheduling backups via SqlBackupAndFTP
- User-friendly interface
- Easy to schedule common backup scenarios
Disadvantages
- Paid application with limitations in the free version
PowerShell and Windows Task Scheduler
PowerShell is a powerful tool for automating tasks in Windows. To schedule a PowerShell script on Windows, the Windows Task Scheduler (similar to cron jobs) is ideal. You can set up the Task Scheduler for SQL database backups directly from the PowerShell console.
Below is an example of a simple database backup script. This is not a complete solution but a good starting point for exploring the topic.
First, you need to install the module for interacting with SQL Server:
Install-Module -Name SqlServer
After installing the module, you can use cmdlets to create backups. For example, to create a full database backup:
Backup-SqlDatabase -ServerInstance "localhost\Instance" `
    -Database "DatabaseName" `
    -BackupFile ("C:\Backup\DatabaseName_" + (Get-Date -Format "yyyyMMdd_HHmmss") + ".bak") `
    -Username "YourUsername" `
    -Password "YourPassword"
To automatically delete backups older than a specified number of days, you can use the following script (deleting backups older than 30 days):
$olderThan = (Get-Date).AddDays(-30)
Get-ChildItem "C:\Backup" | Where-Object { $_.LastWriteTime -lt $olderThan } | Remove-Item
Try running these commands before moving on to scheduling to ensure that everything is specified correctly and that you have sufficient privileges to perform the operations.
Both commands can be scheduled using the Windows Task Scheduler, which can be done directly from the powershell console.
This command creates a SQL daily backup job that will run at 3:00 AM and perform a backup of the database named DatabaseName:
$trigger = New-ScheduledTaskTrigger -At "03:00" -Daily
$action = New-ScheduledTaskAction -Execute "powershell.exe" -Argument "Backup-SqlDatabase -ServerInstance 'localhost\Instance' -Database 'DatabaseName' -BackupFile ('C:\Backup\DatabaseName_' + (Get-Date -Format 'yyyyMMdd_HHmmss') + '.bak') -Username 'YourUsername' -Password 'YourPassword'"
Register-ScheduledTask -TaskName "SQLBackupTask" -Trigger $trigger -Action $action
This command creates a task that will run at 4:00 AM and delete backups that are older than 30 days:
$triggerCleanup = New-ScheduledTaskTrigger -At "04:00" -Daily
$actionCleanup = New-ScheduledTaskAction -Execute "powershell.exe" -Argument "$olderThan = (Get-Date).AddDays(-30); Get-ChildItem 'C:\Backup' | Where-Object { $_.LastWriteTime -lt $olderThan } | Remove-Item"
Register-ScheduledTask -TaskName "SQLBackupCleanupTask" -Trigger $triggerCleanup -Action $actionCleanup
To verify that everything is set up correctly, run these tasks sequentially using the following commands:
Start-ScheduledTask -TaskName "SQLBackupTask"
Start-ScheduledTask -TaskName "SQLBackupCleanupTask"
After some time, check the result of the last run:
Get-ScheduledTaskInfo -TaskName "SQLBackupTask"
Get-ScheduledTaskInfo -TaskName "SQLBackupCleanupTask"
Pay attention to the LastTaskResult fields. If it is zero, everything is okay. If it is any other number, the command completed with an error.
Tasks in Windows Task Scheduler can be configured through the graphical interface, but it is not very intuitive. A few PowerShell commands are often more efficient.
Advantages of scheduling backups via PowerShell
- Free of charge
- Allows you to set up complex backup scenarios
Disadvantages
- Requires programming skills and knowledge of PowerShell scripting
- Developing and maintaining scripts can be time-consuming
- Setting up notifications for task completion is not straightforward
- The graphical interface for Windows Scheduler is not very intuitive
Backup schedule best practices
Scheduling backups involves more than just setting up a backup routine. You also need to determine how frequently to perform backups and how long to retain them.
For consideration
There are four key metrics to consider before planning your automated backup strategy:
RTO (Recovery Time Objective): This is the maximum amount of time that a system can be unavailable during a failure. In other words, it is the time required to restore the database to a working state from a backup.
RPO (Recovery Point Objective): This defines the maximum acceptable amount of data loss measured in time. Essentially, it is the longest period you can afford to lose between the last backup and the point of failure.
Retention period: This is the duration for which backups are stored and available for recovery. It allows you to restore data not only from the most recent backup but also from backups made, for example, a month ago, if needed.
Storage costs: This is the amount of money you are willing to spend on storing backups.
Align these objectives with your business requirements and capabilities.
How often to perform backups
For most databases, it is recommended to perform daily full backups. This ensures that you can restore your data up to the most recent day in case of a failure.
Differential backups: These can be performed every X hours, based on the frequency of full backups. For example, every 3, 6 or 12 hours.
Transaction log backups: These can be performed at any frequency, even every 5 minutes if needed.
When to schedule backups
It is best to schedule full backups during times when server load is minimal, such as at night or on weekends.
Differential and transaction log backups place significantly less load on the SQL Server and can be scheduled at any time.
Conclusion
In this article, we covered how to automate backups in SQL Server, including the use of SQL Server Agent, SqlBackupAndFTP, PowerShell, and Windows Task Scheduler. Each of these methods has its advantages and disadvantages, and the choice depends on your needs and skill level.
Additionally, you can manage backup scheduling across all your servers using SqlBak.

