ERT, RTO, RPO… all ducks in a row


This article will explain what the following terms mean:

  • RTO (Recovery Time Objective),
  • RPO (Recovery Point Objective),
  • ERT (Estimated Recovery Time).

The terms ERT, RTO, RPO are used in IT’s “Business Continuity and Disaster Recovery policy”, and basically they are time characteristics (measured in seconds, hours etc.) of a disaster recovery of a data system.

In the article RT (Recovery Time) and RP (Recovery Point) definitions are used for defining RTO, RPO, and ERT. This approach may lead to a new understanding of the terms and further discussions.
Read More

File Backups

SQL Server allows to make backups and restore not only the entire database but also a single filegroup or even a separate file.  This is called a file backup. This type of backup contains all data from one or more files or filegroups.

File backups are often used to increase the recovery process speed by restoring only damaged files, without restoring the rest of the database, if necessary. Assume there is a database that contains several files. Each file is stored on a separate disk and suddenly one disk fails. In this case the recovery process will not take more time because there is no need to restore the entire database, it will be enough to restore only the file from the failed disk.

Another use case is when some filegroups in your database are updated more frequently than others. In this case you can backup them separately using a file backup.

One of the biggest disadvantages of using file backup is that such backups are difficult to manage. It takes more time to manage every file backup separately. Also, if failure occurs and the backup of the damaged file is lost the entire database becomes unrecoverable.

Let’s explore how does full file backup work under different recovery models. Assume there is a database “Adventureworks” which contains two filegroups “Group1” and “Group2”, each filegroup includes two files “File1” and “File2” for filegroup “Group1” and “File3” and “File4” for “Group2”.

Case for Simple Recovery Model

To make sure that the database can be restored, under the simple recovery model,  all read-write files must be backed up together. It’s quite simple to accomplish this as there is no need to backup all read-write files one by one, you just need to use the READ_WRITE_FILEGROUPS option (known as a partial backup):

BACKUP DATABASE Adventureworks READ_WRITE_FILEGROUPS, 
   FILEGROUP = 'Group1', 
   FILEGROUP = 'Group2' 
TO DISK = 'Groups.bck'

Full file backup (simple recovery model)

Case for Full Recovery Model

If the database runs under the full recovery model you should backup the transaction log, regardless of the file backup strategy you chose. All transaction log backups beginning with the first file backup and a complete set of  full file backups equal to a full database backup. Please check the picture bellow to understand how it works:

BACKUP LOG Adventureworks TO DISK = 'log_13_00.bak' 
BACKUP DATABASE Adventureworks FILEGROUP = 'Group2' TO DISK = 'Group2.bck' 
BACKUP LOG Adventureworks TO DISK = 'log_14_00.bak' 
BACKUP DATABASE Adventureworks FILEGROUP = 'Group1' TO DISK = 'Group1.bck'
BACKUP LOG Adventureworks TO DISK = 'log_15_00.bak' 
BACKUP DATABASE Adventureworks FILEGROUP = 'Group3' TO DISK = 'Group3.bck'

Full file backup (full recovery model)

Note though, that using this backup strategy leads to a complex database restoration process.

If any file is offline then the whole filegroup containing this file is offline too and cannot be backed up.

SQL Server backups only one file at a time. Of course, it is possible to backup multiple files in one operation, but should you need to restore only one file, the restore operation will take more time (to find the file, the whole backup will be read).

Case for Differential File Backup

SQL Server allows to make not only full file or filegroup backups but also a differential file backup. Creating a full file backup makes it possible to apply a differential file backup. If the database runs under the simple recovery model the differential file backup can be applied only to read-only filegroups. As far as the full recovery model is concerned, a differential file backup can be applied to any filegroup which has been previously backed up. Differential file backups reduce time to restore database because less transaction log backups have to be restored. It is better to use differential file backups under the following circumstances:

  • There is a need to backup some files more frequently than other
  • Some files are really large and changes in these files occur infrequently

Making a differential file backup is quite simple, just add “WITH DIFFERENTIAL” option:

BACKUP DATABASE Adventureworks 
   FILE = 'File2',
   FILE = 'File3' 
TO DISK = 'Groups_diff.bck' WITH DIFFERENTIAL

Differential File Backup

How to Create a File Backup with SQL Server Management Studio

Here is how you can create a file backup using SSMS:

  1. Right click on the database you want to backup
  2. Select “Tasks”, then “Back up…”
  3. Choose “Files and Filegroups” and in the new window check in the files or file groups you want to backup
  4. Add a backup destination
  5. Click “OK”File Backup

Point-in-time recovery

Point-in-time recovery allows to restore a database into a state it was in any point of time. This type of recovery is applicable only to databases that run under the full or bulk-logged recovery model. If the database runs under the bulk-logged recovery model and transaction log backup contains bulk-logged changes, the recovery to a point-in-time is not possible.

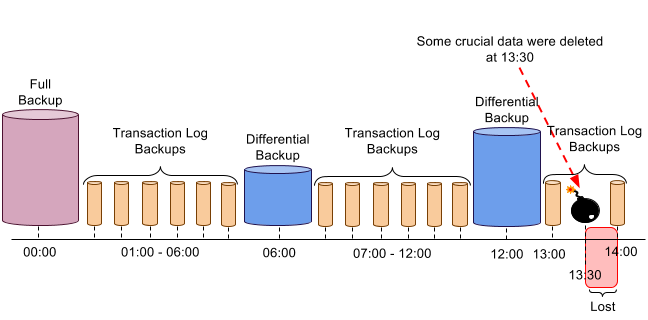
To understand how point-in-time recovery works let’s review the use case with a sample database (under the full recovery model) where a full backup is made every 24 hours and a differential database backup that is created every six hours, and transaction log backups are created every hour. Please see the picture below:Point-in-time recovery
Assume some crucial data were deleted at 13:30 and the last transaction log backup was made at 14:00. The transaction log backup from 14:00 gives us the opportunity to restore the database to its state at 13:29:59. In this case, only 30 minutes of updates will be lost.

Below we will consider two ways of restoring a database to a point-in-time:

Using Transact-SQL

To recover a database to a point-in-time it is necessary to start from restoring the full database backup using the following syntax:

RESTORE DATABASE your_database FROM DISK = 'full_00_00.bak' WITH NORECOVERY, REPLACE

After the full backup is restored it is time to restore the last differential backup. It our case – the last differential backup was made at 12:00. Differential backup can be recovered with the help of this syntax:

RESTORE DATABASE your_database FROM DISK = 'diff_12_00.bak' WITH NORECOVERY

This differential backup includes all changes that were made to the database since the last full backup.

And the last step is to apply all transaction log backups that were made after the differential backup. Please apply all transaction log backups in the same sequence in which they were created. It is crucial to remember to specify the time to which database should be restored with the help of STOPAT option when you restore the last log backup (in our case the database should be restored as of 13:29:59). Please also note that all backups, except the last one, are restored with NORECOVERY option, while the last one should be restored with RECOVERY option recovering the database into its working state:

RESTORE LOG your_database FROM DISK = 'log_13_00.bak' WITH NORECOVERY 
RESTORE LOG your_database FROM DISK = 'log_14_00.bak' WITH STOPAT = '2015-11-19 13:29:59.000', RECOVERY

Using SSMS (SQL Server Management Studio)

  1. Right click on the database that should be restored from the list, select “Tasks” – “Restore” – “Database…”Restore Step1
  2. In the window that appeared press “Timeline” button to set up the time for database restorationRestore Database
  3. Check in “Specific date and time” to set up the time for database restoration (13:29:59), press “OK” to save changes, and press “OK” button in the previous window:Restore to a point-in-time Step3
  4. When the restoration process is completed, the following message will appear on the screen:Restore to a point-in-time Step4

CHECKSUM and VERIFYONLY

A database backup process is an integral part of a recovery system. All backups must be operable so that they can be restored at any time. It is recommended to make regular database backups and the majority of SQL Server users actually follow this recommendation. But how can you be sure that you would be able to restore the database from the backups? Sometimes backups can be corrupted. This is why it is useful to test database backups for their integrity. Of course, the best check for any backup is a restore to a server, but there are some other, less radical ways of doing it. Let’s explore CHECKSUM and VERIFYONLY options.

CHECKSUM

The checksum is a value calculated from the data page bytes. Equal data pages have equal checksums. To make the checksum recorded into each page of the backup file the “WITH CHECKSUM” option needs to be added to “BACKUP DATABASE” command.

Using a CHECKSUM option makes database backup process longer, but if the database is really large it is better to use CHECKSUM option and be confident that all pages are written to the disk and ready for the restore process. To check the checksum value use the following SQL Server option:

VERIFYONLY

The VERIFYONLY  option does not restore the backup, it only verifies it. The VERIFYONLY performs several checks, such as:

  • Checksum
  • Availability of free space in destination place
  • Some header fields of database pages
  • Readable state of all volumes and the state of backup set

It is recommended to check the backup file before the restore process with the help of  VERIFYONLY option. If the file in proper state the SQLServer will display the following message:

The backup set on file 1 is valid.

If even a single byte is damaged the SQLServer will report the following:

Msg 3241, Level 16, State 0, Line 5
The media family on device 'd:\checksum.bak' is incorrectly formed. SQL Server cannot processthis media family.
Msg 3013, Level 16, State 1, Line 5
VERIFY DATABASE is terminating abnormally.

How to Use CHECKSUM And VERIFYONLY Options

Here are some ways of how to add CHECKSUM to the database backups and how to check them with the help of VERIFYONLY option:

T-SQL

Use T-SQL Command to work with CHECKSUM and VERIFYONLY options:

To make database backup simply add “WITH CHECKSUM” clause:

BACKUP DATABASE your_database TO DISK = 'backup_with_checksum.bak' WITH CHECKSUM

To check the database with VERIFYONLY option use the following syntax:

RESTORE VERIFYONLY FROM DISK = 'backup_with_checksum.bak'

SQL Server Management Studio

Another way of using CHECKSUM and VERIFYONLY options is to apply them in SQL Server Management Studio (SSMS):

For that you need to right click on the database you want to backup, select “Tasks”, then “Back up…”. In the window that opened select “Media Options” page and check “Verify backup when finished” and “Perform checksum before writing to media”. Look at the picture below:Checksum

SqlBackupAndFtp

If you prefer third-party utilities you can also use SqlBackupAndFtp to set up CHECKSUM and VERIFYONLY options:

Just scroll down to the “Backup options” section and check off “Enable CheckSum” and “Verify After Backup” options.


Backup chain

A backup chain is a specific sequence in which all database backups should be restored. If backup chain is broken, the restore process will be not possible and some data will be lost. Let us consider the following example with all three backup types to understand the backup chain better.

Example of Database Recovery

Many know that in order to minimize the risk of data loss it is advisable to use the full recovery model, which allows making transaction log backups. In their turn, transaction log backups enable database restoration to a particular point-in-time. Let’s consider the following sequence of database backups that form a database backup chain. It is assumed that the full database backup is made every 24 hours at 00:00, differential – every 6 hours, and transaction log backup is created every hour.  Backup sequence

Full Backup

Suppose some crucial data were deleted at 13:30. The best way out of this situation is to restore the database to the statement at 13:29. You should begin the restore process of this database from the last full database backup restore operation:
RESTORE DATABASE your_database FROM DISK = 'full_00_00.bak' WITH NORECOVERY, REPLACE

Differential Backup

After the full backup was restored the next necessary step would be restoring the last differential backup. If you are not sure which differential database backups belong to the restored full backup, you can first restore the headers of backups. Please use the following syntax to do it:
RESTORE HEADERONLY FROM DISK = 'full_00_00.bak'
RESTORE HEADERONLY FROM DISK = 'diff_06_00.bak' 
RESTORE HEADERONLY FROM DISK = 'diff_12_00.bak'  
The following result will be received:
Full&Diff
In this scenario you need to pay attention to the full backup CheckpointLSN value and compare it with Differential backups DatabaseBackupLSN value – they should be identical (marked as blue square). It means that these two differential backups belong to this full backup and can be restored after it. To find out what differential backup was made earlier, compare their FirstLSN numbers (marked as orange square). The last differential backup will have bigger value.
If you try to restore a differential backup before restoring its full backup, you will get the following error message:
Msg 3136, Level 16, State 3, Line 1
This differential backup cannot be restored because the database has not been restored to the correct earlier state.
Msg 3013, Level 16, State 1, Line 1
RESTORE DATABASE is terminating abnormally.

That means that the backup chain was broken and any further recovery process is not possible. Therefore, pay attention to what differential backup should be restored after the full backup. In our example it is necessary to restore a differential database backup from 12:00 using the following command:

RESTORE DATABASE your_database FROM DISK = 'diff_12_00.bak' WITH NORECOVERY

Transaction Log Backups

Now that we’ve restored the full and differential backups, let’s restore the database to its state as of 14:29. This is where we will require the transaction log backups. In this case it is also necessary to follow a certain sequence to avoid breaking transaction log backup chain.
If you need to determine what transaction log backup follows after another, you need to get backup’s headers (same as we did with differential backups):
T.Log sequence
This picture shows a transaction log backup chain, each backup from the chain has its own FirstLSN and LastLSN. Every LastLSN value of the transaction log must be the same as FirstLSN values of the next transaction log backup. These values help to restore transaction log backup files in the right sequence. To find out what transaction log backup should be restored after the differential backup, compare their DatabaseBackupLSN values – they should be identical:
T.Log-and-Diff
To understand which transaction log backup should be restored first after differential backup, please check LastLSN value of the differential backup. This value should be somewhere between the FirstLSN and the LastLSN values of the transaction log backup. Otherwise, if the wrong transaction log backup is applied to the differential backup, you’ll get the following error:
Msg 4305, Level 16, State 1, Line 17
The log in this backup set begins at LSN 74000000071200001, which is too recent to apply to the database. An earlier log backup that includes LSN 74000000065600001 can be restored.
Msg 3013, Level 16, State 1, Line 17
RESTORE LOG is terminating abnormally.
To restore transaction log use the following syntax:
RESTORE LOG your_database FROM DISK = 'log_13_00.bak' WITH NORECOVERY 
Then to restore the database up to the state at 13:29:59 run the foloowing command for transaction log from 14:00 using “WITH STOPAT” option:
RESTORE LOG your_database FROM DISK = 'log_14_00.bak' WITH STOPAT = '2015-11-19 13:29:59.000', RECOVERY

Partial Backup

The peculiarity of partial backup is that it does not contain read-only filegroups. So it’s a good choice if your database has a read-only filegroup and there is no need to backup it all of the time. Though all recovery models in SQL Server support partial backup, it was primarily designed for use under the simple recovery model as it makes backup of huge databases, containing one or more read-only filegroups, more flexible.

A partial backup can be applied both to full or differential backups, though it is not applicable to transaction log backup. As far as differential partial backup is concerned, only the data extents that have changed in the filegroups since the previous partial backup are recorded into it. Please note that differential partial backups can be applied only with partial backups.

Let’s consider the picture below to understand how partial backup and differential partial backup work:

Partial Backup

Below I’ll explain what is shown on the picture. Take a huge database that uses simple recovery model, where the full database backup was made at 12:00:

BACKUP DATABASE your_database TO DISK = 'full.bak'

Because the size of the database is large and it takes more time for making backup, a decision was made to create partial database backup, which includes the primary filegroup and read-write secondary filegroup:

BACKUP DATABASE your_database READ_WRITE_FILEGROUPS TO DISK = 'partial_backup_full.bak'

This backup takes less time than full database backup. Following that some changes were made in the primary filegroup and the read-write secondary filegroup. These changes were stored in the following differential partial backup that was created at 14:00:

BACKUP DATABASE your_database READ_WRITE_FILEGROUPS TO DISK = 'partial_backup_diff.bak' WITH DIFFERENTIAL

Note that SQL Server Management Studio does not support partial backups.

Here is another, more interesting case. Assume that the database was changed from read-only to read-write after partial backup was made. In this case, perhaps, some secondary read-write filegroups will not be included in the partial backup, therefore, when the time comes to make a differential partial backup the following error occurs:

Msg 233, Level 20, State 0, Line 2
A transport-level error has occurred when sending the request to the server.

To avoid this error, make another partial backup before a differential partial backup. Following this operation, the new partial backup will contain every read-write secondary filegroup.

Restore Process

The commands for the database restore process from the example above should be executed in the following order:

RESTORE DATABASE your_database FROM DISK = 'full.bak', WITH NORECOVERY 
GO 
RESTORE DATABASE your_dataabse FROM DISK = 'partial_backup_full.bak', WITH NORECOVERY  
GO
RESTORE DATABASE your_database FROM DISK = 'partial_backup_diff.bak', WITH RECOVERY  
GO

Log Sequence Number

Every record in SQL Server transaction log has its own log sequence number or LSN. Log sequence numbers are ordered in such a way that changes related to the record with greater LSN occurred after the changes related to records with smaller LSN. Each backup that is set in SQL Server has FirstLSN and LastLSN values. To find out all backup’s LSN values you need to look at its header using the following syntax:

RESTORE HEADERONLY FROM DISK = 'full.bak' 

To understand what these LSNs mean in each database backup let’s consider a backup sequence created (the database uses full or bulk-logged recovery model) using the following commands:

BACKUP DATABASE your_database TO DISK = 'full.bak'
BACKUP LOG your_database TO DISK = 'log.bak'
BACKUP LOG your_database TO DISK = 'log1.bak'
BACKUP DATABASE your_database TO DISK = 'diff.bak' WITH DIFFERENTIAL
BACKUP LOG your_database TO DISK = 'log2.bak'
BACKUP LOG your_database TO DISK = 'log3.bak'
BACKUP DATABASE your_database TO DISK = 'diff1.bak' WITH DIFFERENTIAL
BACKUP DATABASE your_database TO DISK = 'full1.bak'
BACKUP LOG your_database TO DISK = 'log4.bak'

This shows that we have created three different types of database backups: Full backup, Differential backup and Transaction Log backup. Now let’s check their LSNs and compare them:

RESTORE HEADERONLY FROM DISK = 'full.bak' 
RESTORE HEADERONLY FROM DISK = 'log.bak' 
RESTORE HEADERONLY FROM DISK = 'log1.bak' 
RESTORE HEADERONLY FROM DISK = 'diff.bak' 
RESTORE HEADERONLY FROM DISK = 'log2.bak' 
RESTORE HEADERONLY FROM DISK = 'log3.bak'
RESTORE HEADERONLY FROM DISK = 'diff1.bak' 
RESTORE HEADERONLY FROM DISK = 'full1.bak'
RESTORE HEADERONLY FROM DISK = 'log4.bak' 

These commands produce the following results:
LogSequenceNumber

where:

  • FirstLSN – Log sequence number of the first transaction in the backup set
  • LastLSN – Log sequence number of the next log record after the backup set
  • CheckpointLSN – Log sequence number of the last checkpoint
  • DatabaseBackupLSN – Log sequence number of the last full database backup

How do FirstLSN, LastLSN, CheckpointLSN and DatabaseBackupLSN Relate to Each Other

The DatabaseBackupLSN of the first full backup is always equal to zero:Full(DatabaseBackupLSN)

The FirstLSN of the first full backup is the same as the CheckpointLSNFull FirstLSN and CheckpointLSN

Full database backup is the main type on which all other backups (especially differential backups) are dependent. In the restore sequence a differential backup is always restored after the full backup. In order to determine the full backup to which differential backup relates, you need to check the values of DatabaseBackupLSN of differential backup and CheckpointLSN of the full backup – their values should be identical.: Full and Differential LSN

Full CheckpointLSN and Differential DatabaseBackupLSN

But what if there is no differential backup, and there is a need to restore the database with the full and transaction log backups? To find out which transaction log backup should be restored right after the full backup is restored take a look at the LastLSN of the full backup and the FirstLSN and the LastLSN of the transaction log backup. The LastLSN of the full backup should be between the FirstLSN and the LastLSN of the transaction log backup. Full and Tran.Log

Likewise, in order to find out which transaction log backup should be restored after the differential backup you need to pay attention to the LastLSN of the differential backup and the FirstLSN and the LastLSN of the transaction log backup. The LastLSN of the differential backup should be between FirstLSN and LastLSN of the transaction log backup followed right after it: Differential LSN and Tran.Log LSNThe CheckpointLSN of the differential backup maps to the CheckpointLSN of the first transaction log backup created after this differential backup:

Differential CheckpointLSN and Transaction Log CheckpointLSN

First transaction log backup has the same FirstLSN and CheckpointLSN as the first full database backup’s CheckpointLSN:Full CheckpointLSN and Transaction Log FirstLSN and CheckpointLSN
For a transaction log backup, the LastLSN value is the same as the FirstLSN of the next transaction log backup:Transaction Log LastLSN and Transaction Log FirstLSN
Transaction Log LSN

Note that LastLSN value of the previous transaction log backup is equal to LSN of the first log record stored in the following transaction log backup, as shown on the picture above.

Transaction Log

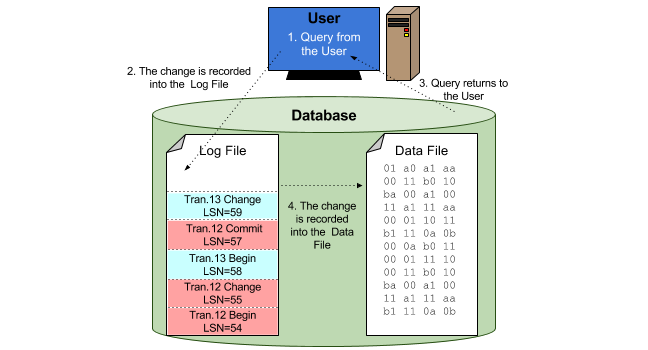
The transaction log is a crucial part of each database that records all transactions and database changes made by each transaction. The purpose of the transaction log is to keep record of all changes that were made in the database. Let’s consider the example from the picture below:Transaction Log Record

  1. The user makes some changes in the database.
  2. This query is executed and this operation is immediately recorded in the transaction log.
  3. When the record is saved, the query returns to the user. But what about the record in the data file?
  4. Data file is later updated during a checkpoint. It works this way because the data file may need to expand to accommodate the changes.

One more thing that has to be mentioned is that a database can have one or more transaction log files. Using two or more transaction logs will not make your database work faster, because writing can occur only into one file at a time, meaning that parallel I/O operations are not possible. The scenario under which multiple transaction log files are recommended is when the first one can not grow anymore.

Virtual Log Files

The transaction log stores every transaction made in a database, except those that are minimally logged (such as SELECT INTO or BULK IMPORT). Each transaction log record has its own unique number, called the Log Sequence Number (LSN), and stored in transaction log’s Virtual Log File (VLF), whose size is not fixed. A transaction log can have any number of virtual log files:Transaction Log (5)

Transaction Log Truncation

The log file will grow until it filled all free space on the disk where it is located unless log records are removed. As time passes, old log records become unnecessary for recovery process so they must be deleted to free space for new log records. Such process in SQL Server where all unnecessary records are removed to reduce the size of the log file is called transaction log truncation.

The way this truncation happens is dependent on the recovery model that was selected for your database.

Simple Recovery Model

The transaction log is truncated when checkpoint occurs. At that time, all committed transactions are written to the data file and virtual log files can be reused. Look at the picture below: Transaction Log Checkpoint

After the checkpoint occurs, virtual log files 1 and 2 are no longer in use because transaction 11 and 12 have been committed. SQL Server marks virtual log file 1 and 2 as reusable. Such process is known as truncation of the transaction log. All committed transactions have been truncated, but the physical size of the transaction log remains the same. If there is a need to make transaction log file smaller, turn AUTO_SHRINK option on and it will physically shrink the log file (where possible) at periodic intervals:

ALTER DATABASE your_database SET AUTO_SHRINK ON
ALTER DATABASE your_database SET AUTO_SHRINK OFF

To set up auto shrink using SSMS, right click on the database for which you want to set up transaction log auto shrink, select “Properties”, then “Options”. Choose “Auto Shrink” and switch from “False” to “True”, and then click “OK”.

Transaction Log Autoshrink

So after the transaction has been committed, SQL Server can reuse the space. But be careful with this option as there is no way to control when auto shrink starts. Also, such operations where file grows, then shrinks, then again grows and again shrinks, take more resources.

Full or Bulk-Logged Recovery Models

In this case, the transaction log is truncated only during the transaction log backup. In the full or bulk-logged recovery model when the checkpoint occurs, all dirty pages are written to the disk, but SQL Server will not mark any of the virtual log files as reusable. The transaction log will be truncated only after transaction log backup is completed:

BACKUP LOG your_database TO DISK = 'log.bak'

Trunating the Transaction Log

Remember, if the database is running under the full or bulk-logged recovery model and the full backup has been never made, the transaction log will be truncated at each checkpoint.

Maintenance of the Transaction Log

As mentioned above, the transaction log is automatically truncated under the simple recovery model, but how can you manage the transaction log if the database uses full or bulk-logged recovery model? This is achieved through regular transaction log backups.

Moreover, it is recommended to monitor the transaction log space. Use the following command:

DBCC SQLPERF(LOGSPACE)

That returns the following table:

DBCC SQLPERF(LOGSPACE)

  • Database Name – name of the database
  • Log Size (MB) – current size of transaction log
  • Log Space Used (%) – shows how the percentage occupied with transaction log information in the log file
  • Status – log file status (always ‘0’)

Another useful command that can help to find out how many virtual logs are in the transaction log file that is being currently used:

DBCC LOGINFO

DBCC LOGINFO

  • FileId – shows in which physical file the VLF is stored.
  • FileSize – size of the transaction log file (in bytes).
  • StartOffset –  used as the sort column for the output. Note that the first VLF is always 8,192 bytes.
  • FSeqNo (File Sequence Number) – indicates the order of usage of the VLF. The VLF with the highest FSeqNo number is the VLF where current log records are being written.
  • Status – there are two possible values: 0 and 2. VLF with 0 indicates that it can be reused, the VLF with value 2 indicates the it is not reusable.
  • Parity – has two values: 64 and 128. It switches every time when a VLF is reused.
  • CreateLSN – indicates when the VLF was created. If the value is 0 it means that VLF was created when the database was created. If the VLFs have the same value it means that they were created at the same time.

COPY_ONLY Backup

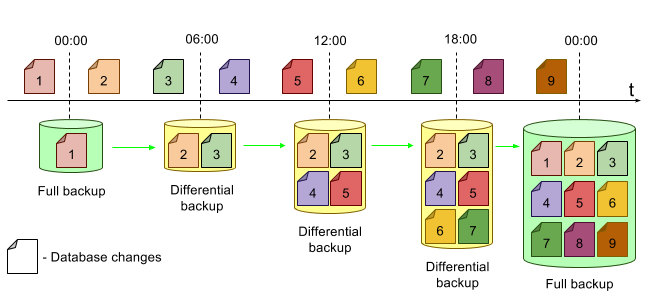
In order to understand how to operate the “COPY_ONLY” option and its nature, let’s consider the following example. Assume that a full database backup starts at 00:00 once a day and a differential backup starts every six hours. On the picture below you can see what database changes (marked as pages) are included into each of database backups shown on the picture.

Backup (Full+Diff) (1)

Assume that there is a need to make an extra full database backup to retrieve it on another server. Suppose that this backup is done after the database change #4. If the full backup is made without T-SQL option “COPY_ONLY”,  the differential backup that was made after such full backup will no longer contain changes #1, #2, #3 and #4:

Without COPY_ONLY (1)

The picture above shows that the full backup that was made after the database change #4 has disrupted the backup schedule set by the user (marked as green arrows). The following two differential backups that were made according to the schedule at 12:00 and 18:00 completely depended on the last extra full backup (marked as red arrows). If the last full database backup that was made after database change #4 is not saved and the database failure occurs, the best way out is to restore the database to the database change#3 state (06:00). All changes that are highlighted in red will be lost.

To make a full database backup and thus keep backups schedule safe and sound, it is necessary to use “COPY_ONLY” option. In this case, the database backup sequence will not be broken and the full backup will be available.With COPY_ONLY (1)

Copy-only Transaction Log Backup

You can use COPY_ONLY option with transaction log backups as well (note though that they are suitable for full or bulk-logged recovery models). If you need to make an extra transaction log backup and not to break the backup chain, then use “WITH COPY_ONLY” option, otherwise if the backup file is lost the restore process will not be possible. It has to be admitted that “WITH NO_TRUNCATE” option does not truncate the transaction log too.

How to Make a Copy-only Backup

To make a copy-only backup simply add “COPY_ONLY” clause to BACKUP DATABASE command:

BACKUP DATABASE your_database TO DISK = 'full.bak' WITH COPY_ONLY

Another way of making copy-only backup is using SQL Server Management Studio (SSMS): right click on the database you want to backup, select “Tasks”, then “Back up…”. Select type option as “Full”, check the “Copy-only backup” checkbox, add backup destination, and then click “OK”.

If you use SqlBackupAndFtp to schedule your database backups, please click “more settings…” and scroll down to the “Backup options”, then check off “Copy Only”.